The mg34 is a creature of a beast that the smallest change can result in many.
Like any inspection you should go from front of the weapon to back of the weapon:
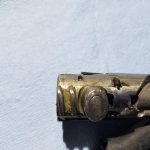
1.Booster 10.5mm is the ideal balance
2.Flash cone make sure it is snug American training manuals at the time instructed troops as a field expedient repair to loosen the flash Cone to increase pressure ,this in a battlefield situation worked but it should not be employed as a owner as it can be damaging to the gun.
3. Push in on the muzzle of the barrel to ensure the recuperator is functioning correctly. This is done with the flash cone and booster cone off. There should be positive spring tension returning the barrel forward.
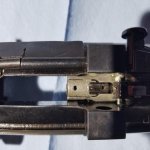
4. Barrel latch , depress the barrel lodge and open the 2 halves of the receiver you will then ensure that the barrel slides in and out of the jacket smoothly and check your cam guide ways ensure the rivets are not coming loose on your guides.
5. Cocking handle: The handles employed we’re design for an open bolt firing gun and repeated slamming causes the ends to wear down prematurely and the whole assembly to snap in half. inspect this for hairline fractures and to ensure the handle locks positively in the latch located on the barrel jacket. Handles that do not positively lock can interfere with the free sliding of the bolt.
6. Receiver inspect the two guide rails inside the receiver for pitting and deep gouges this can occur when feed rollers stop moving correctly.
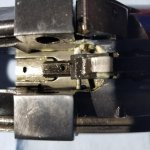
7. Ejector plate , look on the bottom at the contact surface for major gouges in where seldomly this is the problem as it is very hardened steel, ensure that this plate is not loose me personally I staked the screws to ensure they don’t come loose.
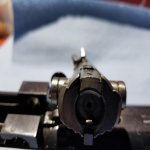
8. Ejector pin and pin timing, probably one of the most crucial weaknesses of the gun. Without proper ejector timing the gun firing live will jam. People will do tests on a workbench and have nice positive rejection but once they fire live the gun doubles and jams, this is caused by poor ejection timing
9. Ejection timing, to check ejection timing place the bolt in the receiver and slide the bolt forward completely do not install the recoil spring. Begin to pull the bolt to the rear, and place your finger on the face of the bolt maintaining positive pressure on the ejector pin. As the pin contacts the plate you will see the pin begin to protrude from the face of the bolt. Looking from the top of the receiver down through the bottom your reference point is the trigger guard. Your pin must be fully protruded before the face of the bolt passes the trigger guard. For protrusion after this point would be considered late ejector timing and will cause the spent casing to rebound off the trigger guard and back into the receiver causing a double feed. Correct ejector timing will result in the casing clearing the trigger guard dented casings are normal.
When inserting the bolt into the receiver it is normal to have a small amount of resistance in the middle of the receiver this is the ejector pin dragging lightly against the ejector plate. If this gets filed too much the bolt will slide into the receiver like butter but have incorrect timing and cause all the aforementioned issues. Having too much resistance on your ejector pin Will cause the Pult to bind up in the gun to the rear when firing and yes a jarring of the cocking handle Will release the bolt and allow it to go forward. Solution is to double check your ejector timing and adjust accordingly.
10. Bolt, this is the heart of where many issues lie . First thing first #### the bolt and check the tension if it is very heavy chances are you have an upgraded firing pin spring designed by the manufacturer to be able to shoot surplus hard primer ammunition. The issue is the MG 34 is a recoil operated gas assisted firearm. The firing pin spring tension on these new springs are simply too high making the firearm bleed off most of its energy in the unlocking phase not leaving enough for the complete cycle of operation. Simple solution if available is to change to an original German firing pin spring The spring will enable you to shoot a wide spectrum of different types of ammunition however commercial ammunition is recommended for optimal performance . Ppu aka privi partisan 196gn has been the best choice observed with the operation of this firearm.
There are commercially available springs for this solution.
11.Searing action, there are two kinds of Sears presently available on the market the old style with holes in a rearward projection ,and the new style with the holes in the forward projection changing the fulcrum point tipping point of the sear .inadvertent discharge of this firearm is a common issue and can be solved with two simple solutions. The first one being too remove the C clip holding the disc and tighten it so it snaps closer to the main body. Often times this clip is slightly in the way and interferes with the smooth operation of the sear causing it to skip or in this case discharge tightening will correct the issue. Case hardening to sear and polishing with the buffing wheel will ensure that there is positive and smooth contact with the disc. You’ll also want to check the sear spring and ensure that it goes up and down positively under spring tension.
Another common issue for the inadvertent discharge is often the sear axis pin has either snapped in half and is still held captive inside or the pinholes have become elongated causing the sear to skip. When purchasing Sears from TNW they come as a whole assembly and not just the sear because these parts wear evenly to one another. Simple solution for elongation it’s once your assembly is put back together is to weld over the holes and file smooth this way the holes cannot longer elongate or crack at the eyelets therefore increasing the service life of your parts.
12.Bolt Rollers, Ensure that your rollers move freely ,again Molly bedenuim grease is your friend . Not only your rollers should be greased but the cam on your bolt shaft cams in the guide way of the carrier should be greased as well this will ensure smooth operation.
13. Trigger, there are two different types of triggers on the market at the moment the old style and the new style with two rollers. both are compatible but one is optimized for the new sear. Ensure that the trigger goes up and down and that it disconnects under spring tension Grease in this area it’s not a bad idea either.
14. Buffer housing, ensure that the buffer is not cracked and that the housing is positively screwed in place sometimes the securing pin will snap in these will come loose
15. Buttstock, ensure there are no cracks in the butt stock if there are remove and repair accordingly
16. Top cover and feed tray, ensure that the feed slide moves freely in the top cover and that there are no gouges for where on the feed arm. The feed arm slides in the top channel of the bolt and should be smooth
Belt holding Pawl and feed Pawl should be under correct spring tension one quick test other than pushing on them would be to put a belt of dummy cartridges on the feed tray with the cover closed and try and pull the cartridges out to the left of the receiver they should be maintained positively on the tray.
Feed tray, ensure your feed tray is not cracked along the securing hole and that it snaps positively in place on the receiver, you will also check for burrs in the feed path to ensure the cartridge pass smoothly through the tray.
I hope this helps