Annealing Brass opinions please

Not everyone can or will buy an annealing machine.

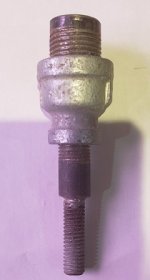
After using my fingers for a while, I was graduated to using this homemade fixture made from hardware store components, that is used along with a cordless drill. It holds the brass, rotates it easily, protects the base from the flame and acts as a heat sink.

Set the flame and the distance from the flame, and after a predetermined time count rotating in the flame (that can be determined using Templilaq) , drop the brass onto a cloth or into water if you're so inclined.

Not as precise as a machine I suppose, but is still effective.
 

Attachments

  • Annealing Fixture.jpg
    Annealing Fixture.jpg
    31 KB · Views: 49
Last edited:
the picture from 156821 is very similar to what i made after seeing a video that another man put on u tube i have no hopper on mine......my motor is from a barbeque rotisory and the drum that turns is the part that you put the coffie in thats from a 80 cup coffie perk .....perfect flame adjustment gives you the correct amount of heat it worked great from the get go i use old brass to get correct heat for the speed of the bbq chicken turner............rotisory bad spelling i know but its late don
 
The true function or primary function of annealing is to increase the life of the brass. How you achieve that is irrelevant. It will however produce a different neck tension. Neck tension can be regulated with the neck crimp. So, unless your an F class shooter, the needs will determine your process. Doing it with a candle by hand is a perfectly good method too. They can't make a cartridge case without annealing it.
 
8 seconds with the tip of the flame hitting the datum on the shoulder (approx.) I use a AGS V3 annealer that you can get on Amazon for $400 delivered. Works slick and fast.
Only one I see on Amazon is now $500 ish, went up that much in a couple months?
 
Finally got around to using my AGS this week. First time annealing.

I tried the dark room, watching the flame, etc., but I was worried about overdoing it, I found the time my brass was in the flame was 10 seconds.

I ordered some Tempilaq, gave it a go last night. 750deg inside the neck. Roughly 6 seconds in the flame before the Tempilaq changed. Checked with a few more cases and then ran some through.

Question is, visually I doubt I could tell the difference between my annealed and un-annealed brass. I'm assuming since my Tempilaq melted/changed colours I reached sufficient temperature and time?
 
Question is, visually I doubt I could tell the difference between my annealed and un-annealed brass. I'm assuming since my Tempilaq melted/changed colours I reached sufficient temperature and time?
Erik Cortina on Youtube has a good segment on annealing.....bottom line is you can go well above recommended time and temperature without doing any damage to the brass. I go 8 seconds in the flame and that has served me well.
 
  • Like
Reactions: Fyn
Question is, visually I doubt I could tell the difference between my annealed and un-annealed brass. I'm assuming since my Tempilaq melted/changed colours I reached sufficient temperature and time?

Since your Tempilaq changed you have good certainty you reached 750F. The problem is that for all the internet people who set it as a target, there is no good evidence that 750F is an appropriate temperature. My own opinion is that 750F is a little cool, I would probably go with 850F or 900.
 
I've taken to annealing my brass every load. Im holding each brass between my thumb and fingers and twirling them in a propane torch flame close to the flame tip. I remove the brass just after the blue heat line breaks the case shoulder and quench in a wet cloth.
The 1st&2nd annealing I used a wax candle and spun the brass as described in The candle flame until too hot to hold any longer. The soot left on the brass got old quick so now it's the torch method.
The brass in the photos were done this morning. Do they look right? Too hot?
Thx for any input.View attachment 908542View attachment 908541
They loook pretty good.
I would add a caveat though.
Depending on your goals, this may not be your best option.
If you are looking to simply extend brass life, this will help for sure.
If you are looking to improve consistency, then I would suggest hand twirling in a propane flame and quenching in a wet towel is not at all consistent and I’m not sure that visual inspection would make me feel better about that.
Im actually not sure about quenching tbh. As a Hobby knifemaker, i know that quenching hardens steel and several treatments are required to temper some flexibility back into the steel.
Brass chemistry is different than steel but I am pretty sire the principal is the same. So when you then “cold work” it in the press and during shooting, those stresses are more likely to result in fracture.
None of the auto-annealers I am aware of recommend or require quenching so at the least, I would delete that step.
Air cooling slowly allows for molecules to align in a preferred state and significantly reduces inherent stresses and evens things out. Exactly what you want in rifle brass

Jmo

P.S. there are lots of good looking kits out there and templaq is a great tool to add.
However, even when you get the timing right, slight changes in flame from one session to the next or after a bottle change, etc, can have an impact on the effects of the preset time in the flame.
Whether that plays out on the range is another matter.
 
Last edited:
Just what is “classic annealed look”?
My opinion, the classic annealed look is how Lapua brass comes out of the box.

In a dim room room, you can see the color change quite well. It happens fast. Brass will go dull red around 700 degrees, and will be bright orange around 1100. So theory has it, it would be red around 900.

With the right drill operator and focus, I'd say a guy could be very consistent spinning the brass in a drill with a stationary propane torch.

What I do, is spin the brass at 50 rpm or so in a drill and while resting the drill on a counter edge, tip it into the inner torch flame so the flame is pointing directly at the middle of the shoulder. At the right angle, look at the inside of the neck. The tip of the case mouth goes dull red first and half a second later 3/4 of the case neck is dull red and the mouth is red. Ends up around 7.5 to 8 seconds for a piece of 223. You'll also see the flame itself throw off an orange flare. I dont count anymore, I have found it more consistent to rely solely on the color change. Only after I really dialed spotting the case mouth change and 3/4 of the neck dull red, my brass started to closely mimic that of Lapua brass. Around 100 pieces of sacrificial military brass until I felt confident and consistent to try it on my Lapua brass.

Pick up some range brass or get some surplus to your needs brass and practice the motions and outright cook a couple dozen brass until youve trained your eyes to see what is happening inside that split second change.

It takes 10-12 seconds for the shoulder to change color...by then the entire neck is glowing bright orange.

At the end of the day I'm not a match shooter needing the automation, and at most its 10 minutes of focus to do a hundred pieces of brass. Once youve scrapped a handy pack of surplus brass, it is fairly easy to be consistent and robotic about the drill method.

I've still got quite a few surplus brass, perhaps I'll whip off some brass and take a picture of over/under annealed brass, clean/dirty annealed brass, etc. There isnt particularly a ton of visual variation.... solely just need to rely on that youve done it right following good theory.
 
  • Like
Reactions: Fyn
In my opinion if worth a 2¢
750F is sub 400C ... for best result the Temp shall be in a 550-650C ballpark the brass crystal structure to stabilize = based on engineering books.
I got myself a press foce meter earlier this year and dual purposing between my "mandrel press" and "bullet seating press".
I have tested speculating now maybe about 100-150 brass (W308) from three people were annealing in batches for me on their setups... If memory serves me well all three were telling me they had an AMP.
I measured the press force when running a mandrel, also in step by step process I measured the force on same when I got to a bullet seating die.
I can confirm that there were differences between batches.
So I created my own batches based on measured values. Test shot, and I can confirm the ES/SD is much consistent. (but again I am shooting paper rings only, maybe not effecting the hunter ppl).
This made me decide to build my own induction annealer just for a case if I can make a consistency better for my game.
My work is still in a progress but getting close.
 
  • Like
Reactions: Fyn
Back
Top Bottom