Any ELR SMEs willing to give some advice?

matt4792

Member
Rating - 0%
0   0   0
Im currently trying to figure out the most precise way to ensure level between a new scope and rifle, and ensure level of an added scope level bubble.

Regarding the former, from what read so far most systems seem to consist two individual levels placed separately on the rifle and scope. Eyeballing a bubble seems a little imprecise to me, especially when trying to push out to very long ranges. I've also seen the wedge systems as well. Anyone willing to speak to the accuracy of either method? Is there something more precise out there that I'm missing?

As far as scope levels, I've always done it by lining up the reticle to a plumb line, and then ensuring the bubble was level before tightening. This has worked fine at closer ranges but I am thinking any imperfections will really start to show at further ranges. I did see mention of another electronic system but I don't think it's available outside of the US yet. Anything I'm missing?

So there is nothing wrong with a bubble level. Obviously some bubble levels will be more precise than others. Long skinny bubble levels will be more accurate than short fat ones. But any tool is only as good as the person using it.

First, ensure action is level inside the stock. Stock design will dictate this, but I place a level over the gap in the stock where the action sits, position the stock in a vice and secure it, and then position another level somewhere else on the stock that won't interfere with install. If the stock has a rear removeable cheek piece, I take that out. IF both bubbles are level, good to go, remove the level at the action.

Second, install the action, and confirm the action is level with the stock. If the action has a rail, put a level on the rail, and confirm that the level on the stock lines up. Stock still level in the vice, action level in the stock.

Then, install bottom half of rings. lay scope in bottoms, loose fit the tops with screws. if the scope turrets are flat on top, lay a bubble. if scope turrets don't lend themselves to a level, then hang a plumbline and use cross hairs. Set the plum line as far away as reasonable, and set scope to mid range of zoom. With scope leve, confirm stock is still level. if all is good tighten screws checking level on stock frequently to ensure all is still aligned. Once thats done, install scope level if required, confirming with either stock level or plumb line to ensure gun doesn't move while securing stock level.

I've done this on several rifles with a $5 set of magnetic levels and shot out to 1000 m without observing tracking issues.
 
I put the ring bottoms or unimount bottom on the rail and then level the rifle (I just put a carpenter's level on the pic rail). Then I mount the scope in the ring bottoms and figure out where I want it for proper etc relief. Then loosely attach ring top caps and put a level on the turret of the scope (making sure rifle is still level). Torque ring top caps down. Add scope level and match scope level to level on top of turret. I then put a target at 100 yards (to zero) as well as a 4'+ piece of cardboard. I use a 4' level to draw a perfectly plumb line on the piece of cardboard with a small aiming point at the bottom of the vertical line. Once zeroed, I'll line up my reticle with the vertical line while checking the scope level to make sure it matches up. If it doesn't (sometimes the top turret isn't perfectly plumb with the reticle) I'll adjust the scope level so it shows level/plumb when the reticle is lined up with the vertical line on my target. If it's a new scope, I'll also shoot a 3 rd group at the bottom aiming point and then dial on 10 mils of elevation and fire another 3rd group to both make sure that the scope tracks perfectly vertical and also to measure to see if the adjustments on the turrets equate to the correct distance in real life (ie tall target test).
 
Thanks for the quick replies.

I've been using the bubble level method and had no issues out to 2000m. I just picked up a Charlie TARAC prism system and am looking to push rounds out to the absolute maximum possible range, at which point even the slightest imprecision will show up huge. I figured guys shooting out to those ranges would have devised something a bit more precise than the old eyeball and bubble level.
 
Sometimes old tech is still the best tech. Whichever method you choose, back it up with a tall target test, as already mentioned, to make sure your elevation tracks true.
 
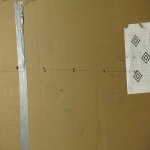
IMG_1441.jpg

(forum software rotates this pic... just imagine the image is vertical)

Tall target test will go a long ways to ensuring your optics is working as you intend AND what you see is what you are going to get.

Shot this at moderate distance (60yds if memory serves) in some gusty side winds (this doesn't matter). Aim at the bottom aiming point and establish a POI, then dial your elevation in equal distance... in this case, it was 1 full revolution.

After each adjustment, aim at the lower aiming point and take a shot. When you have gone all the way up, repeat going down. Then chose random rotations and take a shot until all adjustments are accounted for.

If all goes to plan, you should have a series of small groups on a plumb vertical line... minus affects of wind if any. I think each group had 4rds. And for those observant shooters, the first 'low' shot on the paper target is my cold bore shot

Good luck.

Jerry
 

Attachments

  • IMG_1441.jpg
    IMG_1441.jpg
    43.3 KB · Views: 622
I purchased a Digi-pas digital level, It doesn't seem to be any more accurate than the old bubble levels but I think it has sped up the process a bit having an actual number.
Tall target test for verification.
 
I'm always curious why people focus so much energy on making sure the scope is perfectly level to the rifle, when what actually matters is how level the scope is to the world when shooting.

Even a 5 or 10 degree error between the scope and rifle is completely meaningless, but that does depend upon how the rifle is leveled when shooting.

To that point, there are few shooting style scope levels that are really precise. I do have a digital one that can be programmed for sensitivity that is more precise than any bubble level. It does attach to a pic rail so to use it, it would be important to make sure the scope is level to the pic rail.

A rotatable bubble level on the scope can be centered up to the reticle and then the scope rotation to the rifle would not matter. Finding a precise level bubble is the trick here.
 
Last edited:
I purchased a Digi-pas digital level, It doesn't seem to be any more accurate than the old bubble levels but I think it has sped up the process a bit having an actual number.
Tall target test for verification.
I bought one also, the bubble doesn't match the number even after calibration. I wanna try something a bit higher quality

I'm always curious why people focus so much energy on making sure the scope is perfectly level to the rifle, when what actually matters is how level the scope is to the world when shooting.

Even a 5 or 10 degree error between the scope and rifle is completely meaningless, but that does depend upon how the rifle is leveled when shooting.

To that point, there are few shooting style scope levels that are really precise. I do have a digital one that can be programmed for sensitivity that is more precise than any bubble level. It does attach to a pic rail so to use it, it would be important to make sure the scope is level to the pic rail.

A rotatable bubble level on the scope can be centered up to the reticle and then the scope rotation to the rifle would not matter. Finding a precise level bubble is the trick here.

If your rifle and scope aren't level to each other when you level the scope to gravity you are inducing cant, that absolutely matters.
 
If your rifle and scope aren't level to each other when you level the scope to gravity you are inducing cant, that absolutely matters.

Yes, it induces cant. No, it doesn't matter. A 5 degree angle between your reticle and rifle will give you an offset of 1.575" at 1000yds. A typical 308 at 1000yds will see more wind drift from a 0.2mph wind change then that cant.

rugbydave's method is perfectly sufficient for leveling a scope. Spend your money on ammo, not any of those fancy tools or gadgets.

1 or .5 degree of cant isn't going to matter much but 5* (which is lots) will be way more than that, I'm not going to do the math on it but your looking more like 3 moa at 1000 which is like 30 inches.
 
offset.png


Left diagram.
Assume scope is angled 5 degrees. That means, when the reticle is level, the barrel underneath the scope will be offset to the left or right, depending on which way you angle.
Assume 1.5" height over bore. When scope reticle is level, this gives a horizontal barrel offset of: 1.5" * sin(5 deg) = 0.130"

Center diagram.
Now we zero the rifle at 100yds (3600 inches)
When viewed from the top, you can see that the horizontal offset will mean the bullet will be traversing right to left as it goes through the zeroing target.
Given the offset is 0.130" and the bullet has to travel 3600", the angle of the bullets path away from the scopes line of sight is: tan[SUP]-1[/SUP](0.130"/3600") = 0.00206 degrees
aka 0.1236 minutes of angle.
Heck, if you zero with the 0.130" offset to the right of your point of aim, you won't have any shift further out anyway.

Right diagram.
At distance further then 100yds, the bullet will impact to the left of the point of aim. Since we know the angle, we can determine the offset.
500yds: 400yds past zero: 14400". So 14400" * tan(0.00206 deg) = 0.517"
1000yds: 900yds past the zero: 32400". So 32400" * tan(0.00206 deg) = 1.169"

Apologies, my earlier off the cuff math was too generous, apparently.
 
Last edited:
Your math is correct.
I was just doing some quick calculations and was using 5* as my angle not the angle that it creates at 100 yards. .00206*
My bad. Mind if I steel your diagram for another use?
 
If your rifle and scope aren't level to each other when you level the scope to gravity you are inducing cant, that absolutely matters.

FALSE
FALSE
FALSE... all day long... FALSE

The scope must be level to the world when the rifle is fired.

The scope does not need to be level to the rifle.

If you use trigonometry to calculate the barrel offset of a scope mounted 2.5 inches above the bore, it needs to be offset by 5.7 degrees to equal 1/4 MOA. In other words within a single MOA scope click.

When you consider that it is pure luck to ever get a true absolutely perfect zero, and that only the most accurate rifles would shoot inside such an accuracy parameter... In most cases, chasing perfect scope level to the action is a fools errand and nothing more than a reflection of either your OCD or ignorance. It has no practical benefit in real world shooting.

Furthermore parallel lines remain parallel forever. So if you intentionally induced a 5.7 degree 1/4 inch offset between your scope and barrel and set your zero on your theoretically perfectly accurate rife so the impact was offset by the same 1/4 inch... This relationship would remain constant forever.

If you could shoot a million yards, the bullet would impact to the side by the same 1/4 inch. (Assuming we ignore spin drift and atmospherics.)

If the angular offset of the scope was 11.4 degrees, the bullet would impact to the side 1/2 inch at a million yards.

Now, if your level indicator is mounted on the pic rail or is integral to the chassis... That does change the parameters a little.

In this case it is important to level the scope to the leveling indicator... That does not necessarily mean level to the action itself.

If there is any alignment error between the leveling device and how it is attached, leveling to the action introduces that error into your efforts.

In this case, level the rifle to the leveling device, then level the scope to a plum line at some distance.

In summation, it is only important to level the scope to the leveling indicator! (Assuming you have one.)

leveling the scope to anything except the leveling indicator is simply wrong. Don't ever do that.

Ideally more scope manufacturers will put the level inside the scope field of view, then it would put an end to all of this nonsense.
 
Last edited:
Wow, lots of words. You can put a scope on a rifle at 90 degrees and it you shoot with the hairs level to the target it will work fine. A lot more effort is to set up irons with a front and rears.
 
Back
Top Bottom