Beretta A400 Cycling Issues

Man, don't know how I missed this thread all this time but boy do I feel for you. My A400 Extreme has actually been flawless with all loads, but i did run a couple hundred 3-3 1/2" through it for break in. I'm so glad I've had no issues as Stoeger Canada is absolutely nightmarish to deal with. I had a previous A400 Unico split the handguard wood right below the gas vent at 200 rounds and it only took 10 months to fix and it was pulling teeth to get to that point.
 
Man, don't know how I missed this thread all this time but boy do I feel for you. My A400 Extreme has actually been flawless with all loads, but i did run a couple hundred 3-3 1/2" through it for break in. I'm so glad I've had no issues as Stoeger Canada is absolutely nightmarish to deal with. I had a previous A400 Unico split the handguard wood right below the gas vent at 200 rounds and it only took 10 months to fix and it was pulling teeth to get to that point.

It was a pain but I learned a lot about these guns and what makes them tick.

I sent one email to Stoeger and I knew from the response that I was dealing with cabbages who are only efficient at putting me in a foul mood.
 
Good question.

The new spring (or the spacer in your case) will put even more pressure on the nut when trying to start it and the last thing you want to do is cross thread it.

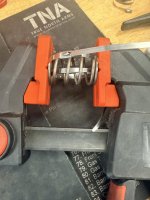
I used one of these to compress the spring fully:

View attachment 1169100

And then I used two of these around the coils lengthwise (one on each side 180 degrees from each other) to hold it compressed:

View attachment 1169101

Steel tywraps are strong enough to hold it compressed and fine enough to let it still slide into position. When in place start the nut, get it a few turns and then cut the tywraps, pull them out then snug the nut up.

I used blue Loctite on the nut and snugged it up with pump pliers.

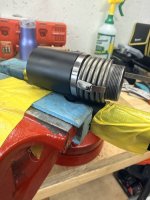
I swapped out another spring on an A400 today and took a couple of pictures.

A400  Spring Compress.jpeg

A400 Spring Installed.jpeg

This works well and makes it pretty easy. The spring *just* fits with the stainless tywraps holding it in the compressed state.

My process:

1) Install two steel tywraps around the coils of the upgraded spring
2) Compress the spring with the clamping tool
3) Tighten the stainless tywraps
4) Remove the clamping tool and verify the spring is held in the compressed state
5) Slide the spring into place. Note the spring with the steel tywraps is pretty snug so just gently ease it on with your hands.
6) Apply blue Loctite to the nut and hand screw into place then tighten with the tool of your choice (pipe grips for me)
7) Cut the steel tyraps and pull the pieces out (doable but can be tricky as everything is tight).
8) Build the gun back up and go shoot 2 3/4" ammo!
 
Back
Top Bottom