Buttstock Extension

bc308

Regular
Super GunNutz
Rating - 100%
88   0   0
Location
Central AB
I am adding a 2 3/4" walnut block to a walnut stock. Its an O/U to be used for trap doubles. I am not sure if putting in dowels is overkill, but I like "hell for strong". I will put in a couple screws as well.

My question is regarding adhesives. I have on hand steel Devcon, J B Weld, and TiteBond 3. Which product would be the best? Thanks.
 
Last edited:
I agree with OkayShooter. TiteBond 3 is a PVA adhesive. To get the strongest bond, apply the adhesive to both surfaces. If you drill for the dowels after the block has been clamped and glued on, you will avoid the possibility of hole misalignment. I don't see a need for screws.
 
Titebond 3 for sure is the best option.

End grain to end grain is the weakest wood joint possible, so your dowel thought is not overkill

Also mentioned 'use hardwood dowels' - the ones you get in big box/canadian tire stores are generally poplar, technically a hardwood but very soft - hit up a lumber yard and get some maple ones. (or make your own)
 
No matter which adhesive you use, the bond will rely on how well you clamp it together. Carpenter’s glue is best if you clamp it well. I agree with adding a few ‘serrated’ dowels though. They should also be glued in before you clamp it all.
 
No matter which adhesive you use, the bond will rely on how well you clamp it together. Carpenter’s glue is best if you clamp it well. I agree with adding a few ‘serrated’ dowels though. They should also be glued in before you clamp it all.

I would be inclined to clamp it with the screws you intend to use ~ just don't starve the joint :)
 
I do not think screws are a good idea. The OP would be going through the end grain of 1 3/4" thick wood with, presumably, flat head screws. Even with pilot holes, there is an excellent chance the wedging action of a screw head would split the wood. A proper clamping setup will better accomplish the same thing with no risk. Due to the porosity of the end grain, glue starvation should not be possible. Drilling and doweling after glue-up will make for a strong joint. Pre-made serrated dowels should be available at just about any building supply or hardware store.
 
I do not think screws are a good idea. The OP would be going through the end grain of 1 3/4" thick wood with, presumably, flat head screws. Even with pilot holes, there is an excellent chance the wedging action of a screw head would split the wood. A proper clamping setup will better accomplish the same thing with no risk. Due to the porosity of the end grain, glue starvation should not be possible. Drilling and doweling after glue-up will make for a strong joint. Pre-made serrated dowels should be available at just about any building supply or hardware store.

With a properly piloted hole the OP should have no issue with splitting - if he thinks it will be an issue, put the screws through the dowels. (which I frequently do fixing or relocating a screw.)
 
The issue is not clearance for the shank of the screw. It is the countersink for the screw head. The screw head acts as a wedge. The OP might not have a problem, but I have seen too many splits caused by flat head screws torqued down into a countersink, and have no desire to tempt fate. Running screws through the dowels is an interesting approach. However, in this situation, the screws would need to be considerably longer than the dowels in order to have any effect and, for all intents and purposes, the screws would be redundant.
Doweling and re-drilling the screw hole is a great way to deal with stripped threads.
 
if you do not want to split it .... short pcs split easily

recessed the spot for the screw, washer and a pan head wood screw
drill the hole the size of the screw on the pc you want to add...
just a pilot hole in the original stock.
wood Dowl and carpenters glue
 
I have simply glued in place extensions on numerous stocks using Acraglas. I have one .22 I extended in 1978. It has been used hard and is still just fine.
 
I am adding a 1 3/4" walnut block to a walnut stock. Its an O/U to be used for trap doubles. I am not sure if putting in dowels is overkill, but I like "hell for strong". I will put in a couple screws as well.

My question is regarding adhesives. I have on hand steel Devcon, J B Weld, and TiteBond 3. Which product would be the best? Thanks.

I wouldn't use any of them... I would favour Brownell's AcraGlas or plain old carpenters glue.

Fit two flat surfaces, good carpenters glue and two small dowels and clamped is all you need. You could substitute a couple of screws for the clamp. Just make sure the piece you are adding has clearance on the screws so they will draw the joint tight. Don't over tighten...
 
Titebond 3 is good for large glue up as it has longer open time and is water resistent for out door projects,
It has no advantage over 1 or 2 in this case or Elmer's, whatever.
I have used 1 /2 inch hardwood dowel, , no screws, but you should have good quality bit , and a jig on drill press helps.
If you make / turn your own dowels out of maple, you have to cut 3 or 4 groves to let the excess glue out .
If you buy maple dowel, I sand lightly, as I have seen some with wax?? on them that interferes with glue.
 
The issue is not clearance for the shank of the screw. It is the countersink for the screw head. The screw head acts as a wedge. The OP might not have a problem, but I have seen too many splits caused by flat head screws torqued down into a countersink, and have no desire to tempt fate. Running screws through the dowels is an interesting approach. However, in this situation, the screws would need to be considerably longer than the dowels in order to have any effect and, for all intents and purposes, the screws would be redundant.
Doweling and re-drilling the screw hole is a great way to deal with stripped threads.

odds are that the butt plate screws he has are going to be too short to get through the plate and extension - he's probably going to wind up with 2 1/2" screws to get through all that. and finding some that long that match the plate (unless its the type with hidden screws under a pad) probably nil.

So on reflection ~

cut dowels so that when seated they will be just shy of the top of 1 1/2" extension
set the dowels in the original screw locations, glue & let cure
drop your extension over the dowels, use the butt plate as a clamping device with the original screws run into the dowels.

If you don't want 2 glue ups, do the same, but glue up everything and clamp it.
 
Thank you for all the replies. The point is well taken not to use tapered head screws. That is definitely asking to split any wood. My trade is HD mechanic. Very little in machinery has a taper under a fastener; car wheel nuts are one of the only things that come to mind.

In this situation the clamping force is more along the lines of head bolts holding down a cylinder head.

This buttstock is on an early 60s Broadway Trap that is cut off at 11 1/4". Bubba then tried to add a couple 1/4" laminated mystery wood spacers finished off with a Morgan adjustable recoil pad. The whole mess was loose when I got it. My plan is to salvage the Morgan and arrive at a 14 1/2" to 14 3/4" LOP.

The tricky part will be finding the "real estate" to get room for the dowels and screws. Browning saw fit to bore the centre of the stock out 1" wide by 2 1/4" high, far more than was necessary for the attaching bolt. There is very little area for the glue to work on, hence my wanting to use the dowels and screws.

Another option will be to fill the "cavern" with Devcon, leaving what is necessary to pass the attaching bolt and hopefully giving me more area to anchor the block.

I have drill presses and plenty of other equipment.

Again, thanks for the tips, I will think about this a little more before I start on it.
 
I can visualize your problem very clearly... I have encountered several problems as this over the years.

Lack of strength after gluing is not a problem. Tapered head screws are not a problem either although I prefer a completely flat head. The trick will be to place the screws where they will not be in the way when you add the final attachment (the pad) Good glue and screw placement and recess the head and when it tightens the joint, stop tightening it. Pre-drill for the screw threads... some old dry butts stocks split easily when a thread is forced in... and the screw may wander as well.
 
The tricky part will be finding the "real estate" to get room for the dowels and screws. Browning saw fit to bore the centre of the stock out 1" wide by 2 1/4" high, far more than was necessary for the attaching bolt. There is very little area for the glue to work on, hence my wanting to use the dowels and screws.

Another option will be to fill the "cavern" with Devcon, leaving what is necessary to pass the attaching bolt and hopefully giving me more area to anchor the block.


have a wood lathe? drill a hole large enough for your stock bolt to clear down the center of a block of wood, turn it down to your 1" width - using that to replace your dowels. you can then fill the rest 'cavern' with whatever you want... i.e. if your cavity is 6" deep you will be making a 7 1/2" dowel with a hole down the middle, drilling a 1" hole in your extension as well .... that should give you another 1 1/4" of real estate that you only need to find room for the butt plate screws.
 
Buttstock Extension w/pics

Guntech and Sean, thank you for your input. In the interest of making this thread educational, I am posting some pics of what Guntech visualised and has probably dealt with before.

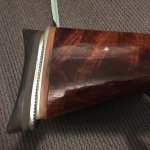
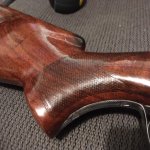
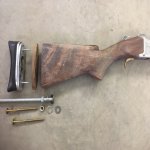
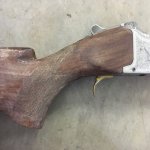
The pics show what appears to me, to be work done by several people. The original finish was so thick it had depth to it, almost as if it had been dipped. The checkering was filled in and Bubba over-sanded the points ahead of the checkering. That wood is gone, never to return. After half a day with a brass wire brush, and a whole can of Circa 1850, I was able get the "Mr. Mike's" (BC joke) table finish off. Fortunately the checkering is mostly there and I will be able to re-point it.

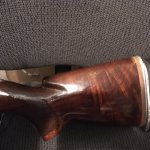
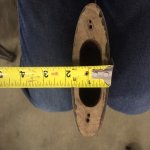
Now as for the attachment at the butt, you can see my possibilities. With two sets of previous attachment holes, carefully using the 5/16 Deck screws will give me plenty of holding power in new wood, under the flat heads. I also have the option of threading in the ready rod and attaching to it, along the lines of Sean's thinking. I need to keep a flat surface under the Morgan base, as the main adjusting bolt is trapped in a slot, and cannot be allowed to drop out.

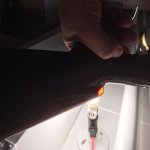
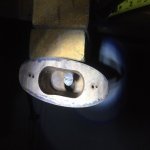
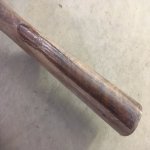
So to further seek wise counsel, check out the picture against the light. This is a "knob" at the end of the strip down the comb. Bear in mind, I am retired and this is not a collector piece, but a shooter for trap doubles locally. After my half day with the Circa 1850, whatever this knob and strip are made of it is still there. When you tap on the comb top or knob, it sounds almost like glass. It is very hard and well attached. I am sure my belt sander will be able to cut it, as the comb is too high. Here is my question. What is this product that is impervious to Circa 1850 and lots of acetone? Maybe Ian Robertson is following along.
 

Attachments

  • IMG_5779.jpg
    IMG_5779.jpg
    100.2 KB · Views: 30
  • IMG_5780.JPG
    IMG_5780.JPG
    136.1 KB · Views: 30
  • IMG_5781.JPG
    IMG_5781.JPG
    132.4 KB · Views: 30
  • IMG_5783.JPG
    IMG_5783.JPG
    54.8 KB · Views: 31
  • IMG_5796.JPG
    IMG_5796.JPG
    71.8 KB · Views: 31
  • IMG_5797.JPG
    IMG_5797.JPG
    96.6 KB · Views: 31
  • IMG_5798.JPG
    IMG_5798.JPG
    95 KB · Views: 31
  • IMG_5799.jpg
    IMG_5799.jpg
    87.6 KB · Views: 31
  • IMG_5800.JPG
    IMG_5800.JPG
    86.8 KB · Views: 31
Back
Top Bottom