You are using an out of date browser. It may not display this or other websites correctly.
You should upgrade or use an alternative browser.
You should upgrade or use an alternative browser.
Case Hardening
- Thread starter tokguy
- Start date

The brittleness can be easily taken out by tempering the metal afterwards without altering the color. Also,by treating the finished product with bake on lacquer makes the coloring last a very long time.
To repeat what I wrote earlier; it can be done in a heat treating furnace but you would also have to have an inert gas atmosphere or you would lose the colours. Those colours are know as the oxidation spectrum and heating the metal up above the brown colour and in the presence of oxygen would turn it to a higher temperature colour; probably blue/black or grey depending on high the temperature was
cheers mooncoon
Having not done it myself but fully planning to learn...case hardening is not as complex as it's made out to be, Mauser or other; many of the world's best smith color case Mausers. No receiver is purposely built from a brittle steel. Carbon penetration of the material can be easily determined by breaking off sacrificial steel pieces. Where the threat would exist would be in taking say a cast iron receiver (old rolling blocks iirc) with a massive and brittle carbon content then making them harder. Or in leaving a Mauser receiver in the kiln for days until the whole receiver is hard. But the usual method simply drives carbon in 1/32 or so. The interior lugs are themselves already pack hardened.
There's this tendency in gun-dom to sneer at the methods and materials of the past but since 1900 all that's happened is manufactures keep reinventing the wheel in poorer and poorer ways (almost without exception; a $1000 Mossberg MVP is in every way inferior to a $250 Swede M96). The American press is simply an industry mouthpiece, and the industry uses the Fifth Amendment to prevent competition, while the uniquely American penchant for litigation prevents innovation. To adjust for inflation a P-17 for instance would wholesale cost ~$2000 and a Mauser, ~$3500-$4000. That's a far cry from the Axis' at $150 or so.
Colt I believe used kiln or carbonia bluing treatments on pistols, which isn't the same. It's a bulk process.
For anyone who wants to try and experiment a bit, I came across this a while ago.
I'm interested but your link doesn't work. Please correct.
Man... I wish I could find that guys post where he case hardened or maybe it was color case hardened by wrapping the project with mechanics wire or maybe he wrapped something to the project, put it in a bbl and caused a bright flash reaction (with acetylene I think). The process was pretty spectacular and the results rather impressive
EDIT: Found it, but unfortunately the images are toast
https://www.canadiangunnutz.com/for...conversion?p=13475869&viewfull=1#post13475869
M
Last edited:
Have you ever seen a Mauser '98 bolt which has lost it's locking lugs?
I've seen a couple. One of them the shooter didn't see...ever.
OUCH! That sounds kind of final.
No receiver is purposely built from a brittle steel. Carbon penetration of the material can be easily determined by breaking off sacrificial steel pieces. Where the threat would exist would be in taking say a cast iron receiver (old rolling blocks iirc) with a massive and brittle carbon content then making them harder. Or in leaving a Mauser receiver in the kiln for days until the whole receiver is hard. But the usual method simply drives carbon in 1/32 or so. The interior lugs are themselves already pack hardened. .
I think you need to learn a bit about metallurgy. Most modern guns are made from heat treatable steel and that means that they can be worked while soft then hardened and the hardness drawn to a working level by reheating. When that is done, they are uniformly hard all the way through. If you want to colour case harden that, you need to heat the metal red hot and soak it in a source of carbon for a time that depends on how deep you want the carbon to penetrate. It is my understanding that carbon penetrates the surface about .001" per minute of soak while at a red hot temperature. The colours are formed by different levels of oxidation when the metal is dropped into bubbling water or when heat shields are used as shown by an article by Oscar Gaddy (now deceased) in the Double Gun Journal some years ago. Colour case hardening was primarily done in the "good old days" as a way of strengthening and protecting from wear, wrought iron and low carbon steels. In modern times I think we most commonly see it on replicas of antiques made in Italy using low carbon steels. The method shown by pauls is not case hardening it is just a specialized form of chemical bluing and I suspect would not stand up the wear very well. The plus side is that it does not change the heat treating of the metal. Relative to dates; Bessemer developed his process for controlling carbon content in 1854 and while it was widely adopted, in Britain and some other countries, the resulting iron was still brittle because of naturally occurring phosphorus in the iron. The ability to remove phosphorous was developed in the mid 1870s. Wrought iron, which I would describe as non homogenous iron as opposed to being of uniform chemical composition all the way through, continued to be made I think up until around 1900 although it escapes me why it persisted as long as it did.
cheers mooncoon
I understand that. However the discussion was on Mausers and Mausers as a rule -- especially restorable ones -- are not modern guns. And when originally produced, or even currently produced, the metallurgy is chosen for toughness and wear characteristics. Therefore modern Mauser actions are produced from annealed higher-chrome and nickel 8620, 4140, and other tool and punch style steels, and previously with a sort of (ideally) higher chrome 1018 type, original actions being pack hardened in the lugs but fairly soft elsewhere. The issue being that if a steel like say O1 was used then it would become too brittle on heat treating as the fine grain in the steel would be prone to split, and impacts have a tendency to cold-forge and crack. Chrome-vanadium (used for shotgun hinges and hex keys) because though tough as anything it work hardens badly and would be expensive to produce. My point was that, properly controlled, there's little risk in color casing on an older Mauser, though warping can be an issue, logically, due to vastly different thicknesses on a given piece. Case hardening of any kind also requires an anaerobic environment (to my knowledge) because oxygen bonds more easily than carbon, causing scale; the colors themselves I don't believe to be part of the temper spectrum exactly, as the colors can be changed by adjusting the trace materials in the charcoal. Reading the Gaddy articles I recall carbonate being a major factor. I know that I can change the color of an oil temper for instance by simply changing the kind of oil. Oscar Kob's work is easily recognizable due to his method; other smiths make different colors.
I approached member rwnblack to recovered some of his images of the process. He needs to chime in and explain what each image depicts.
Impressive to say the least!


M
Impressive to say the least!
M
Attachments
Last edited:
Member rwnblack posted some images of the process on the BP forum some time ago. Unfortunately the images are toast due to you know who.
https://www.canadiangunnutz.com/for...conversion?p=13475869&viewfull=1#post13475869
Looked like an asbestos suit and welding helmet activity. Real loose your eye brows stuff LOL
M
Those images can be restored if you are talking about not being able to view photo bucket pic's. It depends what browser you are using. There is a fix for firefox or google chrome and it is free.
R
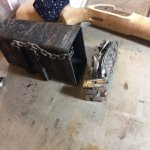
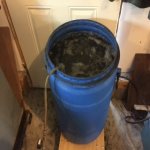
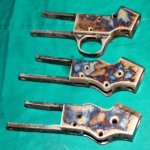
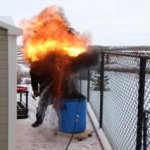
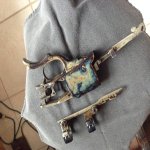
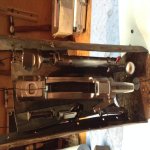
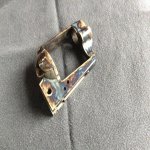
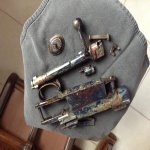
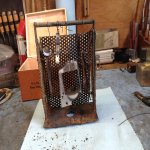
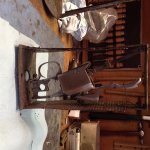
Thanks for posting the photos. This is my casehardening setup. I polish the pieces to 400 grit with emery but never use a polishing wheel. I wire all the pieces together and attach a chain that is welded to the inside of the steel box. The next picture is the box after i packed the parts in a mixture of wood and bone charcoal. The more bone the more colour but it can get too dark if you don't use enough wood. The stevens actions in the pic I used a 2:1 ratio of wood to bone. The next pic is my muffle furnace wih the box in it. I have a temperature control so it stays in a very narrow range of temps. I use 720 C for most things but i find i need go higher for chrome moly. I usually hold the parts in the oven for about 1 hour when it hits temp. Some times i drop the temp 50 c for the if the action is cast. The blue barrel is full of cold water and I bubble air through it for about 1 hour before the dunk. The tank is on wheels so I can roll it outside for the quench. Drop the contents in only an inch or two above the water. I wear a facemask for grinding and cover my hair. I wear a heavy shop coat, jeans, boots and heavy linesman gloves. I have heavy tongs that i lift and dump the box. It makes a big mess but the flames only last a fraction of a second or two. The charcoal seems to fly a fair ways, cant do this near flamable stuff. My daughter hid behind the garden shed to take this picture. After the quench i spay down the parts with WD40, coat in heavy duty oil. If I am worried the steel has brittle spots due to carbon content of steel, i put a realy heavy dose of oil on and the parts, wrap them in tin foil and draw out the temper in my furnace at 325 C. This chanes the colors a bit but they are still nice. The end result is the last pic. I have a batch of parts to do tonight so time to get back to it.
My writing skills are somewhat impaired, to do a severe sickness 15 years ago. So excuse any mistakes in gramma and spelling.
Since I read the post of "rwnblack " about his Sharps , I tip my hat to him. He is excellent!
The method he outlined in his resent post is the same as I use. All the older guns, produced until the 1920,s can be cch this way.
Our heat treatment with the modern equipment ( hardness tester, electronic controllers, digital measuring devices ) is superior to the methods of our forefathers. The heat treatment until the 1920,s was by eye and gut feeling. I measured Mausers between 8 and 44 on the C scale of my hardness tester. 24 till 30 is ideal for non magnum cartridges. Cloudy days could throwd off the temperatures by 300 till 400 F, if done by eye.
My standart numbers for Winchester, Marlins, Rolling blocks and all the guns of this vintage is:
annealing : 1450 F for 1 hr. dropping the temperature 100 F per hr. untill 400 F. Then you can remove it.
polished : 400 grit
degreasing : 1/2 hr in boiling water with washing soda, then 15 minutes in clear boiling water to remove residue.
charcoal mixture: 1 part bone charcoal and 2 parts wood charcoal always works
kiln time : 2 hrs. at 1350 F , dropping to 1150 F and holding it for 1/2 hr.
water: rainwater at 50 F , the air hose startet when kiln reached 1350 F , remove 5 min. before dumping the parts in water
This will give you a case of ca. 4 th. The core stays soft and takes the energy when firing the gun.
Since I started this hobby 50 years ago , I always hang my parts into frames which go into the crucible. The
way I place them , lets me to a certain extent control the colours. After doing it for so long, I still get excided
every time I take it out of the water, because you never know what to expect.
tempering: 400 F for 1 hr.
finishing: Nikolas bake on laquer, baked for 1 hr at 300 F.
After cleaning up the mess, which takes quite a bit of time, open a bottle of red wine and admire your work.
I hope, this takes some of the mystic and voodoo out of cch. It is as easy as bluing a gun, but it takes about 9 hrs, from start to finish.
"gnmontey", I do not know how to post pictures in this forum, but if you send me your e-mail address with private message, I could send you some pictures if you are interested in posting them. Thanks!
Cheers, Oskar
Last edited:
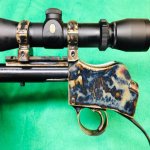
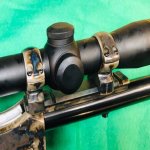
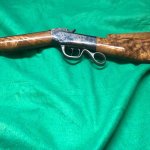
Thanks Oskar, that is high praise to get a compliment from someone who does such exceptional work. In fact I went running to to my wife and said look at what Oskar wrote.... My next project I am going to follow your method to the letter. I did a couple of locks last night and a tang and buttplate for a Rigby I am building that has tang sight built into both tangs. I didn't do the cool down before the dunk and the colors came out darker and less defined. In the case of these muzzleloaders i think that is okay. Here are some pics from my midnight dip. Today I plan on rust bluing the barrel, i nitre blued the small bits last night and the stock only needs a few more coats of oil so it may be done soon.
View attachment 144227
View attachment 144228
View attachment 144229
View attachment 144231
View attachment 144233
View attachment 144227
View attachment 144228
View attachment 144229
View attachment 144231
View attachment 144233
Last edited:
This is my first try posting pictures using the direct link as a member, i doubled up on one pic and missed one. Here is the missing photo.
View attachment 144467
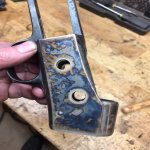
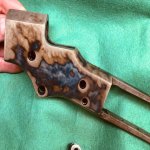
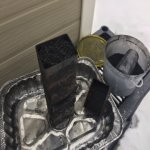
Here are a couple of projects where I used a method closer to the one that Oskar described with the slight cool down and post temper draw. The old stevens shotgun is a cast steel action that I converted to 17 hornet so wanted to use lower temperatures and draw the temper to prevent any brittle spots.
View attachment 144468
View attachment 144469
View attachment 144470
View attachment 144471
View attachment 144467
Here are a couple of projects where I used a method closer to the one that Oskar described with the slight cool down and post temper draw. The old stevens shotgun is a cast steel action that I converted to 17 hornet so wanted to use lower temperatures and draw the temper to prevent any brittle spots.
View attachment 144468
View attachment 144469
View attachment 144470
View attachment 144471
Last edited:
Posting some images on Oskar's behalf.
The pictures show, how I place the parts on the frames and how they look
after being done. I think people who want to try cch should see the set up.
The flash you mentioned is created when the red hot parts and the charcoal
hit the water. It is a little explosion.


Fascinating!
M
The pictures show, how I place the parts on the frames and how they look
after being done. I think people who want to try cch should see the set up.
The flash you mentioned is created when the red hot parts and the charcoal
hit the water. It is a little explosion.
Fascinating!
M
Attachments
Last edited:
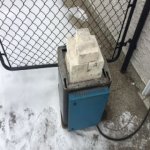
I have been doing a bit of casehardening this winter. The bitter -40C seems to help. I work pretty fast outside right now.


Attachments