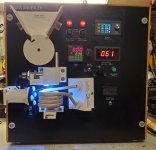
DIY brass annealing setup?

Finally got the water pump this evening. I am also having some brainstorming now with the stupid water system.
The ZVS original copper tube OD is 5mm.... I don't want to solder another 1/4" tube over a 5mm to build up a wall thickness for a silicon tube because a stupid water radiator barb is 8mm. My plumbing soldering skills are pure basics only.
I will go tomorrow to a plumbing store or HD if I can find - a plastic - inline barb fitting, not really inclined to have another metal piece between wires.

For now I will finish this my brass annealing ZVS project with a count down timer what I currently have, of course same all components mounted on a piece of plywood sheet.
When time comes to move all to a enclosure, I have in my plans to control the annealing not by timer but buy IR/laser Temp controller.
Set the Temp for let say 400 C or 450 C or 500 C where the controller will cut ... and that can give a best samples to compare the material.
Brass IR emissivity sits in a wide range, shiny things are generally pretty hard to measure with IR, calibrating the measuring device could be tricky. Some IR guns come with K type thermocouple for setup and verification.
Handheld IR guns also have height over bore aiming issues since the visible and IR light sources are not coaxial.

https://www.thermoworks.com/emissiv...18-ku1usXZtQFiIGxPI2Ppc2ISF2LtY-ZSHkoq4wiGSw-
https://blog.thermoworks.com/infrared-thermometry/
 
depends what case you want to measure, minimum beam diameter is 11mm and minimum beam diameter at useful distance is 13mm, plus "oval" effect of angling sensor. I don't see any data on sensor reaction time but I would guess slow + coil delay so you may need to trigger early to prevent overshoot. The brass will change color and therefore also emissivity as it anneals.

S090bda42ec9042349565e02fc2f149d5t.jpg
 
depends what case you want to measure...
Thanks, this was very educational.
I have a handheld laser-IR meter but to do the exercise I need a third hand ... have not tried at this stage yet.
Theoretically - controlling the annealing "length" with a Temp sensor - shall be - more precise=consistent vs a count down timer.
But again I can understand the Temp sensor delay time... maybe the sensor shall be ON all time (same as the timer) ???
I don't know, it is way too far out at the moment but definitely worth to tinker about.
 
bigHUN - I understand you havent annealed any cases yet in your reloading career. Suggest you try a few by hand with a propane torch, you'll learn a lot. For one, there is no need to hold the brass at annealing temp for a length of time. Second, it is desirable to heat the brass neck relatively quickly (a few seconds) to avoid heat migration beyond the shoulder (brass has a very high thermal conductivity). Using a timer is an easy and reliable way to avoid "overshoot" as described above. Third, the coloration on the case gives an excellent indication of consistency, no need for further analysis.
 
Last edited:
Thanks, this was very educational.
I have a handheld laser-IR meter but to do the exercise I need a third hand ... have not tried at this stage yet.
Theoretically - controlling the annealing "length" with a Temp sensor - shall be - more precise=consistent vs a count down timer.
But again I can understand the Temp sensor delay time... maybe the sensor shall be ON all time (same as the timer) ???
I don't know, it is way too far out at the moment but definitely worth to tinker about.
Timers are sufficient, you can see how consistent the anneal height is in my picture of my 308 Lapua brass. The coil doesn't have much residual heat in it if it's being liquid cooled, so it's not going to be dumping a bunch of heat into the 200th case and throwing off the time to anneal. After a 200 case session my coil is barely above room temperature. Using temperature sensors certainly isn't necessary and will come with a fair few headaches to setup. That being said there are people that use temperature triggers, freedomjockey on Reddit does here is his setup.
 
Yeah, cosmic and grizzly, both you are right what you saying...
I am just an another square head with bad habits from earlier life in precision engineering ... the entire life I spent with numbers and calculations. I will not torch, I am already deep inside building this my annealing machine, it works and the finesses I will be adding on the go.
 
Timers are sufficient, you can see how consistent the anneal height is in my picture of my 308 Lapua brass. The coil doesn't have much residual heat in it if it's being liquid cooled, so it's not going to be dumping a bunch of heat into the 200th case and throwing off the time to anneal. After a 200 case session my coil is barely above room temperature. Using temperature sensors certainly isn't necessary and will come with a fair few headaches to setup. That being said there are people that use temperature triggers, freedomjockey on Reddit does here is his setup.
I took a little peak at this project and it looks to me like the optical sensors are proxy detectors to trigger heating when a case is present, do you have more info on the temperature sensor part? The below quote gives me the impression his setup is time based.

FreedomJockey via Reddit said:
Turns out, 3.0 second for the Hornady brass and 3.8 seconds for the Norma/Prime brass. For reference, it was ~1.8 seconds for the LC 5.56 brass.

 
I took a little peak at this project and it looks to me like the optical sensors are proxy detectors to trigger heating when a case is present, do you have more info on the temperature sensor part? The below quote gives me the impression his setup is time based.


You're right. There are definitely people using temperature triggers on Reddit and the hide, this just wasn't the one I was thinking of (although it's another very cool build). I'll poke around and try to find it again, I'll post links when I do find it.
 
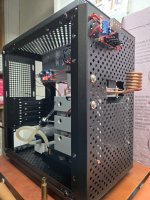
I got to a point where I would need to decide how and why to put this gizmo in some sort of enclosure.
I am sure I am careful enough to use it as is on an open plate, but for storing it for weeks or months in my garage up somewhere on my shelfs I may need some cover for it.
An old PC computer case comes to mind first if I could find some, not really skilled for fabricating things from wood.
What did you guys do with your built?
 
I built this annealer a few ago. I made the wooden box on a wooden frame so that each of the six sides a removable.
No separate CPUs, only relays and the off-the-shelf display modules you see. Has separate 48VDC and 12VDC power supplies.
The white components are 3D printed ABS. It uses a double 1/4" copper coil and is water cooled.
 

Attachments

  • annealer.jpg
    annealer.jpg
    115.6 KB · Views: 26
This where I got so far, next will be start 3d printing.

20250608_210514.jpg

The original 4mm copper coil is a bit slow with a 10mm larger ID, I think I will wrap one tighter, got some new 1/8" tubes.
Any advantage dual wrapping? A continuous inner and outer coil I have seen some internet pictures?
 
This is a really impressive thread, love all the ingenuity. That said, I have to admit the level of effort you gents are putting in pushed me to finally picked up an AMP DS. I finally conceded I have more more money than brains or time, at least in this matter :)

After doing gas annealing for decades I have admit that induction annealing is where its at. I just finished a 500 case session on 300 WIn mag, 338 Lap, 50bmg in the living room(while my wife was out, obviously). Yeah its is pricey but so is the investment in large caliber brass that not getting cheaper or easier to source for quality stuff. Between the reliable annealing and collet dies the brass should last at least until the primer pockets give up, which might verry well be my lifetime, lol.

Regardless well done gentlemen, carry on, great thread :) .
 
Any electric guy can chime in, please?
Looks like my aliexpress powersupply is underpowered at 24V 400W 16A for this coil board.
Tinkering buying a larger Watts PS, but not educated with these things....
The ZVS board is spec maximum current 20A and max power 1000W. Reading on all forums nobody actually reported the max .
To buy a 24V 600W or a 12V 1000W ??? and most likely amazon this time...
Also I have in my drawers a new never used Hella foglight relay 12V 30A, I plan to insert between the timer 10A relay and a ZVS coil, maybe that small relay cannot handle a draw.
 
Last edited:
Any electric guy can chime in, please?
Looks like my aliexpress powersupply is underpowered at 24V 400W 16A for this coil board.
Tinkering buying a larger Watts PS, but not educated with these things....
To buy a 24V 600W or a 12V 1000W ??? and most likely amazon this time...
Also I have in my drawers a new never used Hella foglight relay 12V 30A, I plan to insert between the timer 10A relay and a ZVS coil, maybe that small relay cannot handle a draw.
48v (~21A) or 36v (~28A), 1000w minimum. at 12v you will be pushing close to 85 amps and require 2AWG wiring to hit the 1000w that board will pull. 24v will require 8AWG, 36v will require 10AWG and 48v will likely be fine with 12 AWG.
 
Like always with these Chinese - no specs and no explanation products...
I just checked the box (also the aliexpress page) saying only "12-48V 1000W max ... blablabla ... 24-36V" . So my first confusion right there.
Also they never mentioned anywhere what is a recommended PS minimum.
Because I already invested into 24V parts, I will order a larger Amp/Watts PS in 24V again.
Edit:
Edit:
I had it backwards, I need to correct myself. I will need a DC 48V 1000W PSU for best performance.
Thanks all for your Help.
 
Last edited:
Back
Top Bottom