Forming 577-450 brass help

Edburns117

Member
Rating - 100%
17   0   0
Location
SW Ontario
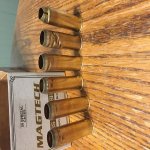
I am in need of help and after watching several videos on YouTube about forming this brass and how to anneal, I am still defeated with crushed brass to tell the tale.
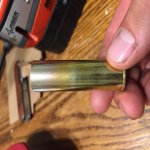
I have magtech 24ga brass and I’m using Lee full length sizing die.
I’ve seen in videos people having issues with not enough or too much lube so I’ve tried various amounts. I always use the press slow and pull it out to look at and relube if needed.
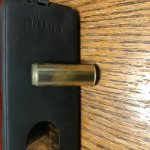
With the torch I try to anneal the brass until it gets a bluish purple look. I did try quenching one but got the same crushed result. I tried anneal farther down the case (around half) but still no luck
I knew coming into this it wasn’t going to be easy but I feel with this much failure I must be doing something wrong. Any and all advice or techniques are welcome

Thanks, Ed

ACA8EEF2-C1B5-49C1-B158-8B3281ADD61E.jpg
4BC574D2-4B9D-42A6-B304-BFA913E5CC35.jpg
 

Attachments

  • ACA8EEF2-C1B5-49C1-B158-8B3281ADD61E.jpg
    ACA8EEF2-C1B5-49C1-B158-8B3281ADD61E.jpg
    104.5 KB · Views: 182
  • 4BC574D2-4B9D-42A6-B304-BFA913E5CC35.jpg
    4BC574D2-4B9D-42A6-B304-BFA913E5CC35.jpg
    60.2 KB · Views: 179
I think you may have used too much heat. In a darkened room in which I can just still see enough, I get the brass to glow a dull red and then stop. The last time that I did 20 of the Magtech brass, I crushed 2 cases.
Something you might try, is annealing only the first half inch or so first, and then form in baby steps until you feel the resistance from the brass which is not annealed. Then anneal the next portion and repeat. Once you get a feel of how the brass is acting, then you may be able to anneal in one try to where the shoulder will be.
 
Last edited:
You need a bushing to size the neck down part way. I use the 24 ga magtec brass. I made up a piece on my lathe out of a piece of solid brass. One end larger than case mouth the other end about 0.520. Kind of like a funnel with a gentle slope. Annealed before this step and before case goes in sizing die. You are trying to move a lot of brass in one step. Brass is pushing inward and if it is able to flow it should thicken the case necks instead of buckling. Smaller reductions with a repeat annealing works better than doing everything in one step.
 
These look like all great suggestions! I think I’ll start with trying to anneal in a darker room and get the brass to a dull red. That seems to me like a better system then what I’ve been trying. Probably will anneal and form the case in small sections like suggested . That seems like something I can try fairly easily. If that doesn’t work I’ll go to trying a two stage sizing. I know I’ve had to do that taking 303 to the 6.5 Dutch. Thanks so much for the help and if anyone wants to add more I welcome all advice. Hopefully it won’t be too long and I can try these ideas, then I will post my results. Maybe in the future this thread could help others who take on 577-450

, Ed
 
Another couple of tips...you may have other die bodies from other calibers in your collection that the barrel opening can be used for incremental down-sizing rather than having to find a specific size or build one.

The second tip is that when you are sizing down ,take the neck/shoulder past the "factory" SAMMI case length spec. and then "fire-form" back up to fit your chamber before your first full-service loads are used. This ensures all your loads will fit "the first time".

Good advice... if you happen to have a RCBS collet type bullet puller, the interior of the body is an almost perfect first step in sizing down that brass. Now the next step is to buy a snider so you can use all the "mistakes"!!! Good luck.....Catnip
 
Thanks for the advice, when I get one sized down I will make sure to go past to fire form. After you fire form do you only resize the neck and leave the shoulder?

My first two cases I did without annealing. First one is the far right or top case due to my side ways picture, the one with the crease. The other one that’s not in the picture split down half the side.

I don’t own a snider but that was my first thought on these failed attempts haha.

So tonight I tried the annealing in a dark room. I must say for me watching for a dull red is easier than a bluish colour. Only did the very end and then let it cool.
Which brings me to another question on whether to quench or not. Is there a difference in the annealing results?
Back to the case, I put it in the die and just did a bit and went to anneal again. After I annealed I was looking at the case and saw that the neck was coming down uneven. I’ll post a picture and you can share your thoughts on it. Not sure if my annealing skills need work or if this is something normal when working brass this large

I’ve been looking at getting a bullet puller so I will keep that one in mind if it will help me out with this.

Thanks again for more great tips, sorry for the long read

,Ed

D082475D-6BDB-4927-9EAD-4394096238DD.jpg
 

Attachments

  • D082475D-6BDB-4927-9EAD-4394096238DD.jpg
    D082475D-6BDB-4927-9EAD-4394096238DD.jpg
    88.1 KB · Views: 86
Which brings me to another question on whether to quench or not. Is there a difference in the annealing results?
Back to the case, I put it in the die and just did a bit and went to anneal again. After I annealed I was looking at the case and saw that the neck was coming down uneven. I’ll post a picture and you can share your thoughts on it. Not sure if my annealing skills need work or if this is something normal when working brass this large
I
,Ed
View attachment 286236

Quenching makes no difference to the brass. More of a safety factor to prevent skin burns.

I like to rotate the cases in the shell holder 1/8 to 1/4 turn and repeat the ram stroke.
 
I think you are getting brass too hot and only doing one side

When I aneal i do it over the washing machine and drop hot brass in to a bucket of water

a small flame app 3/4 length or less... just hold the neck of the brass in the tip of the flame or close

Hold brass with your fingers rotating brass in the flame, ... torch and brass at about 30deg angle ... if at 90deg angle your fingers will get very hot

you should be able to do a count to at least 5-8

When it gets too hot to hold drop in bucket of water

Do not burn your fingers
 
I do mostly neck size but have the option of full length as well as I made a set of dies with the chamber reamer I used to cut the chamber.

I formed a bunch of 38-56 from 45-70, a downsize of .85 in 4 increments but you are going down .145 so a few more "increments " may be needed (I had only 4 failures out of 150 or so that I did). One more thing, I never annealed any of them from start to finish.
 
So tonight I tried the annealing in a dark room. I must say for me watching for a dull red is easier than a bluish colour. Only did the very end and then let it cool.

Why only do the very end? Why not anneal the whole extent that will eventually be formed?

Which brings me to another question on whether to quench or not. Is there a difference in the annealing results?

No significant difference.

I formed a bunch of 38-56 from 45-70, a downsize of .85 in 4 increments but you are going down .145 so a few more "increments " may be needed... One more thing, I never annealed any of them from start to finish.

My instinct says this is the correct path. Brass is ridiculously malleable, if you have your reduction steps right the brass should form without annealing. Looking at your photos the brass is buckling, a problem likely to be made worse if the material is softer. It may make sense to anneal the cases after they are formed to reduce stresses or hardness before firing, but the only reason to do it before forming is if you or your press is not strong enough to handle the chore.
 
Here's a pretty good video for forming 577-450 brass. The lesson learned is to take small intermediate forming steps and not too much lube. He addresses the "wrinkling" problem in more detail around min 17:00. Good luck with your project.

 
Good advice... if you happen to have a RCBS collet type bullet puller, the interior of the body is an almost perfect first step in sizing down that brass. Now the next step is to buy a snider so you can use all the "mistakes"!!! Good luck.....Catnip

This very much interest me as I’ve been looking at getting a bullet puller and if I can kill two birds with one stone it will be a bonus!
Is this the style of bullet puller you are referring to?

Thanks, Ed

21917E0E-B6F5-4ECF-A690-095A481D6D7F.jpeg
 

Attachments

  • 21917E0E-B6F5-4ECF-A690-095A481D6D7F.jpeg
    21917E0E-B6F5-4ECF-A690-095A481D6D7F.jpeg
    59 KB · Views: 45
That is the same type as mine (collet style),but it does not look like the same brand. You would need to check the size and taper of the inside of the body to be sure it would work, as different brands used their own size and shape of collets. Mine is an older RCBS with a 7/8 thread. Hope some of this helps a bit....catnip
 
Ok thanks I will put my research into the product. It seems like my project will be on hold for awhile.
While I’m ordering stuff are there any dies recommend for taking this brass down in steps?

Thanks, Ed
 
Back
Top Bottom