Garand Timing Block/Gauge

purple

CGN Ultra frequent flyer
Rating - 100%
185   0   0
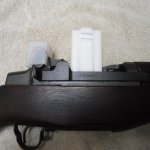
Here's a "reactive gauge" to determine the proper timing of bolt closure on loading the rifle. The block is pressed down on the follower, like an en bloc clip, and is read in relation to the receiver rail. I've highlighted the two index marks on the gauge in black. The bolt must not close before the lower line is even with the receiver rail. The bolt must close before the top line hits the rail. The timing block will or will not release the bolt when inserted, which gives a positive indication of whether or not timing is correct.

Timing can also be checked with an en bloc of dummy rounds, but the timing block is much handier to use.

Timing problems involve one or more of the following being off spec; bullet guide (most frequent), op rod catch, follower arm, follower, follower arm pin. I found one case where faulty timing was caused by the hooks on the op rod being worn or not making proper contact with the op rod catch. The timing block is available from BrownellsDSCF1704.jpg
 

Attachments

  • DSCF1704.jpg
    DSCF1704.jpg
    63.4 KB · Views: 137
I was able to get an Italian made timing block many years ago. It was quite handy to take to gun shows and test out the merchandise. Back in the day of $400 garands
 
The most common cause of faulty timing is the height of the fulcrum on the bullet guide. WW2 production bullet guide height was around .175. Post-war production increased it to .183 minus .004 tolerance. A .175 height can work, provided all other parts are in spec. If timing is off due to a short bullet guide fulcrum, the height can be increased by punch peening the edges of the fulcrum to displace some metal upwards. Rough edges can be smoothed with a stone.

I recently worked over a rifle which failed to feed the first round properly. Initially, I thought it was faulty timing, but eventually pinned it down to a worn camming rib on the right interior of receiver forward of the follower. This camming rib serves to keep the first round centered as it is stripped from the clip and moves towards the chamber. The rib cannot be measured, so it either works or it doesn't. This was the first time I've encountered this situation, which shouldn't be all that surprising considering the heavy use that many rifles saw in service.

This only creates a problem when the top round is on the right side of the en bloc, which is how military ammo was loaded. The rifle will also load, feed and function with the top round on the left side of the en bloc. The solution to this problem is just to load your en blocs with the top round on the left side.
 
It appears to be made of Delrin.

Is it subject to a lot of stress? The common PLA filament has it's strength limits, but is suitable for many things, and best of all is very cheap. If I could print one for a dollar's worth of filament, and not have to mail order a specialty part from the USA and pay shipping, even if it has a limited lifespan, it might be worth it.

I did a search for 3D printed Garand timing blocks, but didn't find any STL files. If someone gave me accurate dimensions, I could perhaps create an STL file using a CAD program.

Found a pdf of the blueprints:

https://www.foundry.ray-vin.com/firearms/m1timingblock/m1-timing-block.pdf
 
They do have to be pushed down against spring pressure. Brownells lists them for $44.99. It's probably only worthwhile if you handle different rifles. Otherwise, an en bloc of dummy rounds does the same job. I kind of like seeing the gauge make the rifle go "thunk" at he right time.:cool:
 
If I get bored, I'll see if I can design one for 3D printing. PLA filament should be plenty strong enough to depress the follower and hold back the bolt.
 
Thanks to VanceM for providing me with the stl file for the timing block. I printed one this evening on my 3d printer using black pla and it works great. Plenty strong for the job.
 
Back
Top Bottom