Gunstock staining, advice needed

yorgi

CGN frequent flyer
Rating - 100%
151   0   0
Location
Toronto, Ontario
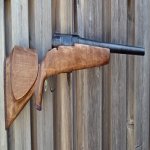
I'm in the last steps of completing a scratch-built rifle stock from laminated Birch boards and frankly.... I'm getting sick of all the work involved :(

I have no dreams of grandeur, it's a cheap project so I'm not looking for a showpiece just want it to look somewhat normal.

Yesterday, I sanded down to 220, applied Pre-Stain Conditioner and gave it a coat of stain, the endgrain turned horribly dark... I then resanded the endgrain with up to 1000 sandpaper, reapplied conditioner and stain, it somewhat fixed the problem.

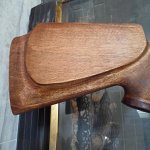
This morning, after drying, I noticed a distinct "ring" of light-coloured wood all around the edge of the cheekpiece, obviously I screwed something up.

My question is this: Should I now sand down the lighter ring down to bare wood and try restaining? Could it be that I oversaturated the "ring" with conditioner ? Thanks in advance.
 

Attachments

  • SAM_9989.jpg
    SAM_9989.jpg
    83.9 KB · Views: 377
You say the stock is made from "laminated birch." Can you be more specific? How thick are the plies? I think I see a line down by the toe... what kind of lumber is it?

Even if that stock were solid wood, you're going to have exposed end-grain around the cheek piece, and it's simply not going to take stain in the same way as the face grain will.

Do you plan to cover it with a clear finish of some sort? If so, what does that stock look like when you wet it, under the kitchen faucet? Does the color even-out at all?

I ask, because staining laminated wood is asking for a bit of trouble. The glue isn't going to take stain the same as the wood, for one thing, which may explain that long white line down by the toe. When you see those wild-looking plywood stocks with the multi-colored plies in them, the plies are dyed before laminating.

k50scbwTfdsPa9wYAGkXh9aaJ1vaGDm5xSJ9M9LtixYf2hQ6Wb4BXmSOwvgrDZbi0HoQGtkeVf1myvUmZd0EmbTc


I'm one of those people who don't use stain for anything, ever. It's a bad approach on any wood with irregular surfaces, like that stock, because the whole surface is varying face- and ed-grain, and it's never going to take the color evenly. "Laminated" can only make it worse. If I were you, I'd remove as much of that stain as possible, or maybe apply some more to get it as even as possible, and then finish the stock in something like this:

https://www.amazon.ca/Mohawk-Finishing-Products-M100-0383-Classic/dp/B07NC6PL32/

It's a dye-based surface finish, and won't be effected by plywood grain, glue, etc. Another, potentially better option is to use a pigment-based finish. Mohawk/Behlen make those too. With pigment based "toner," the more you apply, the more opaque it will get, obscuring whatever flaws lie underneath. Of course, if you apply enough, it will start to look like brown paint.

Probably not at all what you wanted to hear, but that's what I've got. Can you describe the wood? Is it made from 3/4" birch?
 
Birch is inconsistent if it even takes stain. Ime.

I'm not sure what to do other than see if the white ring will take some stain after more sanding. I've heard of using dye but never have myself
 
the problem is the wood did not take the stain consistently as the sanding seams to have changed direction with the grain. possibly grit of sand paper as well.
try to resand in the direction of the grain. blending the light and dark areas. good luck
 
cleger, Buckmastr and gaff, thanks very much for your advice.

Yes, inconsistency seems to be the norm in this staining... The stock was made by laminating three 3/4" solid birch boards. A few months ago, I made another one for a shotgun stock that turned out pretty well, I think the difference was that the colour I selected was lighter and more reddish than this particular (English Walnut) stain. No hiding the flaws when the end colour is dark, makes the light areas stand out more. My plan for finishing the stock is to give it a few coats of Minwax Antique Oil, IIRC it's a mix of BLO and Varnish, light sanding in between coats. I'm hoping to end up with a satin finish.

Put a lot of work into it so far to give up... so, based on your suggestions, I think I will try to get a hold of some dark brown dye. I will sand down the light areas, mix some dye in the stain and hope it will take and show up darker. Can someone suggest a readily available dye that would work? Would craft/paint stores have it in stock?

P.S. Based on all the problems I've had so far with stain, I will definitely take cleger's advice and start using dye toner instead...
 
Last edited:
Have you tried Schaftol made by Scherell
It's a European stain and oil Finnish comes in different shades and darkness.
 
I have used a alcohol stain( dye) you need air brush or small finish sprayer . It is used furanture manufacturing, I can make spruce 2/4 look like walnut , depending on the colors used.
Spray can?? I have seen stain/ finish in spray cans, Verathain makes some, don't really like it, but real light coats , you could even it out. BUT try on scrap first.
I would suggest a light color , dark is hard to do on birch. sand and try a redo???? PITA ,I know
Check out water dye, Lee Valley has it , powder, mix with water, have some , never tried it. You did not let the conditioner dry?
 
See if you can borrow some of those stain felt pen things. I have a set, and they are great for little touchups. Then carefully apply your top coat, (spray if you can, at least initially), to let it trap the colouring. Otherwise the usual wiping motion can remove colouring that is sitting on the surface.
 
Canadian Tire has or had stain impregnated wipes, of different colors that actually worked quite well on a few rifle stocks I've refinished.

They were relatively cheap and are easily cut to the size needed for the job.
 
My question is this: Should I now sand down the lighter ring down to bare wood and try restaining? Could it be that I oversaturated the "ring" with conditioner ? Thanks in advance.

Unlike dye, stain doesn't penetrates the wood because the colour particles in stain are too large to penetrate the wood fiber. Stain can be removed just as varnish or paint by chemical stripper or sanding.

The problem of an uneven finish is characteristic of wood such as beech and birch. With either dye or stain, it isn't easy to get an even colour. More stain will darken the colour but eventually with enough stain it will look like paint. Dye may be the best bet but on wood like beech or birch often requires a few careful steps and applications to obtain a good look.
 
You might consider lye dye/stain. Just lye and water two tsp. per cup to start. Keep some white vinegar around to neutralize. The richer the mixture the darker the colour and the harsher the burn on your hands. It will not be very effective on a glue line, but penetrates far deeper than stain. The colour never becomes opaque.
 
If you dye that piece, you'll be fairly committed to your dye job... you won't be able to sand it off, without digging pretty deep.

The reason I suggested that Mohawk tinted aerosol is because it sits on the surface. If you didn't like it, you could wipe it off with a rag dipped in lacquer thinner. The one I linked to is dye-based, but don't confuse that with dyes sold for coloring raw wood; those penetrate the wood, while the color in that Mohawk product stays in the finish, like a "candy apple" paint job, or the red-tinted candy coating on an actual candy apple.

Here's an excellent video by one of your countrymen that shows the difference between dye and stain.

https://youtu.be/o3Ysfw0LmMw?t=370

This same principle will apply to dye- or pigment-based finishes. The dye-based ones will remain translucent. The pigment-based ones will become progressively more opaque, the more that's applied. The difference between these and stains (or dyes) like you have used is that they sit on top of the wood, not in it.

But again, I'm talking about colored finishes, which are your best option for a piece of wood like that. If you go with something designed to penetrate raw wood, as you have done, then whether dye or stain, you run the risk that it turns out uneven, and as I wrote, dye will be tough to remove afterward, should you not like the result.

https://www.mohawk-finishing.com/products/wood-touch-up-repair/aerosols/tone-finish-toner/

^^^
Those are the pigment-based finishes. Note that they will start to look like "paint" as the film thickness increases, as suggested in the video I linked above.

Note also that if you're determined to use that Minwax product, you can disregard everything I've written, since it is linseed oil with a plasticiser, and would rub right off if applied over the stuff I've suggested, no matter how long it were left to "dry." It's a good product, but it isn't going to be any help in getting a uniform color.
 
cleger, thank you for taking the time to educate me on the different types of finishes. Although a "mature" guy, I'm relatively new to woodworking, so any tips and tricks from experienced people like yourself are greatly appreciated. As for this particular project, I have resigned myself and joined the "good-enough" camp ... Even before I started on it, the whole plan for me was to practice my inletting and shaping skills on a sacrificial piece of wood, a training piece sorta, kinda.

I'm almost ready to construct a rudimentary gunstock duplicator, so this particular stock was meant as a master, planned all along to use a solid piece of walnut as the final stock. Any inconsistencies, flaws and screw-ups on the master were to be corrected via Saran-Wrap and Bondo, to be corrected on the copy. Not trying to make a silk purse out a sow's ear, just something somewhat presentable.

Going back to my original post, thanks to everyone's advice, I went ahead and sanded the offending area down to bare wood. I then applied a generous amount of stain, let it take (horizontally) for two hours, wiped the excess and repeated. Tried my best to blend it in, not the best work but it'll do.... Too many inconsistencies between the three boards themselves and even withing every separate board. One board in particular had tight rings, wide rings and pure white wood all across 6".

Well, enough talking, here's what I ended up with.
 

Attachments

  • sakvendL.jpg
    sakvendL.jpg
    24.1 KB · Views: 122
  • sakvendR.jpg
    sakvendR.jpg
    30.9 KB · Views: 122
That really does look quite good. I don't think anyone could have done any better, given the approach you took.

I mentioned it before, but if you want to see what the stock will look like when oiled, you can wet it with water. It may sound risky, but it isn't. Just be sure your stain has dried fully beforehand. Then you simply need to let the water dry thoroughly (as for several hours) before applying your oil.

That way, you'll have a chance to see what it will look like before you commit it to finish.
 
Back
Top Bottom