Hairline crack in Husqvarna 1640 stock

Kevin32

CGN Regular
Rating - 100%
2   0   0
Picked up an absolutely mint Husqvarna 6000 rifle the other day. I've had trouble getting it to shoot consistent, despite the rifle appearing nearly unused my groups were near 3" at 100. Upon inspection, I noticed the front action screw wasn't torqued very much. After some further shooting and tinkering I noticed a hairline crack.

Should I drill and insert a wood dowel, metal crossbolt/pin, or just use some thin glue and clamp? Other suggestions?

If fixing the crack doesn't make accuracy acceptable, would sanding the barrel channel to make it free floating be a good idea?
 

Attachments

  • IMG_20240111_151702_628.jpg
    IMG_20240111_151702_628.jpg
    31.5 KB · Views: 338
  • IMG_20240111_154222_518.jpg
    IMG_20240111_154222_518.jpg
    43.2 KB · Views: 341
I've repaired cracks of this kind with a glue that penetrates deep into the wood/crack, like 2P10 (thin formula).

But there seems to be a bedding problem with your action into the stock. Is there any recoil lug/pillars?
 
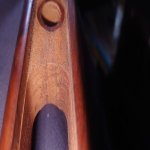
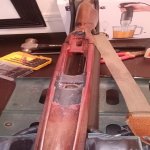
What I see in your picture is all hidden under metal - whatever you do to repair will not show once rifle is assembled. I would consider to gouge that out - chisel or saw - really open that up and then re-bed the thing with epoxy - you will want to fix the cause of that crack - could be drying too fast, or could be recoil lug bedding has gone wonky (punky wood), or never was adequate to start with. Your idea of dowels or pins I assume would be inserted from exterior - making them visible? I think that sort of crack could be repaired completely showing nothing once completed?

As far as making it shoot more accurately once the crack is fixed - most will say that a free floated barrel is ideal - but was many quite accurate guns made with "full contact" between barrel channel and barrel - but much harder to do, than to "free-float" and very susceptible to even minor moisture level changes in the wood. About worst is to have some contact at random. I do not know those rifles - is possible they had a "pressure point" in the forearm tip - supposed to be pushing up on the barrel - was common enough to sand those out to see if it would shoot better without. Was also a common enough thing to epoxy bed a pressure point back in, after discovering that the "free-float" did not improve things.

I'd suggest to make your changes one at a time - and have a good idea what is a valid confirmation of change - a single two or three shot group is not it. From your pictures, that appears to be a sporter / hunting rifle - create realistic expectations for that - is not likely that you will make it function as if it was an all-out bench rest or target type rifle - about now you should decide what "good enough" might look like - so that you know when you get there.

To give you some perspective - I try for about 1 MOA for my hunting rifles - most won't do that for 5 shot groups at 100 yards from sandbags - on demand. Most have done so, at least once, or a couple times, but seldom dependably, every time. That said, I have taken many dozens head of game with my rifles. I have never been in a formal target shooting competition, so requirements there might be different. But I think for that type of rifle and scope, a five shot group at 100 yards from sandbags, into a 1" group centre-to-centre, is doing very well. A "hunter" tends to depend on the one, first, cold bore shot - I understand some target disciplines have "warm-up shots" and "sighter shots", and then shoot for group size or the score of multiple shots.

I think the 6000 series was made by Husqvarna in last half of 1960's? - so rifle is circa 55 years old - give or take a few years. Maybe is best to refer to what "good performance" looked like then, compared to now, in 2024.
 
Last edited:
Free floating the barrel all the way may not be the solution. As Potash says "you will want to fix the cause of that crack".

Is the barrel free floating if the action is set tight into the stock? If not, you can always free float it and add pressure points as needed at a later time.
 
If that were my rifle, I would take a hacksaw and cut out the crack, then glass bed the receiver in a manner that will also fill the front and rear action screw holes with bedding compound from top to bottom.

Make sure to use a lot of release agent on the receiver screws, especially on the threaded area.

When everything has hardened up and you feel it's stress free, drill out the action screw holes with a slightly larger drill so they don't bind and create stress when everything has settled down.

This method is good for fixing that issue without having to add unsightly cross bolts or recoil shoulders. The glass bedding, if done properly, will do it all and strengthen the stock.
 
  • Like
Reactions: DGY
To repair the crack I'd dremel an area or areas for a machine screw with a nut on the end and either acraglas or epoxy it in.

See what happens after that if you want to proceed any further with bedding etc

for example using your photo

 
I think that crack is a natural 'check' in the wood from drying out more after the stock was machined.

I usually made a wedge I could place in the magazine area to force the crack wider... then force glue in it, remove the wedge, wipe away excess and let it dry. Then glass bed the recoil lug and that area behind...

I have also drilled and run a 6 x 32 brass rod right through the stock and filed it smooth to each side.
 
To repair the crack I'd dremel an area or areas for a machine screw with a nut on the end and either acraglas or epoxy it in.

See what happens after that if you want to proceed any further with bedding etc

for example using your photo


Yes.
 
To repair the crack I'd dremel an area or areas for a machine screw with a nut on the end and either acraglas or epoxy it in.

See what happens after that if you want to proceed any further with bedding etc

for example using your photo


Yup those Lightweight Husqvarnas are very attractive rifles but a longitudinal crack in the receiver area of the stock is a common problem with them. It usually first shows as a crack in the top tang area and by that time the hidden crack is more extensive and accuracy has deteriorated. This crack first appears out of sight, usually starting in the web between the trigger cut out, a very small area, and the magazine cutout. There often is no sign of setback where the recoil lug contacts unless the action screws have been allowed to come loose. My guess is that the root cause was that the very light stock, being very thin at the sides in this area, is flexing enough on firing to eventually start to crack at the weakest point, this little web. A very reliable repair can be made by routing out a cavity for a machine screw with nut as shown and epoxy it in place with the crack firmly clamped closed. Invisible with the rifle assembled, an easy, permanent, inexpensive repair. Also a good preventative measure and it can be used at the same time to reinforce the recoil lug bedding.
 
I’d try gluing first, then if that doesn’t work, a brass cross pin. Bed the action to make sure the barrel is floating and the action screws aren’t crushing/compressing the wood too much. Usually they crack behind the mag well, but the theory is the same to fix it.
 
I've attempted my first bedding job!

- dremmeled out for three 2mm nuts/bolts
- glued surface of crack along back and bottom
- free floated barrel by putting tape in barrel channel
- removed material between forward of chamber and back of recoil lug for epoxy bedding
- removed material on rear tang for epoxy bedding
- used Vaseline as a release agent, play doh to build a damn at barrel and tang
- mixed up JB weld Kwik

Pictures just show the bolt insertions
 

Attachments

  • IMG_20240117_100114_541.jpg
    IMG_20240117_100114_541.jpg
    46.6 KB · Views: 146
  • IMG_20240117_100836_384.jpg
    IMG_20240117_100836_384.jpg
    46.4 KB · Views: 143
Looks good - I hope that works for you!

I have done similar, but went at it different - maybe made some assumptions that I do not know are correct.

I used JB Weld Epoxy Steel - mostly because I can get the smaller squeeze tubes in town - in the past I have tried Devcon, MarineTex, etc. - came in larger containers - I think it was the hardener that set up long before I used it up - so, for me "false economy" to buy larger quantity and then toss most of it in garbage.

I assumed that the epoxy was at least as strong as the wood fibres - so I would cut out wood a lot and replace with epoxy - I assumed that did not weaken the thing. I also assumed that the stuff adhered to wood at least as strongly as wood fibres are bonded to each other - but I tried to make "mechanical locks" into the wood, or at least gouge or roughen it up for the epoxy to grab.

For what you are doing - I have a 3/8" (9.5 mm) diameter flat bottom bit - I would cut overlapping holes then clean up with a flat chisel - to end up with a 3/8" wide trench about half way through the wood. Pour in some epoxy. Lay in a length of 1/4" (6 mm) all-thread rod or cut off end from 1/4" bolt - I assume the epoxy can grab those threads snuggly. With the threaded rod in place, then pour more epoxy over top to fill up the trench - you can bed the recoil shoulder at same time, if that is done from the top.

You might consider to do similar repair between trigger slot and magazine mortice - is the next weakest area on most stocks - various commercial stocks have cross bolt visible or hidden back there - to hold stock together - thinner sides along magazine going to flex ("wow out") under recoil - often cause a split between magazine and the trigger slot. About no end to it - you can drill a hole from top of rear action screw down through to pistol grip cap, but not break through - then embed a 1/4" all-thread or similar in epoxy - a steel reinforced wrist to the stock - all hidden, once the rifle is re-assembled.
 
Last edited:
After a painstaking couple hours I got the stock released. Maybe Vaseline isn't the best release agent. But also I put way to much epoxy and mechanically locked in the recoil lug. To come out it would have to be pulled straight, not tilted.

So I dremmeled away as much as I could from underneath. Took a while. Had the GF try to pry the barrel out. No dice. Finally took a can of compressed air upside down and froze the bedding area. GF pulled it off with extreme force. Chip came off at the rear tang. Glued it back on. Also in my frustration and dremmelling I managed to damage the stock by the mag well. I'm just really happy it came off at all and I didn't destroy it all together. Also note JB Kwik sets up well real quick and I wouldn't recommend it for that reason though the consistency was nice.

Range day tomorrow!
 

Attachments

  • IMG_20240118_210141_829.jpg
    IMG_20240118_210141_829.jpg
    44.5 KB · Views: 83
  • IMG_20240118_210127_282.jpg
    IMG_20240118_210127_282.jpg
    54.9 KB · Views: 83
Next time, use the wax type Kiwi Shoe Polish.

It's about as close to Johnson's Paste Wax as you will get in Canada.

They both use Bee's Wax as a base and add stuff to make them easier to spread. I usually warm up the shoe polish so it will spread evenly/thin.
 
After a painstaking couple hours I got the stock released. Maybe Vaseline isn't the best release agent. But also I put way to much epoxy and mechanically locked in the recoil lug. To come out it would have to be pulled straight, not tilted.

So I dremmeled away as much as I could from underneath. Took a while. Had the GF try to pry the barrel out. No dice. Finally took a can of compressed air upside down and froze the bedding area. GF pulled it off with extreme force. Chip came off at the rear tang. Glued it back on. Also in my frustration and dremmelling I managed to damage the stock by the mag well. I'm just really happy it came off at all and I didn't destroy it all together. Also note JB Kwik sets up well real quick and I wouldn't recommend it for that reason though the consistency was nice.

Range day tomorrow!
Just read up of the modifications you did to your Husqvarna. Did the accuracy improve after free floating the barrel, and bedding the action?
 
Back
Top Bottom