


- Location
- Vancouver, BC
Hello, I purchased the Inline Fabrication Quick-change System and now I need to figure out how I'm going to store the presses while they are not in use.
I've never done any woodworking in my life so I dont understand what type of wood or what thickness I should use. I just know that probably hardwood is what I need to use since the reloading presses are pretty heav
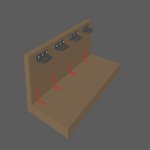
My idea was to build something out of 2 pieces of wood. One would be the base and one would be the backside where the inline fabrication hangers are attached to.
To join both pieces of wood I would some glue and long screws from the back. For more support, I would put L-Brakets (marked in red)
The hangers (marked in black) come with 3 screws 1.5" long.
The back wood needs to be around 3ft wide so my 3 presses and vice fits and about 1ft tall to clear the bottom of my longest press.
The wood would be around 2-3" thick. Not sure about what type of wood.
I live in a rental apartment so I cant set up a proper reloading area and mount heavy things to the walls etc. This is why I want to build something that if I move I can just move around into my new apartment.
Do you guys think this is the best option? What type of wood should I use, what thickness?
Many thanks!!!!!
View attachment 289763
I've never done any woodworking in my life so I dont understand what type of wood or what thickness I should use. I just know that probably hardwood is what I need to use since the reloading presses are pretty heav
My idea was to build something out of 2 pieces of wood. One would be the base and one would be the backside where the inline fabrication hangers are attached to.
To join both pieces of wood I would some glue and long screws from the back. For more support, I would put L-Brakets (marked in red)
The hangers (marked in black) come with 3 screws 1.5" long.
The back wood needs to be around 3ft wide so my 3 presses and vice fits and about 1ft tall to clear the bottom of my longest press.
The wood would be around 2-3" thick. Not sure about what type of wood.
I live in a rental apartment so I cant set up a proper reloading area and mount heavy things to the walls etc. This is why I want to build something that if I move I can just move around into my new apartment.
Do you guys think this is the best option? What type of wood should I use, what thickness?
Many thanks!!!!!
View attachment 289763


")


