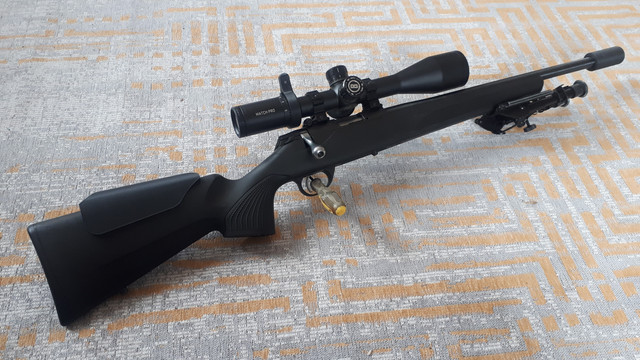
Help with designing T1x chassis

Jahnj0584

CGN frequent flyer
Rating - 100%
48   0   0
Location
Halifax NS
I'm a machinist. I'm also frugal and have free aluminum, tooling and a T1x. I'm throwing around the idea of making my own chassis based off the idea of an LSS from MDT.

https://mdttac.ca/lss-chassis-system/

My biggest questions are where to find the spec sheet for the AR15 grip platform and where you recommend I buy one as well as a buffer tube with adjustable check rests. (or 3D print my own....)

If you check my post history you'll see I've made two stocks from wood with cnc and by hand in the last year. I already have the T1x action entirely modelled in Fusion.

I am also open to the idea of doing a more Gray Birch style stock but I need a 'pad' at the buttstock since I also shoot off bags and put my left hand under the buttstock/on my bicep.

Very odd chance but if there's anyone with a chassis and 3D scanner maybe we can talk...


PD_LSS-RFChassis_02__02149.1650382426.jpg


Last edited:
For the AR-15 info do a search on 'AR-15 Technical Data Packages' or 'M16 Technical Data Packages'. They are around on the interwebz and downloadable in pdf format.


Mark
 
As tradition allows, Im going to make another wooden stock by hand this xmas vacation. I've started the modelling process and some of the machining steps. Most of it will be carved by hand, since a) no point modelling surfaces for 1pc and b) my basement flooded in Oct and insurance still hasnt given me my computer back to run my cnc at home. I will have to use the TM2 at work and just be patient with its 4k max spindle. The real concern now is how I do the bottom metal, either model it perfectly or just get long action screws (m6?) and trace/inlay it as I would with a guitar.


Here's how it stands right now.


The inletting for common actions and triggers should not be hard to find. Index off the centreline of the front mounting screw (for instance), and proceed. Therefore, you are really choosing the exterior profile. I personally dislike any stock that is a cheesegrator on my hands. A decade ago every hairybag had to (just absolutely had to) have a 'chassis' for his M14/M305. None that I handled - chassis' that is not hairy bags - was not designed to gouge out flesh. Whatever you choose should be smooth and flowing lines with minimal sharp or protruding edges. Secondly, remember that in Canada we have four months when the ponds are too hard to swim, and eight when they're too soft to skate on. Metal on skin is very uncomfortable; worse if you happen to touch a moist lip or nostril hair.

Secondly, I understand the flexibility and adjustability of those fancy 6 axis adjustable butts. After the first few trips, are you ever going to move things? Going back to my first point about sharp edges, why not set some outside lines and make wood or HMW plastic surfaces to conceal the clamps and screws. Three or four decades ago, Accuracy International started this evolution with clamshells. Were they wrong?
 
This is very interesting and I would be interested to see the final design as well.

I’m not sure if making your own buttstock or just having a similar interface to others would be the way to go.

I like the wooden model. It looks cool. Wish I had these skills. (I can do cad just not access to your level of equipment)

Also lefty friendly are always nice!

B
 
The inletting for common actions and triggers should not be hard to find. Index off the centreline of the front mounting screw (for instance), and proceed. Therefore, you are really choosing the exterior profile.

Do you have a source for any of these?


What are you using for wood?


Mark

A leftover piece of walnut. I used 1/2 of it to make the scorpio last year. I know it's not crazy figured, but it looks and feels great in person and I love being able to spend some time doing work by hand again.

 
Do you have a source for any of these? .....

No. But the interweb is a big place. Someone will have scanned the inletting for a Remington 700 Short Action (for instance) and posted it on line. I don't recommend trying to search on your phone because of the limits of word searches, back functions, and multiple open screens. I do my best work on a proper sized monitor, but I haven't looked for 3D files for anything. For that you're on your own.
 
No. But the interweb is a big place..

Eye roll. I look forward to seeing some of the ones you can find because there's nothing for step models or even proper prints.


Put a lot of hours into the program tonight. Programmed and cut a test out of a 2*4 from the workshop scrap pile.
It would've been a lot easier if I was just lazy and did a giant swimming pool cavity that Tikka does, but this is way harder and makes me feel a lot more satisfaction.

I turned some rods down to the M6 minor diameter to align the action and bottom plate. I'll need a blushing to go up to the bottom plate hole size, and can mark an exact location for the recess. I'll probably also have to do some internal relief work.

I ensure the action fits snug first, then add the magwell to check clearences. Then add just the trigger and repeat. Finally the entire assembly is test fit.

Should I be putting steel pillars in here as well? I can't help but think the recoil lug (which I'll also have to make to 0.246") is isn't going to be enough of in own over the years.


Last edited:
Don't forget the little shelf in the inlet to hold the bolt release pin in place. Actually need a wide shelf for T3 as well as T1, T1 needs a wider shelf. We just finished our new T3/T1 stock design and added that feature.
edi
 
Don't forget the little shelf in the inlet to hold the bolt release pin in place. Actually need a wide shelf for T3 as well as T1, T1 needs a wider shelf. We just finished our new T3/T1 stock design and added that feature.
edi

Not sure I fully follow. I don't see anything that needs to be added and everything fits.


Ran the walnut after some slight tweaks to where the bolt-end of the action sits. Tika actually side mills a profile into the end of the receiver.

Im going to only worry about carving all the wood over the holidays, then when I return i may open up the holes for steel pillars as well as make myself a Ti recoil lug. I think it'll be one or the other though in terms of necessity.
PXL-20231220-224413586.jpg


PXL-20231220-222629761.jpg
 
Not sure I fully follow. I don't see anything that needs to be added and everything fits.
]
I did a quick google. Would the pin holding the bolt release ‘button’ start to slide down over time if there isn’t a physical shelf to hold it in place? Compare the bolt release area of your factory inlet to yours where you have cut away material. You might see something.
 
I did a quick google. Would the pin holding the bolt release ‘button’ start to slide down over time if there isn’t a physical shelf to hold it in place? Compare the bolt release area of your factory inlet to yours where you have cut away material. You might see something.

I "see" what you mean, but a push pin a) shouldnt come out and b) won't fall down far enough to disengage with this inletting.


This is as far as I got yesterday before the family started to want to spend time together. Hoping to get some time in tonight or tomorrow. I'll 3D print myself a buttpadd in the future.


PXL-20231224-185100994.jpg
 
That looks fantastic! Wonder what it would look like with one of the flush 5rd mags.

I have been working on a t3x while in my vice just doing general cleaning with the stock off and did have the pin that holds the bolt release fall out while I was removing the bolt. It’s only happened once and I couldn’t recreate it but it did happen.

I’ve enjoyed watching this process makes me wish I had the tooling cause I’d love to make a chassis or stock for my t3x and t1x. You are an inspiration to us all.

B
 
I have a CPRS shoot this weekend (the only one this year in NS!) so I got my butt into gear and did some quick sanding to 150 and stipled the grip with my dremel and a ball burr. Mag base is printed. Scope lever is printed. Going to have to print out a buttpad tomorrow and maybe a cheek riser.

AP1GczMkJ18RW4LlimSPCA9MktFuEGE2dqvAEt1i16KaEiOQV-rVKs4tGjaNguIYUBkGjCiYyLY_b6lQEXkBi7TFG0ae-ZI8s2_bptmqplFzzo7a8SwoSUH3StzHmhVgidck4KqBgZdTJdlA5MIlk_b38fG3haOUJqH8535pW1CRc6LNACfbNxU8RSO-XlSeCWzm54PP7VoPjtSNLYDz62DDV3RE3TVWXe09Awb56WzQRXPM4yMHJz7typxa76Xkh4jqGn-e7YoM0buk2JCv9L3JqWw8gHfVmWjd3yoQ93AFobuBJG8nDkqBK6qX8Aaxu2u6rTji41IHlAuHkvjgL7cH5BWK58i1itQz2LB9IiMx_RKJ_t-jiHEwv63fZxIfHmTwMrhzes1BhEOflJLh30nhYNjUGt6xvkLxLzAWn263KoAf6Y8KOdQKpxV8Lp7btmTSR3mYWslCqWCS3V1eE0s4JBdFgMc9kDlgmpyAM0Vr-SNbHbW6TlIfWXN3OhKcWIviBUtRIkEKVf_Tc9-wn5lKP-2bTC_1_k1Byd132ZbyMEGZNjOilTsNAhO3s6Hs7s9kLnmbQmLEKZXtniG-lgE62bF9PPYceFEHDckGc4cq6-XFaKD_6aw5qEeIKsKPRVxML0UOCg4vwkvwNZxmP8QOM7B-VJFn8CvJC7h1dZSa6n27sfw9xfDTjGrClta4u2zzlfNs9Fce7EuPcOD_fTy-OnAW6e9OKKj_TIaPQ3dhdJ7UjMixKAsI0Ncxmih5ykutvEHflJmU02v-ALcizPnb-hJfaaO_HuUaA7OlkmPsU1jhwPvMPHMKzd4nx1OvEMnwUAYnKkYY8NQ0-R0YneB-GNDzTfIi0NGn_sZ6_3inhcEhhGiNQSttQALG0pHBEyy29_bemKSggm7OlEoOGaeELBjp2g=w2192-h1233-s-no-gm


AP1GczNVH_m7B8fYg-Rw1-BYn1-uY9yqVK2MCDLk4y_m58R6AwEKp1l3UERGYYWZzgLJlliZrHCHMxr8_nU_ltkz4Ee41mZeJM2lDhIK3djixSVSZ2XY5b_JzZdU43aVsomx2A_nnnGzQxwZq7dm_c0LnbI8yw=w969-h1292-s-no-gm
 
Back
Top Bottom