- Location
- Edmonton area, Alberta
Right, I bought this C96 at auction with a description of a dark bore. Well dark bore equaled throwing around half the projectiles that went through it sideways through targets. So... being the industrious type (read: cheap) with a lathe, I set about researching how to reline this sucker. Now, I'm a hobbyist doing this in my garage so I don't have a full sized lathe. I have a mini lathe. And that little bastard can do some incredible work if you decide to work around it's limitations. Usually at the cost of time. So to start, I was doing drawings and trying to figure out how much I could get away with drilling out the old barrel to make the liner acceptably thick. Then I found actual instructions on Lugerman's site on his broomhandle barrel restoration page.

Well that took the guess work out. So I ordered an aircraft drill (long drill bit) and a pair of reamers to take it to the finished dimensions.
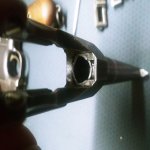
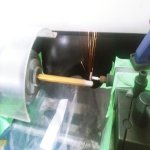
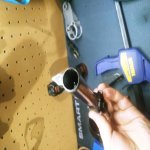
To drill out the old barrel, I wanted a piloted drill bit to start it. Couldn't find one to buy so I decided to make one. I needed a tool post grinder. Couldn't find one so I decided to make one. I fired up Freecad and had my buddy print one on his 3d printer. Onward to putting a pilot onto a drill bit.


Worked like a hot damn!
Had to add the angles to make a drill bit actually cut.

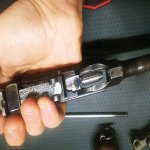
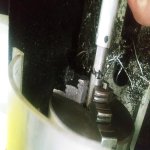
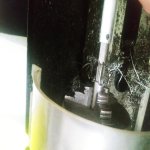
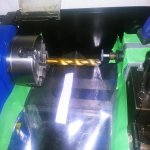
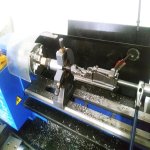
Time to pucker up and get this thing set up in my lathe. The front sight makes it so I'm unable to put it into my headstock so I chucked it into my 4 jaw and steady rest. I had made a rod that fit into the bore to indicate that everything was running true and concentric. Oh god typing that out makes it sound so easy. This took hours of frustration. Like I said, this machine's limitations usually cost time. I had to talk myself up to put a drill bit into this things chamber. My brain was screaming that I'd ruin a 110 year old pistol.
.jpg")

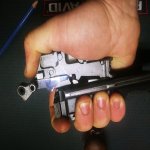
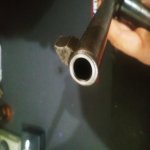
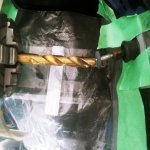
Once the drill bit touched the chamber there was no going back. I use a home made floating reamer holder as I can dial everything perfectly straight, but my tailstock definitely isn't. So I eliminate it from the equation. Drilling out the bore went swimmingly. I started with the pilot drill bit until it was 4 diameters deep, then swapped to the aircraft bit to finish. Reaming went even better. So now I had a .421" smoothbore broomhandle. The remaining barrel was real thin.


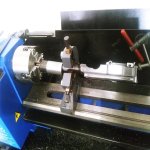
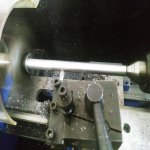
I spun the liner on centers to match the dimensions of the reamed holes. As I got it down to near its final dimensions (ie. thin) I would only advance the cutter 5 thou to keep deflection down. My micrometer says it worked. Took forever though. You can see how large the blank was when I started in this photo.

Well that took the guess work out. So I ordered an aircraft drill (long drill bit) and a pair of reamers to take it to the finished dimensions.
To drill out the old barrel, I wanted a piloted drill bit to start it. Couldn't find one to buy so I decided to make one. I needed a tool post grinder. Couldn't find one so I decided to make one. I fired up Freecad and had my buddy print one on his 3d printer. Onward to putting a pilot onto a drill bit.
Worked like a hot damn!
Had to add the angles to make a drill bit actually cut.
Time to pucker up and get this thing set up in my lathe. The front sight makes it so I'm unable to put it into my headstock so I chucked it into my 4 jaw and steady rest. I had made a rod that fit into the bore to indicate that everything was running true and concentric. Oh god typing that out makes it sound so easy. This took hours of frustration. Like I said, this machine's limitations usually cost time. I had to talk myself up to put a drill bit into this things chamber. My brain was screaming that I'd ruin a 110 year old pistol.
Once the drill bit touched the chamber there was no going back. I use a home made floating reamer holder as I can dial everything perfectly straight, but my tailstock definitely isn't. So I eliminate it from the equation. Drilling out the bore went swimmingly. I started with the pilot drill bit until it was 4 diameters deep, then swapped to the aircraft bit to finish. Reaming went even better. So now I had a .421" smoothbore broomhandle. The remaining barrel was real thin.
I spun the liner on centers to match the dimensions of the reamed holes. As I got it down to near its final dimensions (ie. thin) I would only advance the cutter 5 thou to keep deflection down. My micrometer says it worked. Took forever though. You can see how large the blank was when I started in this photo.
Attachments
-
 lugerman.jpg82.8 KB · Views: 1,272
 -
 tool post grinder.jpg68.2 KB · Views: 1,269
 -
 tool post grinder 2.jpg46.6 KB · Views: 1,267
 -
 tool post grinder 3.jpg72.1 KB · Views: 1,268
 -
 lathe setup (1).jpg74.1 KB · Views: 1,266
 -
 drilling bore.jpg80.6 KB · Views: 1,268
 -
 drilled barrel.jpg51.6 KB · Views: 1,258
 -
 after drilling.jpg39.7 KB · Views: 1,262
 -
 turning liner.jpg71.6 KB · Views: 1,260
Last edited: