I reline a Broomhandle barrel in my garage. Come check it out. Shooting update page 3

What an impressive piece of work and kudos to you for keeping it in original calibre, which I also reload for. The only thing I recommend to cap off such precise workmanship is to silver solder the liner in place. Done for life.
 
Silver solder means cooking the whole thing to red heat. Doesn't appeal to me.

I have installed 9mm liners, 1/2" OD, no shoulder, with a bonding agent. No problems whatsoever.
 
Silver solder means cooking the whole thing to red heat. Doesn't appeal to me.

I have installed 9mm liners, 1/2" OD, no shoulder, with a bonding agent. No problems whatsoever.

I agree, I use Devcon Titanium Putty when I'm installing barrel sleeves. 22rf up to US30 Carbine.

Many of the original barrels used on the commercial post war Universal receivers used surplus barrels that had been cut off just after the gas piston.

Back when the M1s became restricted, non restricted barrels were difficult to come by and expensive.

I went onto the internet to check out how they did it. Universal used everything from soft solder to dual base epoxies to hold the sleeves in place.

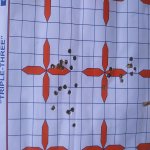
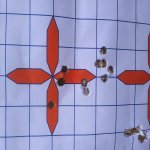
The last 30 M1 i did has a take off match barrel sleeved into the original barrel base, from just after the gas piston port to the chamber. It shoots very well.

It's had a few thousand rounds down the bore and there is no sign of it moving at all.

It's very important to keep the liner a few thousandths smaller than drilled out inside diameter of the original barrel I also like to leave it rough, so the epoxy holds better. Same with the outside of the barrel sleeve.

The next thing is to coat both the outside of the barrel liner and the inside of the original barrel with the epoxy. This ensures no air gaps.

A good friend in Salmon Arm, sleeved a 45 caliber muzzle loader, with a sleeve that came from Track of the Wolf in the US. That was at least a decade back.

I gave him enough Devcon Titanium Putty for the job.

He had a piloted drill made up and welded length of drill rod to it.

He had to do the barrel in 12 inch runs, moving the barrel forward in the chuck until he could drill out the whole 30 inch length.

He did a good job. That old Kentucky Rifle is still shooting a few hundred shots each year.

Levon12345, very nice job. I don't think I would have attempted it myself. My hat's off to you.
 
Very resourceful, skillful to do such a nerve racking project. Thanks for the pictures on the project which are very interesting. A nice C96 is on my dream list...key dream list.
 
There was a small shop in Canada specialized on relining C96. For some reason they quit. I've bought a relined C96 from EE a few years ago. The relining was done by that shop from what I know. The guy said he never shot it ever since. I have put about 200 rounds though it so far. The lining holds well and it shoots very accurate - I did not need adjusting sights too much. And only one FTE so far. Very happy with it. Although I keep my loads within 1000fps - just enough to cycle it. So there was no much stress put on it.
 
Shoulder on the liner is fine. Its now like a chamber insert. That head spaces of the shoulder.

Ive done it that way a few times with liners i use lead solder to lock it in place. Without a shoulder id suggest silver solder to hold it in there. If the barrel was 4140 even annealed it will hold the pressures no issue. So just let it cool on its own after its red hot.

Nice work though man. Looks good
 
Update: she shoots! Ran forty reloads through it. The first 5 rounds failed to eject and had to be tapped out with a cleaning rod but after that no problems. The brass looks excellent. Both these groups are at 10m. They're hitting ~3 inches high. I was aiming at the cross below the groups. These pictures are sideways for some reason.

20210306_122526.jpg
Top group is twenty rounds. 5 of them were the ones that failed to eject. The left/right dispersion was definitely me. Too giddy to shoot straight.

20210306_122519.jpg
This one shows me that if I do my part the pistol will stack them a lot closer to each other.
 

Attachments

  • 20210306_122526.jpg
    20210306_122526.jpg
    67.9 KB · Views: 381
  • 20210306_122519.jpg
    20210306_122519.jpg
    50.9 KB · Views: 380
Last edited:
Glad to see your work steps. And glad to read the informed comments from others who have walked those same steps in the past.
 
Wow!
That is quite an amazing post! Congratulation with your nice work!
I have a question for you. I've got my C96 relined (in 30 Mauser) by C96 Canada and it didn't turned out too well. To make a long story short, a piece of the chamber broke after the first shot... I sent it back to them and it took them almost 3 years (seriously, no joke) to try to fix it with epoxy. I finally manage to get my upper back last week although they were not quite done with it. I test fire it one shot and the chamber still look like crap and the brass got deformed and stuck in it. Here are some nasty pictures of my chamber. Do you think it could be possible to fix it or it FUBAR?

IMG_0983.jpeg
IMG_0985.jpeg
IMG_0991.jpeg
IMG_0984.jpeg
IMG_0987.jpeg
 

Attachments

  • IMG_0983.jpeg
    IMG_0983.jpeg
    96.5 KB · Views: 286
  • IMG_0985.jpeg
    IMG_0985.jpeg
    68 KB · Views: 285
  • IMG_0991.jpeg
    IMG_0991.jpeg
    59.3 KB · Views: 287
  • IMG_0984.jpeg
    IMG_0984.jpeg
    83.6 KB · Views: 287
  • IMG_0987.jpeg
    IMG_0987.jpeg
    115.1 KB · Views: 287
Back
Top Bottom