In over my head!!

Potashminer

CGN Ultra frequent flyer
Uber Super GunNutz
Rating - 100%
586   0   0
Location
Western Manitoba
So, when profiling a barrel from a barrel blank - how does one cut a curved area - for guessing and discussion numbers - let's say you are at 1.000" and want to go to 1.200" over four (4) inches. I think I know how to do so in a straight line - but if I wanted it to be convex - without measuring, let's guess at a 12.00" radius. I know it is done - but I do not know how. Any hints?

And we are talking "home guy" in his shop with old school manual lathe - is nothing CNC here, whatsoever.
 
I always did it by hand feeding the compound as the cut progressed. Pretty lumpy at first... lots of filing and/or belt sander...

It gets better after about a hundred... Finish polishing on a belt sander with the barrel in a spinner.
 
High speed steel ground to any shape you want. I got some plate tool steel and made a few rad cutters for lee Enfield barrel profile where the knox meets the barrel taper. I oil quenched it even thought it was d2 and put it in my adjustable tool post and set it just below center.

It was 1" wide 4"long and 1/2' thick. Drew it out then removed what I didn't want and then clearanced the cutting edge


here is one of the ones i made, this is carbide and made for a 3.25" rad (6.5" circle) but it could be this size and ground for a 20" rad if you wished.

pick up some plate d2 or 02 and you can cut it with a bandsaw, its very soft when its unhardened then you can make all kinds of tools

53494372523_a12293b93e_b.jpg


53494525539_d3e7240a20_b.jpg
 
Last edited:
One possible, lots of others.
On manual lathe
Find a way to mount a template (pattern) on the back of the lathe bed.
Mount a follower on the cross-slide to touch the pattern.
Disconnect the cross feed screw
Use the compound to set cut depth
Cut right to left (forces the carriage back) to follow the pattern.
Final finish by hand
YMMV
 
Personally, I have used a paper template and a pointer mounted to the cross slide, to profile some pretty interesting curves and shapes. Paper is cheap, and it's dead easy to play around with different radii, until you find the one that pleases your eye. Mount the paper on a flat piece of whatever (I used box cardboard and tape) so it is in a fixed position, then adjust the template to fit the appropriate part of the barrel you are shaping, comparing where the tool is on the part, to the pointer on the template you drew.

With a nice convex end on a HSS tool bit, you can simply plunge in on the stock, until the pointer reaches the template line, move over, rinse, repeat along the length of the transition. A big radius on the end of the bit (or a round, carbide insert cutter), and the ridges left are pretty small and easy to polish out with some abrasive paper.

Unlike oldstarfire's suggestion, you always have control of the lathe. No need to take things apart, either.
 
ball or radius turner

I do it mostly free hand (rough / oversize ), file, sand etc. the last bit. If you have a taper attachment and several the same to do, you could modify it to take a template.
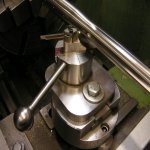
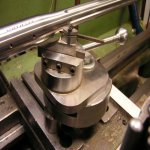
Here's a couple pictures of a ball / radius turner I made years ago, honestly never used it to profile a barrel but it would work. Light cuts only.
PICT0236.JPG
PICT0237.JPG
 

Attachments

  • PICT0236.JPG
    PICT0236.JPG
    105.4 KB · Views: 497
  • PICT0237.JPG
    PICT0237.JPG
    108.2 KB · Views: 499
build a radius tool, that replaces your tool post, lots on YouTube to copy.
ball cutter/radius cutter lathe

IMO, as nice a curve as a Radius Tool can make, getting it set up to have the curve blend in well and where you planned to have it end up, is a bit of a guessing game.

If the OP can live with a little bit of dicking about, to get it set up, it is worth noting that the only real criteria, is that the tool tip be at the correct radius, and at the center height of the lathe, so it could be done with something as simple as a slab of about anything with a bolt hole through it to pivot around. Put a big bloody handle on it so you have some control over the movement (handle length is leverage, is control!), and see to a block of material under the tool, to support it against being pushed down off center.
 
... and be prepared for tool chatter...

slower rpm, faster feed, pointy tool...
 
Last edited:
"tool chatter" - seems to be the constant story here - either that, or harmonics - is lots of "operator does not know how" here, and really thinking the old lathe is not set up solidly enough. I can usually recover from worst cases using the lathe file.

By the way - Thanks to all for the reply posts and the PM's - has been some good ideas to try - I will either get something to work, or I won't.
 
ah yes the tool chatter and barrel harmonics.....

someone had posted some pictures of their setup where they had build harmonic dampeners that bolted to the cross slide for when they were working on profiling barrels.
 
I have used a copier set-up, wherein the cross slide was disconnected and used a spring to maintain contact against a pattern. I have also used a similar set up where I simply fed the carriage forward and the cross feed outward by hand. The third method, which I have also used, was described by Tom Burgess as the "Etch-a-Sketch method, which is self explanatory. Ron Smith showed me a real clever set-up he used which incorporated a saw blade, a mix master, and a contact switch.
 
I have used a copier set-up, wherein the cross slide was disconnected and used a spring to maintain contact against a pattern.

When I bought Sam's lathe he was working on building a copying attachment as you describe. He had the plans drawn out. I was too busy working to ever get the time to do it... but I wish I had taken the couple of weeks to do it...

For 50 years I simply fed the carriage forward and the cross feed outward by hand and an offset tailstock for the main taper ... it worked.

I have gone so far as to make up the parts, but have yet to put everything together. Maybe this year!
 
Back
Top Bottom