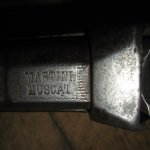
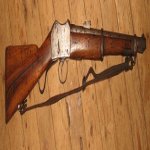
Martini Henry chamber reamer

If you know the exact dimension you are looking to achieve, take a look at ordering a chucking reamer of the size needed for the neck area alone. Check out KBC Tools as a starting point, they do mail order and have several outlets throughout Canada.

If there are none listed, phone and ask about having a special ground to size. Usually not much added cost, but the wait time will be longer.

A chucking reamer has a 45 degree leade that will center itself in an existing hole, and does not cut a taper (unless you have one ground to do so. You would need to make a pilot bushing of some sort (possibly a salvaged head from a cartridge case that split, say) and have it bored out or carefully drilled out to be a close fit on the shank of the reamer. A collar that can be clamped tight on the shank will stop the reamer from being fed in too bar, set it to length against the bushing, maybe fudge a little short on the first go, and remember that the distance is measured at the corner of the 45 degree leade of the reamer, not the front end.

The bushing keeps things straight, the stop keeps it from cutting deeper than you might want. Reamers under 1/2 inch are pretty affordable.

Cheers
Trev
 
Thanks Trev,

I have been thinking along those lines.

The neck seems to be giving me a tight spot. I know that a couple of turns with a finishing reamer would clean everything out.

I might just bite the bullet and order one up. Now I need to research a set of dies do go along with the cutter. Apparently there are a couple of different variations on the neck sizing with different brands of die so choosing one isn't that simple..

So for now I just keep giving mine a little extra squeeze in the neck and keep the fire formed brass to that rifle. Thinking of paper patching them in a different colour so I can tell at a glance which is which. Not ideal as I wanted the carbine to chamber a standard round.

IMG_6136.jpg
 

Attachments

  • IMG_6136.jpg
    IMG_6136.jpg
    52.1 KB · Views: 168
Buy the reamer and clean the chamber up then locally have a couple dies made up using the reamer...kind of mitigates the reamer cost. I have done this for a 38-56 that worked quite well. I form 45-70 cases down to 38-56 in these home made dies.
 
I cant find anybody fairly locally with a finishing reamer. I cringed at the thought of shelling out three hundred bucks for a tool that I might use once in a blue moon. Plus the wait time to get it made and shipped up.

So I revisited the project...

I took a scrapped cartridge case that had a slit in the neck and cut off the neck completely. The thing chambered no problem so that confirmed that the issue was in the neck.

I selected a piece of wooden dowel that fit the bore loose and long enough to reach the receiver from the muzzle. I cut a slot in one end with a hack saw to take a strip of emery tape.

I then carefully measured and marked the dowel holding it on the outside of the barrel to gauge as to where it would need to be for the emery to be positioned in the neck area.

Slid the dowel up to the receiver, slipped in my strip of emery tape into the slot, rotated and pulled everything into position, gave it a shot of gun oil. The dowel end was chucked into my hand brace drill and given 100 turns. Whatever was in there, it was black coming out, so I think that I was polishing out carbon deposits.
Cleaned the oil residue out and tried a sized case measuring as to how far it went into the chamber. It stuck out about 3/8 inch.

I changed the emery tape and gave it another 100 turns, cleaned everything up and tried the same case again. I noticed that it could be inserted further into the chamber just a coontair.

The tape was changed 27 times and I hand cranked each one 100 turns. The chamber is now polished bright and the cartridge slips into position with that satisfying thunk of a round going home.

With the chamber so carboned up and the bore being so black, I wonder if this one has been used for blank fire? The bore is cleaning up better each time I shoot it and scrub. There is actually some shine coming back as the rifling gets more pronounced. It looks very promising. I might try lapping the bore.

 
Nice to be making progress on a project gun like that. Great work!
Before lapping the bore you might want to try bronze wool or chore boy copper pot scrubbers along with a de-carbon solvent like carburetor cleaner etc. This should take out carbon and lead without marking the steel.
It might take a while but it sounds like you are a patient fellow. :)
 
The amount of black coming out of that tube is amazing. I have been using a bronze brush and Hoppes.

Carb cleaner sounds like a great idea, thank you. Carbon is for what it was formulated to remove.

The carbine is almost shooting to point of aim. Just needs a little more TLC and maybe some load development. All part of the fun, not only fixing the gun, but then getting it to shoot well enough to use for hunting. This is a ten year ongoing project.

Patience is something that I do have, or is it stubbornness to give up and dogged determination? But everything takes much longer to do these days. Things seem to turn out better if I take my time. Funny how that works!

Anyway, bench cleared. Onto the next project!

IMG_3891-2.jpg
 

Attachments

  • IMG_3891-2.jpg
    IMG_3891-2.jpg
    63.3 KB · Views: 71
I cant find anybody fairly locally with a finishing reamer. I cringed at the thought of shelling out three hundred bucks for a tool that I might use once in a blue moon. Plus the wait time to get it made and shipped up.

So I revisited the project...

I took a scrapped cartridge case that had a slit in the neck and cut off the neck completely. The thing chambered no problem so that confirmed that the issue was in the neck.

I selected a piece of wooden dowel that fit the bore loose and long enough to reach the receiver from the muzzle. I cut a slot in one end with a hack saw to take a strip of emery tape.

I then carefully measured and marked the dowel holding it on the outside of the barrel to gauge as to where it would need to be for the emery to be positioned in the neck area.

Slid the dowel up to the receiver, slipped in my strip of emery tape into the slot, rotated and pulled everything into position, gave it a shot of gun oil. The dowel end was chucked into my hand brace drill and given 100 turns. Whatever was in there, it was black coming out, so I think that I was polishing out carbon deposits.
Cleaned the oil residue out and tried a sized case measuring as to how far it went into the chamber. It stuck out about 3/8 inch.

I changed the emery tape and gave it another 100 turns, cleaned everything up and tried the same case again. I noticed that it could be inserted further into the chamber just a coontair.

The tape was changed 27 times and I hand cranked each one 100 turns. The chamber is now polished bright and the cartridge slips into position with that satisfying thunk of a round going home.

With the chamber so carboned up and the bore being so black, I wonder if this one has been used for blank fire? The bore is cleaning up better each time I shoot it and scrub. There is actually some shine coming back as the rifling gets more pronounced. It looks very promising. I might try lapping the bore.


Gunsmiths working on obsolete calibers. Use a reamer once and they often give that reamer to the customer.

 
Back
Top Bottom