TacticalTeacher
CGN Ultra frequent flyer
- Location
- Georgian Bay, ON
Bruce Lee once said, "Focus on the things you have and not the things you don't have...." I agree. Like money, I don't have a shzt ton of it, but I'm pleased that I am healthy (no cancer or flu or infzcktions) 
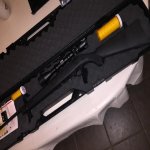
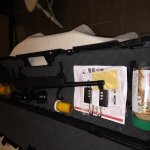
I cannot leave my kids a pile of money when I shuffle off this mortal coil, but I can leave them some greatly tuned Remmy rigs. My second son just got his R/PAL and wanted to get rolling with his CORE (BC hunting course) certification. So in anticipation I found this M700 at Ellwood Epps today. It was used but I found some delightful discoveries.
If you have ever wondered how a Precision Rifle or CQB Match Director gets their rig ready for hunting season, here ya go!

A few patches through the bore and they were very faint grey. That's a great sign! I used these 2 bore cleaners....

Once the barrel was done, I found it was shiny and near new. What's not to like? The bolt face barely had ANY brass rubbings and chips. This thing was hardly fired...
So time to hit the exterior, I took my white grease pencils and white crayons (search the bottom of your kids' Crayon bucket) to mark up the engravings from the factory:


Why do this? Because it's cool! That's why.... Besides, I don't want water being trapped in the markings/stampings when I'm' hunting and have to case up a wet rifle when we transport/move by motorboat!
Then the next step is to rub down all the metal surfaces, especially the Remmy M700 SPS factory (bead blast and blue) which is not always the best, but hey, I understand it was a great price. I don't mind! I rub that wax into the rough textured SPS finish so that all the metal pores have wax inside them. Repels water, too.
If you don't have Neutral Shoe Polish, Carnauba wax from Cambodian Tire (hey, don't get offended my Cambodian brothers, I'm asian... it's all good )
)
Now it's time to grease your lugs (oh I did wax the bolt body) . And I also placed a dab of grease on BOTH bolt lugs (2 on a Remmy 700 bolt)

Time to install my Weaver Picatinny rail... why a Pic rail? Because I'm not certain of his eye relief (He's in Whistler, BC and I'm here in Ontario) and the ARMS 22 rings will allow him to shift the scope placement forward or backwards to suit his facial geometry.

Time for the cheekpiece to get his eye up higher...

This is a trial and fit and try again to get the velcro backed straps tight and balanced without any loose free ends.

All done, now...
Speaking of facial geometry, since the SPS rifle has a scope, I need to raise his cheekbone/face to the scope level with a Blackhawk cheekpiece (Ellwood Epps for $45 plus/minus)
Attached and tightened... sometimes if your rings are quite high, I place a strip or 2 of higher density foam (pipe insulation is very soft, something stiffer will do )
Okay, here comes the scope with rings mounted (but from another rifle, so tweaking is needed)

And move the scope forward in the Picatinny rail slots (recoil and all) then tighten up the ARMS22 throw levers:

As you can see, this scope inside the rings on this Pic rail is not very level.... Needs work, so here goes...

Loosen all ring screws until the scope tube turns freely in the rings. Place level on hopefully a top flat surface and rotate until it's bubble is happy in the middle.

Then start tightening each side a quarter or half turn, ensuring that bubble stays in the middle. Work one side at a time and alternate sides, just keeping that bubble happy between the lines...
Now it's time for the Tourbon Rubber bolt handle (Amazon dot ca is your friend). I bought these for $16 mailed from Xhina. They include TWO sizes. Here is the small one:

The 2 sizes of balls are shown here and the large ball loves this Remmy bolt knob. I rubbed paste wax on the knurled bolt knob first since that helps lubricate the installation (just shove and twist and swear lots) of the knob on the Remmy handle.

And here is the final rig ready to send off to my son! Of course I will sight it in before I Expedite it to him in a hard case....

And that is my preparation for my son's future deer/bear/moose/elk/zombie engagements. I hope you learned something out of this adventure!!
Cheers,
Barney
I cannot leave my kids a pile of money when I shuffle off this mortal coil, but I can leave them some greatly tuned Remmy rigs. My second son just got his R/PAL and wanted to get rolling with his CORE (BC hunting course) certification. So in anticipation I found this M700 at Ellwood Epps today. It was used but I found some delightful discoveries.
If you have ever wondered how a Precision Rifle or CQB Match Director gets their rig ready for hunting season, here ya go!
A few patches through the bore and they were very faint grey. That's a great sign! I used these 2 bore cleaners....
Once the barrel was done, I found it was shiny and near new.
What's not to like? The bolt face barely had ANY brass rubbings and chips. This thing was hardly fired... So time to hit the exterior, I took my white grease pencils and white crayons (search the bottom of your kids' Crayon bucket) to mark up the engravings from the factory:
Why do this? Because it's cool! That's why.... Besides, I don't want water being trapped in the markings/stampings when I'm' hunting and have to case up a wet rifle when we transport/move by motorboat!
Then the next step is to rub down all the metal surfaces, especially the Remmy M700 SPS factory (bead blast and blue) which is not always the best, but hey, I understand it was a great price. I don't mind! I rub that wax into the rough textured SPS finish so that all the metal pores have wax inside them. Repels water, too.
If you don't have Neutral Shoe Polish, Carnauba wax from Cambodian Tire (hey, don't get offended my Cambodian brothers, I'm asian... it's all good
)Now it's time to grease your lugs (oh I did wax the bolt body) . And I also placed a dab of grease on BOTH bolt lugs (2 on a Remmy 700 bolt)
Time to install my Weaver Picatinny rail... why a Pic rail? Because I'm not certain of his eye relief (He's in Whistler, BC and I'm here in Ontario) and the ARMS 22 rings will allow him to shift the scope placement forward or backwards to suit his facial geometry.
Time for the cheekpiece to get his eye up higher...
This is a trial and fit and try again to get the velcro backed straps tight and balanced without any loose free ends.
All done, now...
Speaking of facial geometry, since the SPS rifle has a scope, I need to raise his cheekbone/face to the scope level with a Blackhawk cheekpiece (Ellwood Epps for $45 plus/minus)
Attached and tightened... sometimes if your rings are quite high, I place a strip or 2 of higher density foam (pipe insulation is very soft, something stiffer will do )
Okay, here comes the scope with rings mounted (but from another rifle, so tweaking is needed)
And move the scope forward in the Picatinny rail slots (recoil and all) then tighten up the ARMS22 throw levers:
As you can see, this scope inside the rings on this Pic rail is not very level.... Needs work, so here goes...
Loosen all ring screws until the scope tube turns freely in the rings. Place level on hopefully a top flat surface and rotate until it's bubble is happy in the middle.
Then start tightening each side a quarter or half turn, ensuring that bubble stays in the middle. Work one side at a time and alternate sides, just keeping that bubble happy between the lines...
Now it's time for the Tourbon Rubber bolt handle (Amazon dot ca is your friend). I bought these for $16 mailed from Xhina. They include TWO sizes. Here is the small one:
The 2 sizes of balls are shown here and the large ball loves this Remmy bolt knob. I rubbed paste wax on the knurled bolt knob first since that helps lubricate the installation (just shove and twist and swear lots) of the knob on the Remmy handle.
And here is the final rig ready to send off to my son! Of course I will sight it in before I Expedite it to him in a hard case....
And that is my preparation for my son's future deer/bear/moose/elk/zombie engagements. I hope you learned something out of this adventure!!
Cheers,
Barney
Last edited: