


I have a small batch of Berdan primed .303 brass marked 303MK8Z PP-73. Once fired, pretty much useless to me in that state. So, I figured I'd give the shotgun primer trick a whirl.
No dimple inside between the two flash holes, rule that out. Drilled the primer cup out, pried what was left of the primer out. Using the primer pocket as a pilot, I drilled 1/4" in. hole right through. Tough to get it centered, but it does a good enough job. Counter sunk the new hole enough to have a shotgun primer sit flush. Apply red Loctite to the sides of the primer, slip it into the hole.
Loaded up approx. 10 gr. 700X, crimped a 185 gr. LEE GC WW bullet. Took the 6 rounds out to my "testing ground, fired them off in my original Lithgow musket. All 6 expanded ok, no cracks.
Knocked out the spent primers, loaded up another 10 gr. 700X, crimped in a LEE WW 210 gr bullet.
Here's what they look like: original brass on the right; primed and ready to shoot middle and left.

No dimple inside between the two flash holes, rule that out. Drilled the primer cup out, pried what was left of the primer out. Using the primer pocket as a pilot, I drilled 1/4" in. hole right through. Tough to get it centered, but it does a good enough job. Counter sunk the new hole enough to have a shotgun primer sit flush. Apply red Loctite to the sides of the primer, slip it into the hole.
Loaded up approx. 10 gr. 700X, crimped a 185 gr. LEE GC WW bullet. Took the 6 rounds out to my "testing ground, fired them off in my original Lithgow musket. All 6 expanded ok, no cracks.
Knocked out the spent primers, loaded up another 10 gr. 700X, crimped in a LEE WW 210 gr bullet.
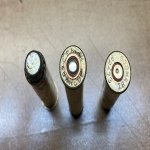
Here's what they look like: original brass on the right; primed and ready to shoot middle and left.
Attachments
Last edited:


