Project Hopkins and Allen Ranger no. 2 hand spring and indexing

theophys

Member
Rating - 100%
1   0   0
Location
GTA
Bubba here :)

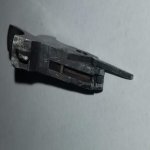
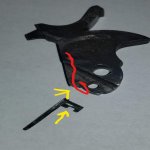
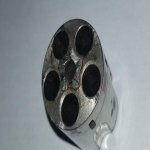
Just picked up a "project" 32RF Hopkins and Allen Ranger no. 2 with the comments "only moves cylinder if pointed downward, 3 out of 5 index well, the remaining 2 need help.

Upon disassembly it was clear where the first problem is: there is some kind of spring missing that is supposed to extend the indexing... sear? hand? lever? out of the frame when the hammer is being cocked. Any leads to a replacement spring or its drawings or specs? From first principles a carefully bent piece of spring steel fixed by the small pin and exerting pressure on the flat part of the hand's pin (see pic) should work - was it the supposed design or was there something more complicated such as a leaf spring there?

Also: any tips on how to correct indexing? Again from first principles, the key driving force factor be the angle between the "hand" and the indents on the cylinder (what's all of this called properly?), so if it gets stuck it engages too early and needs gentle filing to smooth out and if it fails to move it fails to engage and needs filing "into" the indent? There definitely should be a good book abut this...

P.S. Any leads on once fired 32RF brass? Want to give this baby a field test once restored.

THANKS!

20221226_214150.jpg
Inked20221226_214239.jpg
20221226_214050.jpg
 

Attachments

  • 20221226_214150.jpg
    20221226_214150.jpg
    26.3 KB · Views: 146
  • Inked20221226_214239.jpg
    Inked20221226_214239.jpg
    33.5 KB · Views: 147
  • 20221226_214050.jpg
    20221226_214050.jpg
    33.5 KB · Views: 149
You might be able to make a spring from round music wire, or from a narrow strip of flat spring stock. Either way, its going to take time and experimentation. I did a quick 'net search and couldn't find a diagram, let alone a parts supply, apart from a few pieces offered by GPC.
The cylinder is potentially a much more serious problem. The ratchet is not in good shape. I expect it is an integral part of the cylinder. Someone will likely suggest building it up with weld and recutting it. I suppose a really good TIG welder could do that.
I don't want to sound discouraging, but you have a beat up revolver that was cheap back when it was made. It might be repairable as a personal project, but I really don't think it is worth spending money on repairs. Put it in a shadow box for display or sell it as is and put the money toward something that is in working condition.
How are you planning on reloading fired .32RF cases?

Thanks - this will certainly not be my go-to competition gun so if I can get it to kinda sorta index all the chambers and go bang I'll be more than happy. As it is, having it to index 3 out of 5 *without hand spring* is what I'd call a good result, definitely not warranting welding up and re-machining (for which I also have neither skills nor equipment - I guess I would need some sort of a CNC mill for this?).

Re reloading 32RF - I have some DIY primer compound mixture ordered from USA, originally intended for making percussion cups and reloading 22LR, that I can put to use here. Add a little pyrodex and round ball, and working up... (But I'll need to finish my "ballistic box" project first. No way I am holding it in my hand as I experiment.)
 
You have the right concept with regards to the hand spring. The Otis Smith revolvers used the same setup, I did the same repair on one some 30 yrs ago and as I recall, it was neither difficult nor time consuming.
I forged a reclaimed piece of round spring down to the approximate thickness. The spacing between the anchor pin and the bottom of the slot is your thickness guide. Forge to thickness, file to width. I used a hand held propane torch, a carpenter's hammer, a vise, a hacksaw, and files. There is no need to polish with sandpaper as long as you use a fine cut mill file and keep the scratches longitudinal.

The back end of the spring projects enough behind the anchor pin to give it some tension and leverage, which is enough to hold it in place, while the business end of the spring is arched slightly to keep it clear of the bottom of the slot so that its bearing action on the flat of the hand axle is not impeded.
The bearing point of the spring needs to be on the lower side of the axle flat in order to bias the hand toward the ratchet. There is not a lot of leverage available in this geometry. It's easier to make it work hands on rather than to describe it. You will have to guess as to how much to preload the spring.

Although I have been lead bath tempering my springs for more decades than I care to count, when I did the Otis Smith I simply quenched in brine and tempered by colour on a piece of copper. A piece of scrap steel would do as well, anything to keep the torch flame off the spring. Lightly polish the spring so that you can see the colours coming up. Go for a uniform dark blue. No problem if you overshoot the colour, it might still work, and if it doesn't , just re heat treat, it's only a few minutes work.

I don't have suggestions to give you on indexing without examining the gun. There could be subtle factors at play and any advice, no matter how well intended , could be bad advice.
 
Thanks - this will certainly not be my go-to competition gun so if I can get it to kinda sorta index all the chambers and go bang I'll be more than happy. As it is, having it to index 3 out of 5 *without hand spring* is what I'd call a good result, definitely not warranting welding up and re-machining (for which I also have neither skills nor equipment - I guess I would need some sort of a CNC mill for this?).

Re reloading 32RF - I have some DIY primer compound mixture ordered from USA, originally intended for making percussion cups and reloading 22LR, that I can put to use here. Add a little pyrodex and round ball, and working up... (But I'll need to finish my "ballistic box" project first. No way I am holding it in my hand as I experiment.)

Why not get reloadable cases that use a .22 blank or find some .32 short colt brass and drill out the rear for .27 Hilti gun blanks.
 
You have the right concept with regards to the hand spring. The Otis Smith revolvers used the same setup, I did the same repair on one some 30 yrs ago and as I recall, it was neither difficult nor time consuming.
I forged a reclaimed piece of round spring down to the approximate thickness. The spacing between the anchor pin and the bottom of the slot is your thickness guide. Forge to thickness, file to width. I used a hand held propane torch, a carpenter's hammer, a vise, a hacksaw, and files. There is no need to polish with sandpaper as long as you use a fine cut mill file and keep the scratches longitudinal.

The back end of the spring projects enough behind the anchor pin to give it some tension and leverage, which is enough to hold it in place, while the business end of the spring is arched slightly to keep it clear of the bottom of the slot so that its bearing action on the flat of the hand axle is not impeded.
The bearing point of the spring needs to be on the lower side of the axle flat in order to bias the hand toward the ratchet. There is not a lot of leverage available in this geometry. It's easier to make it work hands on rather than to describe it. You will have to guess as to how much to preload the spring.

Although I have been lead bath tempering my springs for more decades than I care to count, when I did the Otis Smith I simply quenched in brine and tempered by colour on a piece of copper. A piece of scrap steel would do as well, anything to keep the torch flame off the spring. Lightly polish the spring so that you can see the colours coming up. Go for a uniform dark blue. No problem if you overshoot the colour, it might still work, and if it doesn't , just re heat treat, it's only a few minutes work.

I don't have suggestions to give you on indexing without examining the gun. There could be subtle factors at play and any advice, no matter how well intended , could be bad advice.

Thanks a lot! I already experimented a bit and can see that it is doable, is only a matter of getting the correct sized spring steel stock so that it is both held firmly by the anchor pin. And thanks for the advice on heat treatment! (I guess I can do a lead bath too, have a melter lying around waiting until I get into bullet casting craft).
 
Thanks - this will certainly not be my go-to competition gun so if I can get it to kinda sorta index all the chambers and go bang I'll be more than happy. As it is, having it to index 3 out of 5 *without hand spring* is what I'd call a good result, definitely not warranting welding up and re-machining (for which I also have neither skills nor equipment - I guess I would need some sort of a CNC mill for this?).

Re reloading 32RF - I have some DIY primer compound mixture ordered from USA, originally intended for making percussion cups and reloading 22LR, that I can put to use here. Add a little pyrodex and round ball, and working up... (But I'll need to finish my "ballistic box" project first. No way I am holding it in my hand as I experiment.)

A file, a LOT of patience, and a really good idea of cause and effect, as far as getting the cylinder to time properly. In the factory, these would have been placed on an accurate fixture, and indexed around to get all the same with a milling machine cutter. If you need to, you make all the ratchet teeth the same, and make a longer hand, to make up for metal removed, so the cylinder advances correctly.

A flat punch and a small hammer, may be handy too, to reform any displaced metal, back to where it needs to be. Gentle taps. Lots of them. works OK on munged screw heads too. Up to a point.

There was (is?) a French outfit selling reloadable rimfire cases, that use an offset bored hole in the rear of the case so a stripped .22 case, or a Hilti style blank, can be used either as primer or sole source of power. You could probably make your own, if you could find some suitable modern brass (not old balloon head cases), with some patience and a decent drill press.

As a means to test things, a small dab of silicone sealant, placed between where the hand rests in it's forward position, and the back wall of the notch in the hammer, allowed to cure, can be used as an ersatz spring to see how things are lining up. Use a bit of plastic to stop it sticking to the hammer where it does not need to. You would need it stuck at both ends (clean metal) and not stuck where the 'spring meets the hammer sideways, if that makes any sense. I suspect that you could just wedge a wee block of the cured sealant in there and it would work for a while.
 
Back
Top Bottom