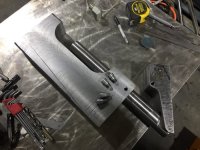
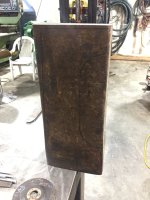
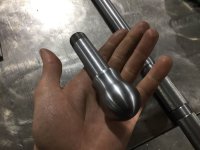
Awesome machining job man , as a hobby machinist myself I can tell by your photos & description your way above my pay grade and I can tell machining quality with that caliber of material your using.
You should very well end up with one of the most smooth running presses ever built....and how do I say the rest without appearing a first rate a$$....I'm just not sure how your efforts are going to realize your hoped for accuracy benefits over any quality commercial offering because you will still have the same short-fall in consistency as any press....you will be using slip fit shell holders that are built to accept brass heads with a lot of variance from lot to lot and your die body threads wont be a perfectly match to your press threads.
You, being a machinist, I think will agree with me that to have your brass line up perfectly with your perfect press run-out you would need perfect machined brass rims & a collet system of some sort to utilize the quality your building into your press....Im not sure how that could be done.
The threads on a die body that are not perfectly aligned with the tool head can change its angle of use with each 1/4 turn of itself...easily tested if your so inclined...install a shell holder in your everyday quality press and run the ram to the top, now install a die in the press and run it down until you see the tapered sliver of light between the two, now drop the ram just a smidge and turn in the die a 1/4 turn and let the ram up to again touch the die base...im betting you see the tapered light has moved to a different position of the compass the same as the die did, this proves the angle of your case can be altered with a very slight die movement, negating all of your diligent work for perfect press line-up.
Hopefully you dont take this as a put-down of your work as it sure isnt meant to be just that a lot of time spent on super accurately fitted pieces with out the last pieces done as well wont reward you as hoped.
No ill regard taken!
you are correct, things tend to only get so good, especially when dealing with off the shelf parts, i have the rough idea to make the shell holders and any adapters that might be of use, I am not yet sure what direction i will go with the main shellholder mount for the ram.
I feel it would be a shame to do all this work and have some clunky loose press that doesnt line up, so i am trying my best to get everything correct.
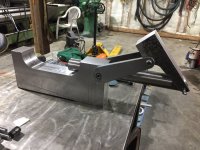
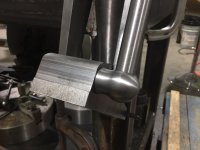
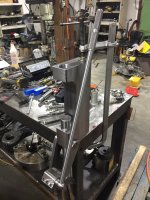
This looks like a single stage press. All the machining work is excellent. The only suggestion I have for you is the overall design. Is this going to be a press that screws in 1 die at a time? Will it have a turret up top to hold many dies? Or have you considered something that is a quick change design like the Forster Co-Ax? I highly suggest the section where you place the die a quick change cut out because my Forster doesn't require more than 3 seconds to swap a die out. No accuracy loss that I have observed. Most interested in seeing your project further.
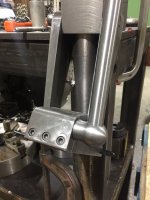
One die at a time, i have no plans of making it hold more then one die.
but it has a large 2"-12 thread that will accept many sized of bushings, so if a guy wanted he could make whatever quick adapters for it.
10 inches of travel seems a little excessive as even a 50 bmg is about 5.5” overall. Can you make a shorter linkage to increase the leverage and use it for easy bullet swaging? To load the 50 bmg don’t you have to pull the top bushing from the press and use 1.25”x12 thread dies? Are you cutting the die threads at 7/8”x14 or larger? The pivot pins for the linkage look a little light in thread diameter compared to the rest of the press and why not a straight solid pin in the lower linkage holes? The internal press opening where the die protrudes has a large radius curve that might interfere with the ram or shell-holder as the thickness of the top of the press will not allow the dies to protrude much and still have enough thread for a lock ring on top, (think short dies like a 221 fireball etc). I don’t want to run down your project but these are all, in my view, valid concerns. Nice work but I will stick to my old rockchucker.
you are correct, I wanted a press that will load 20mm aswell, presses for those larger calibers seem to be non existent,.... im hoping the latest bans are repealed, if not? well maybe it will get sold to someone in the usa and my dreams of owning some cool AT rifles will be shattered.
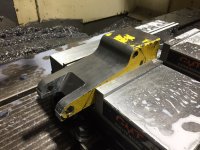
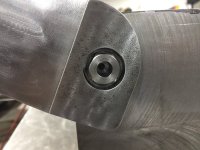
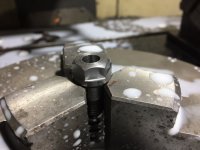
Top thread is 2"-12tpi, and the linkage pins are 5/8 with 1/2-20 threads, it will need to sheer both off (about 30000lbs) They are not made from your average quality steel, the plan is to heat treat them once i finish.
But! if they do somehow sheer, I can make larger ones.
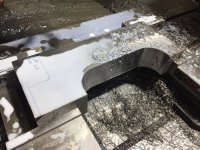
about the large radius, it will be counter-bored so the ram can slip by, and also so the die can go below
No issues about voicing concerns!
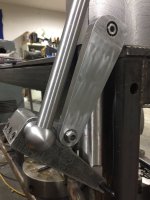
Is it gonna be a dead stop press or an over center? I find using my over center press so much easier than my buddy's dead stop, I'm always pushing as hard as I can to make sure that it's all the way. Over center is like using a breakaway torque wrench you know when it's done the job.
I can make it either or, going to start with a deadstop design and if it sucks i can make it cam-over with a little modification.