Replacement Russian SKS Wooden Handguard - Fitment and Alignment Issues

thegazelle

CGN Ultra frequent flyer
Super GunNutz
Rating - 100%
63   0   0
Location
Ontario
Hi there,

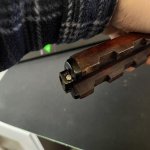
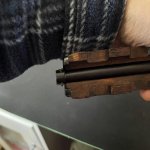
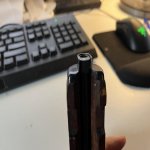
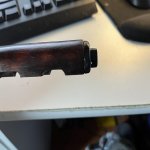
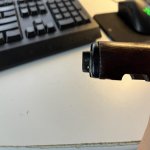
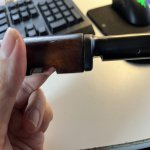
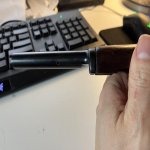
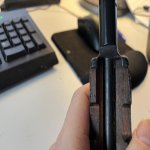
Not sure if anyone can help with this. Recently I had to replace a handguard cover for my new Russian SKS that I just bought last week. I ordered a used wooden handguard and it arrived this morning. I put in the old piston tube and tried to align it to the metal cutouts. It only fits more or less one way, but when I tried fitting it together, I am just a wee bit short in terms of the pin hole alignments (and also the tube is not exactly flush against the back cover - it is very close as you can see in the photos). But as with anything else, close is no cigar. With it not exactly aligned it won't snap into place on my SKS anyway.

Clearly there is a fitment issue with a different wooden handguard. I wouldn't expect something parts like this produced in 1954 to have exact fitment and can be interchangeable, especially when one piece is wood and wouldn't be cut exactly the same.

Now, before anyone suggests I just give it a few whacks with the hammer, I already tried that - and I don't want to wreck my piston gas tube so I stopped hammering on both sides after a while. Presumably, and you can see this in the photos, the wood is flush on side side, but not quite on another. So no amount of hammering will really fix that.

I assume my next step is using a dremel to shave off some of the wood. The question is, where would you recommend?

I have included some photos I took - any suggestions are welcome. Thank you in advance for your feedback and assistance.

2023-01-23 IMG_9642_resize.jpg

2023-01-23 IMG_9636_resize.jpg

2023-01-23 IMG_9637_resize.jpg

2023-01-23 IMG_9638_resize.jpg

2023-01-23 IMG_9639_resize.jpg

2023-01-23 IMG_9640_resize.jpg
 

Attachments

  • 2023-01-23 IMG_9642_resize.jpg
    2023-01-23 IMG_9642_resize.jpg
    42.3 KB · Views: 303
  • 2023-01-23 IMG_9636_resize.jpg
    2023-01-23 IMG_9636_resize.jpg
    40.5 KB · Views: 305
  • 2023-01-23 IMG_9637_resize.jpg
    2023-01-23 IMG_9637_resize.jpg
    39 KB · Views: 303
  • 2023-01-23 IMG_9638_resize.jpg
    2023-01-23 IMG_9638_resize.jpg
    45.1 KB · Views: 301
  • 2023-01-23 IMG_9639_resize.jpg
    2023-01-23 IMG_9639_resize.jpg
    48.3 KB · Views: 305
  • 2023-01-23 IMG_9640_resize.jpg
    2023-01-23 IMG_9640_resize.jpg
    49.9 KB · Views: 302
I'd advise using a file - very carefully - to remove a bit of wood. NOT a Dremel !! Look closely at the marks on the wood made by the metal caps, then just remove a bit at a time. You don't want to end up with it 'too loose' - too big of gaps on either end. Is the repl wood from the same year rifle?
I saw the pic of the 'old' one, looked like it was 'carved' for hand-grips of some sort. I don't know if that was OEM on any years, but may have been by Russian owner?
Aside, I'd suggest shopping at Princess Auto for some low-cost tools. Most there are 'good enough' for DIY projects instead of getting 'name-brand' at twice the cost (or more) .
Good luck with this project.
Ed

Thanks Ed.

Those are good questions. I don't know the origins of the handguard insofar as the year of manufacture. I do know it is Russian, BUT you make a valid point - that it is possible that each year's parts may have some slight variation. That I just don't know for certain. I will check with the seller (who was selling various SKS parts off his Russian rifle) to see.

Thanks for the advice on filing instead of dremel.

Old handguard that my buddy painted black - it was the original handguard from the SKS, which is a 1954 Izhevesk...all the parts were original except for the magazine which was refurbished. I had thought of possibly stripping down that handguard and restaining it, but I neither have the knowledge nor the aptitude to perform this...and besides, I have already chucked out the old handguard anyway. My buddy I think he did say he did something else to it, but that was the original handguard...but being black and the fact that I tossed it as I had ordered this one...well, I am kind of stuck working with this one, which is fine since it matches the arctic birch wood of the one I have.
 
Well I am shocked I was able to eventually figure this out, more or less...the incessant sandpapering eventually yielded the results...it was a bit trial and error to figure out where the alignment issues were, but in the end, the hole is 99% aligned and I was able to push a pin through partly...one side is not perfect, but thankfully the pin was able to be hammered through.

Now, I have this issue...the pin is too long and one side has a flat side to it...is it a matter of filing this, or should I get a pin that is more appropriate, now that I know I can hammer this in more or less.

Before I put the pin in, I tried to fit the handguard with the ferrule on, onto the SKS. Fits perfectly. so I know it works, without the pin. Of course, with the pin in, it protrudes too much and one side with the flat head (I haven't banged it flat yet) and the other side with the protruding pin, won't allow me to insert the handguard into the rifle.

Before I keep playing around with this, I thought I'd ask for further suggestions. See photos, thanks...

2023-01-31 IMG_9701_resize.jpg

2023-01-31 IMG_9702_resize.jpg

View attachment 652604
 

Attachments

  • 2023-01-31 IMG_9701_resize.jpg
    2023-01-31 IMG_9701_resize.jpg
    50.3 KB · Views: 254
  • 2023-01-31 IMG_9702_resize.jpg
    2023-01-31 IMG_9702_resize.jpg
    58 KB · Views: 254
Is that a solid aluminum rivet you have there? If so, that's ideal because the original was steel and much harder to install and remove.
What you want to do is make sure the ferrule fits the gas tube without any gapping whatsoever.
Once the rivet is in place and you start to smash it down, it will exaggerate any gapping that exists.
Notice which hole in the ferrule is a bit wider and probably has a bit of a knife edge to it. That's where the flat head of the rivet goes.
Have your assistant place that flat head with the handguard against an anvil or heavy vice flat surface while helping to pinch down the loose side with a big flat blade screwdriver, while still leaving the skinny end of the rivet exposed facing up.
A 1/8" pin punch is firmly set squarely on the rivet, and a reasonably stout hammer is brought down solidly onto that skinny rivet end.
Carefully inspect and repeat the blows until the rivet has mashed itself into retention.
That's when you get your gunsmithing flat file and smooth both heads of the rivet (only) until it slips into the receiver.
Touch up blue the steelwork and, if you have it, some Birchwood Casey aluminum black on the rivet, and you're done!

Thank you my friend. Unfortunately you way overestimate both my ability to be handy as well as my technical ability. I don't have any way to blue anything - don't own a blowtorch or anything close - I would probably set the handguard wooden part on fire if I tried to blue it with a torch. But my tools are very limited...probably something I need to fix soon. Until recently I thought Stanley was a high quality tool brand.

Unfortunately I don't have an anvil or a heavy vise. I have a small portable one which I got from Home Depot for $40. Again, it's a sad state of affairs insofar as my tool collection.

That said I shall try what you suggest. I do think the pin is aluminum as it seemed to be a tad more forgiving with the fact that one end I didn't quite have 100% aligned and the pin still went through - so obviously it is more pliable than a traditionally steel pin.

I do have a metal file set, so I will try to do the mashing + filing. I won't be able to blue it, and I am almost certain when I file at it, I will hit part of the tube assembly and scratch it up. But I shall be as careful as I can.

Thank you very, very much for your suggestions and sharing your knowledge on this. It has been exceptionally helpful and beneficial to me.
 
Grind it off (but that looks horrible) or reuse the old pin as I recommended to you. No need to blue it. It is not steel, I did it so many times and always ended up using the old one.

I deleted my cynical comment.
 
Last edited:
Is that a solid aluminum rivet you have there? If so, that's ideal because the original was steel and much harder to install and remove.
What you want to do is make sure the ferrule fits the gas tube without any gapping whatsoever.
Once the rivet is in place and you start to smash it down, it will exaggerate any gapping that exists.
Notice which hole in the ferrule is a bit wider and probably has a bit of a knife edge to it. That's where the flat head of the rivet goes.
Have your assistant place that flat head with the handguard against an anvil or heavy vice flat surface while helping to pinch down the loose side with a big flat blade screwdriver, while still leaving the skinny end of the rivet exposed facing up.
A 1/8" pin punch is firmly set squarely on the rivet, and a reasonably stout hammer is brought down solidly onto that skinny rivet end.
Carefully inspect and repeat the blows until the rivet has mashed itself into retention.
That's when you get your gunsmithing flat file and smooth both heads of the rivet (only) until it slips into the receiver.
Touch up blue the steelwork and, if you have it, some Birchwood Casey aluminum black on the rivet, and you're done!

I have my doubts about your expertise.
 
Grind it off (but that looks horrible) or reuse the old pin as I recommended to you. No need to blue it. It is not steel, I did it so many times and always ended up using the old one.

I deleted my cynical comment.

I actually had a look at the old pin that I drilled out but it was too bent for me to consistently make it straight in order to insert (and because the alignment was not 100% it would not work due to its deformation).

I shall work on this this weekend.

Thanks everyone for the suggestions.
 
I actually had a look at the old pin that I drilled out but it was too bent for me to consistently make it straight in order to insert (and because the alignment was not 100% it would not work due to its deformation).

I shall work on this this weekend.

Thanks everyone for the suggestions.

So, how'd it go? Any luck?
 
Butcherbill's advice makes sense. Yours does not.
The ferrule is the steelwork to which I refer the bluing.
Of course, no torch needed, cold bluing will do.
Doubt my expertise all you wish. You don't know who you're addressing and, frankly, your opinion is moot.

A lot of things don't make sense these days.

You can keep using your torch.
 
So, how'd it go? Any luck?

Thanks for the suggestions. I managed to get the aluminum pin filed down with a hand too to a nice smooth even surface level with the metall. Ended up scratching the ferrule but did some cheap MacGyver solution to cover up the marks. Inserts and removes into the rifle smoothly and everything was tested this weekend it functioned fabulously.

The best thing is that the wooden handguard completely matches the wood of the original rifle.

Thanks to everyone for the suggestions and advice. It was extremely helpful and insightful, as always.
 
That elegance right there is a million bucks!

Yup...and I have say and not sure if I ever mentioned this in my other posts (I think my mind may be going faster than Joe Biden's) - but in 2011 or 2012 or so, I had a colleague who had a few SKSes and was telling me LeBaron had a deal on them for $175.00 and you can choose which one you wanted in store.

I had no idea at the time what an SKS was. But since my friend was adamant I check out the "deal", I went into LeBaron. Went to the gun counter and asked to see "the SKS". They brought one out. I was like, what the heck, this things is as old as the hills!!! Is there any kind of warranty on this??? The gun behind the gun counter laughed at me and since he realized I was a complete noob who clearly knew nothing about SKSes (not much has changed!), he just took it back to the rack and told me "no, no warranty one a 60 year old gun". I remember I went back to the office and emailed my colleague (since I had no cell phone or texting capability at the time) and told him, what kind of foolishness was he trying to pull on me. He said it's a deal. I said yeah, if you are a sucker.

All these years later, I am eating those words. My first SKS I bought for 4 times that amount, and I really didn't have much of a pick of the litter. Since then I have become smitten with the Russian rifles, the gorgeous wood, the reliability of function, the ease to take apart and clean, and of course, the affordable cost of the ammunition. Maybe I am atoning for my own foolishness for dismissing such an awesome specimen of history more than a decade ago. It is funny back then how many people relegated the SKS to just a junk fun plinking gun. I am sure the wise folks out there were buying them by the crateful...I recall one CGNer here buying 140,000 rounds of 7.62x39 ammo for a relatively modest amount. I am just happy I have what I have and the fact that something that is almost as old as my Dad still works (probably better than my Dad) is something to behold.
 
Yep, my SKS is a year 'younger' than me and 'shoots' more reliably . . .

Haha...got some instant coffee on my keyboard laughing at this one yesterday night...one of the kids came over and asked what is so funny. I told her never mind.

Be thankful you can still "shoot". I was permanently deactivated by a urological smith a decade ago.
 
Isn't there a risk of https://en.wikipedia.org/wiki/Galvanic_corrosion using an aluminum rivet in steel?

Is that a solid aluminum rivet you have there? If so, that's ideal because the original was steel and much harder to install and remove.
What you want to do is make sure the ferrule fits the gas tube without any gapping whatsoever.
Once the rivet is in place and you start to smash it down, it will exaggerate any gapping that exists.
Notice which hole in the ferrule is a bit wider and probably has a bit of a knife edge to it. That's where the flat head of the rivet goes.
Have your assistant place that flat head with the handguard against an anvil or heavy vice flat surface while helping to pinch down the loose side with a big flat blade screwdriver, while still leaving the skinny end of the rivet exposed facing up.
A 1/8" pin punch is firmly set squarely on the rivet, and a reasonably stout hammer is brought down solidly onto that skinny rivet end.
Carefully inspect and repeat the blows until the rivet has mashed itself into retention.
That's when you get your gunsmithing flat file and smooth both heads of the rivet (only) until it slips into the receiver.
Touch up blue the steelwork and, if you have it, some Birchwood Casey aluminum black on the rivet, and you're done!
 
Back
Top Bottom