Restoration of a Martini Henry - inletting fun

louthepou

Snow-White Le Mod<br>Moderator
Moderator
Rating - 100%
792   0   0
Location
Aylmer, QC
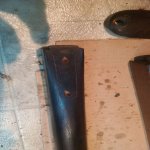
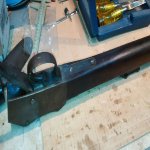
Hi folks, thought I'd share this one with you, simply given the fun I had inletting the forend to receive the metal tab (or "hook").

The India-made forend came rather "naked" - it required inletting both for that hook, and for the semi-hexagonal shape of the barrel at the knox.

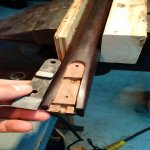
I started by drilling the two screw holes on the new forend, to make sure I was going to draw out the profile of the metal hook in the right spot. i screwed the hook upside down to get a flat contact with the forend, to mark the contour.

IMG_20180826_151445.jpg
IMG_20180826_152330.jpg
IMG_20180826_152512.jpg
 

Attachments

  • IMG_20180826_151445.jpg
    IMG_20180826_151445.jpg
    54.4 KB · Views: 245
  • IMG_20180826_152330.jpg
    IMG_20180826_152330.jpg
    51.5 KB · Views: 244
  • IMG_20180826_152512.jpg
    IMG_20180826_152512.jpg
    56.8 KB · Views: 246
I figured that doing all the inletting by hand was going to be time consuming and, given my hand carving skills, the result would probably end up unsatisfactory. What I needed was a milling machine. But, have you seen the prices on such tools?

Cheap as I am, I started looking for alternatives. I do have a drill press, so... I found out that small milling "tables" exist. Some $120 later, I was set for some milling on that forend. I went for the "Proxxon micro compound table". I'Ve screwed it on a rectangular piece of plywood, and clamped that plywood in my drill press vise. I used a small, round router bit
for the inletting.

In this picture I had just started. The clamping of the forend is a rather... "homemade" affair but, it worked. Almost.

IMG_20180826_160225.jpg

After I started the forend began creeping upwards. So I made a simple cross-member between two of the screws. You can see it in the following picture. After that, final inletting was done with chisels. I'm pretty sure I saved some time, and it was fun too.

IMG_20180827_190615.jpg
IMG_20180827_204514.jpg
IMG_20180828_211311.jpg
 

Attachments

  • IMG_20180826_160225.jpg
    IMG_20180826_160225.jpg
    62.5 KB · Views: 246
  • IMG_20180827_190615.jpg
    IMG_20180827_190615.jpg
    55.9 KB · Views: 244
  • IMG_20180827_204514.jpg
    IMG_20180827_204514.jpg
    51 KB · Views: 244
  • IMG_20180828_211311.jpg
    IMG_20180828_211311.jpg
    59.4 KB · Views: 244
Still a couple of parts missing (coming soon), but it's almost done. (sadly, this isn't my rifle!!!) The simplicity of this action never ceases to amaze me.

Here are the action parts, before thorough cleaning...

IMG_20180903_074025.jpg

And the rifle with stock (stripped, and refinished with linseed oil).

IMG_20180903_092048.jpg
 

Attachments

  • IMG_20180903_074025.jpg
    IMG_20180903_074025.jpg
    113.8 KB · Views: 243
  • IMG_20180903_092048.jpg
    IMG_20180903_092048.jpg
    87.7 KB · Views: 243
I like martini action but caliber is a no-go for me.If I ever find one in 303 I'll likely take it.Something like 32-40 would be even better.

I see Martini action based sporters sometimes so it's not really far fetched.
 
Love Martini 's I have three so far , original 450-577, 303 Calvary carbine and a custom 45-70. Looks like a nice job you have done. They are fun guns to shoot. I have used my two way sliding vise for similar projects with some hillbilly modifications. Surprising what you can do with simple tools.
 
Right on!! I need more time but I'm getting there and hope to be able to play also... Waffling regularly about going down the Martini rabbit hole.

Congrats on the jury-rigged engineering succeeding and keeping $$$$ in check. How many chickens? Egg & Meat Birds?
 
Thanks guys. The only thing that's difficult to do when I finish such projects is to send them back to their rightful owners. Sigh...
 
Back
Top Bottom