Russian SKS Handguard Piston Tube Pin Removal

thegazelle

CGN Ultra frequent flyer
Super GunNutz
Rating - 100%
63   0   0
Location
Ontario
I just bought a Russian SKS last night off a friend. He had it outfitted with the ATI Strikeforce stock, for which I am not a fan, but since he had the original stock, magazine and bayonet, I was happy to buy it off him and then put it back to the way it was originally designed to be, and sell off the Strikeforce stock.

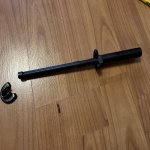
There is a caveat that he me mentioned to me already. Because he couldn't get the original wooden handguard removed from the piston tube due to not being able to get the pin out, he wasn't able to use the polymer Strikeforce handguard so instead he painted the original handguard black to match.

I found a wooden spare handguard that appeared to match what I just bought from another seller and so I am hoping I will be able to get that pin out myself. Given my friend is pretty proficient with tools, I am not going to expend much effort to try to use a punch and hammer and whack out the pin given he has told me he has already tried multiple times, which is why he ultimately resorted to painting the original handguard to match instead of risk damaging it.

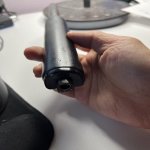
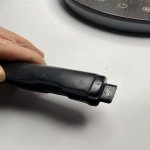
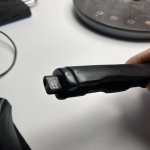
I have looked online and seen more than a few people having this problem. It looks from the description that one side is tapered and the other side may be peened and it looks like the orientation to punch it out would be from left to right (with the pinned side facing closest to the user).

But when I looked at mine it looks like both sides have been filed flush with the piston tube piece. I don't think it's welded but it may be peened on both sides.

Seemingly the way to get it out is to drill it out slowly. But of course that will then destroy the pin and I would need to find some way to replace it. I have read some people use a brass nail or improvise using finishing nails, etc, dremel out the other side and then peen it.

Any suggestions are welcome. I already ordered the spare wooden handguard but obviously it doesn't come with the piston tube. I certainly do not want to damage my piston tube or that end cover. The painted handguard I don't necessarily care about since I am planning to toss it anyway, as I have another coming coming and the Strikeforce kit already has the plastic one in the box.

Would welcome any suggestions. Thanks!
 
usually using a 3 lbs hammer works for me , never had to drill.

the pin is not tapered. dont need to drill all the way. just enuff to get rid of the peen on one side and hammer the pin out.
 
usually using a 3 lbs hammer works for me , never had to drill.

the pin is not tapered. dont need to drill all the way. just enuff to get rid of the peen on one side and hammer the pin out.

Would I need a drill bit equivalent to the diameter of the pin or smaller?

So it sounds like it doesn't matter which side I drill from.

I have tried hammering and it is not moving on either side. I am petrified of damaging it so I may do the partial drill to get it to recess a bit and then use that to hammer the rest.

This reminds me of how difficult it was to hammer out the firing pin retaining pin on my original SKS bolt. But even then I could see which side I had to hammer from and it wasn't peened obviously.. The advantage there was I had a lot more real estate to work with whereas here, that metal cover is almost butting right up to where I need to hammer. And of course everything is black so kind of hard to see...may have one of my kids hold the piece and a flashlight while I give some taps. If that is not successful, I will start drilling.
 
Listen, you have to punch it out from the right side when looking at it from the back (the part towards the rear sight). I have done it many times and it always seems that it is not moving but it does. Use a proper punch and secure it without damaging the trunion. I actually hold it with my hands and foot on a carpet, lol. It takes a while but don't give up. haha.
 
Proper roll pin punches that have a little nub to keep it centered help if the pin is hollow, next step would be a shop press instead of the hammer.
 
And, those youtubers making it look so easy are faking it, it is a PITA>

I may add that the reason you have to do it from the right side because the left side is where they ground it off and you really don't want to take material off or bend it. There is no way to punch it out from the left side without grinding.
 
Last edited:
And, those youtubers making it look so easy are faking it, it is a PITA>

I may add that the reason you have to do it from the right side because the left side is where they ground it off and you really don't want to take material off or bend it. There is no way to punch it out from the left side without grinding.

I have just taken some photos of what I am looking at. I apologize these can't get any more clear but unfortunately my new phone does not do macro photos unlike my old phone - so close ups are always somewhat blurry...

So this is my orientation - I presume it's yours too - so left is left

2023-01-20 IMG_9591_resize.jpg

So the left side.

2023-01-20 IMG_9592_resize.jpg

The right side.

2023-01-20 IMG_9593_resize.jpg

Unfortunately part of my problem is limited tools and my vise is a small little one that sits on the floor...and even with the rubber grips in the vise, the stupid handguard keeps slipping...my punch set (Stanley) has limited punches...I may wait for the kids to come back from school and have them provide more leverage in keeping the part still.

So if I were to drill, I would use a smaller diameter drill bit just to get a crater started and then punch out from there (meaning left to right).
 

Attachments

  • 2023-01-20 IMG_9591_resize.jpg
    2023-01-20 IMG_9591_resize.jpg
    45.5 KB · Views: 180
  • 2023-01-20 IMG_9592_resize.jpg
    2023-01-20 IMG_9592_resize.jpg
    36.1 KB · Views: 179
  • 2023-01-20 IMG_9593_resize.jpg
    2023-01-20 IMG_9593_resize.jpg
    31.3 KB · Views: 179
Proper roll pin punches that have a little nub to keep it centered help if the pin is hollow, next step would be a shop press instead of the hammer.

I would concede that likely I have a very insufficient set of tools, which I suspect is part of my problem.
 
I have just taken some photos of what I am looking at. I apologize these can't get any more clear but unfortunately my new phone does not do macro photos unlike my old phone - so close ups are always somewhat blurry...

So this is my orientation - I presume it's yours too - so left is left

View attachment 649427

So the left side.

View attachment 649428

The right side.

View attachment 649429

Unfortunately part of my problem is limited tools and my vise is a small little one that sits on the floor...and even with the rubber grips in the vise, the stupid handguard keeps slipping...my punch set (Stanley) has limited punches...I may wait for the kids to come back from school and have them provide more leverage in keeping the part still.

So if I were to drill, I would use a smaller diameter drill bit just to get a crater started and then punch out from there (meaning left to right).

Yes the orientation is correct.

Don't drill, you ruin it.

ataD3Rp.jpg


Sorry about the hair in the pic, not mine, lol.

It takes some time to get it out, ruining the whole thing with a vise or pliers should be avoided. As you mentioned, it slips.
 
Last edited:
So...I didn't get this message in time and I took a drill to it. A flat punch kept slipping and my daughter who was holding the piece told me it was just getting all scratched up.

So I drilled right to left and it was a good call because the pin on the other side had a flatter head. Anyways, I partial tried to get a divet in the pin...then went to Home Depot once I got the message and got a punch as you had indicated (mine was a flat punch like a lollipop stick whereas yours is like a crayon). I used the crayon punch and started whacking on it... Alas! the other end started coming out. 30 seconds later, voila, I now have this...

2023-01-20 69594063411__602FD9BA-70BE-41F7-9CE1-E44367605F43_resize.jpg

OK now so I need a new pin, but I can imagine some nail should do the trick...

Thanks everyone for their feedback!
 

Attachments

  • 2023-01-20 69594063411__602FD9BA-70BE-41F7-9CE1-E44367605F43_resize.jpg
    2023-01-20 69594063411__602FD9BA-70BE-41F7-9CE1-E44367605F43_resize.jpg
    97.2 KB · Views: 123
Back
Top Bottom