NorthCoastBigBore
CGN frequent flyer
- Location
- Northwest BC (Rural) 103-I-##
I hope this hopes somebody out. I finally got around to changing the recoil spring & buffer in my M1907 on the advice of another CGN member (been probably a year now since he suggested it, just so busy). The rifle is practically mint, and there was still a healthy gap between the washer & buffer, but the original buffer was solid and brittle with age.
Taking it apart is easy enough. But getting the thing back together was proving a bit tricky. The best re-install tip seemed to be a YouTube fellow by the name of Logcabinlooms, who had a decent idea about running a cord through the spring and then pulling back. But I found it tough to get it compressed enough without breaking the cord and THEN you were left with the spring being all twisted up inside, and inevitably the da$$ thing would spring out on me as I tried to fight the guide rod back in. Most references I found were just to people cursing, swearing, giving up or generally just using brute force to get it in.
Well, I'm not a professional mechanic or gunsmith but I do love it all as a hobby and in my wrench turning experience, hobby or not, I've had to compress a lot of springs for different reasons. This to me seemed to be the same thing (?!) - and the problem of the spring being all twisted up seemed to me to be one of just having no way to maintain the spring straight without the guide rod in place.
Soooo after messing around with the cord method of compressing (which certainly got the spring IN there, but as I say the messing around after that was annoying as all get out), I thought "For Pete's sake this guide rod is basically just a 5/16" rod why can't I just do something to some scrap rod that will catch the spring and let me compress it..."? So I did, and I was able to install the spring AND GUIDE ROD in less than TWO MINUTES (so get ready for a lot of writing that makes it seem like two hours):
{CAUTION: WEAR EYE PROTECTION and whenever working with springs under pressure, take care that it won't launch anything in a dangerous direction. Also watch for PINCH POINTS there are some doozies in here}
1) Take a piece of 5/16" rod and drill a blind hole in the end the right size for a spring pin or whatever that is hard and durable (I used 3/32" because I had a scrap 3/32" spring pin right in front of me). Make sure it is far enough in the rod & tight enough fit that it can't pop out.
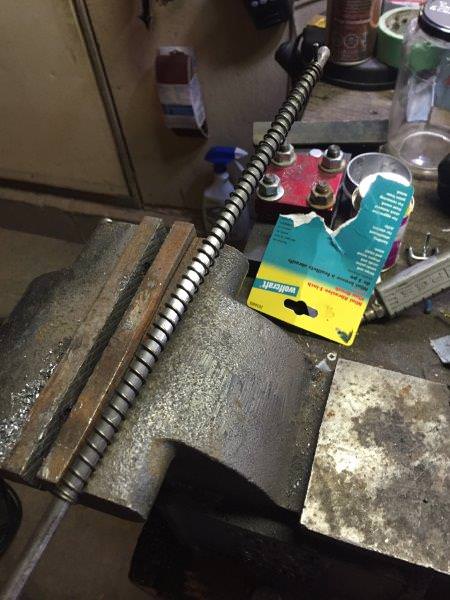
2) Install the pin in the rod (in this picture I haven't trimmed it but you will need to cut the pin to sit just slightly above the height of the spring on the rod) and then slip the spring over the rod; then slide that rod through the breech block.
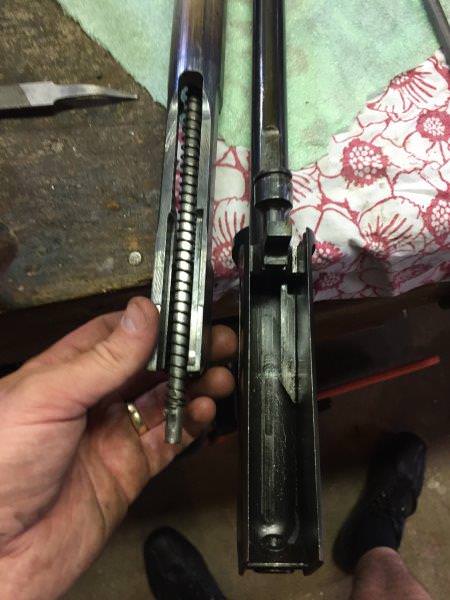
3) (sorry no pictures of the compression but just pull up and then use vice grips or what have you to lock the rod in place). You will have to fully compress the spring to give your slave "guide rod" enough clearance to get past the buffer. Make sure you have the pin facing UP towards you so you can remove it. Install the breech block with the guide rod in place.
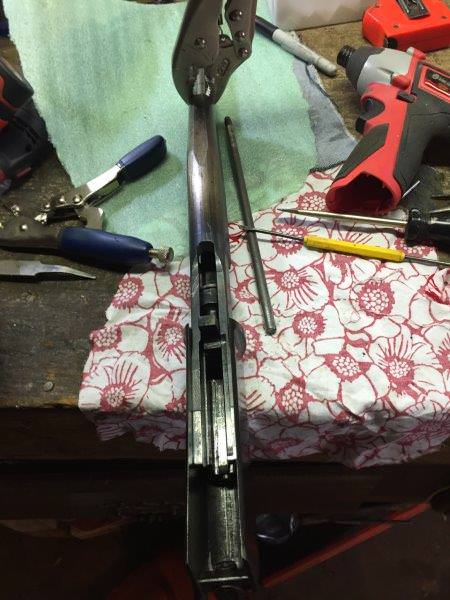
4a) No pictures of this, but reinstall the buffer plate/washer. DO NOT put your fingers in there. Use a magnet and/or pics etc because if that rod releases, you might lose a finger.
4b) Keeping forward pressure on the Slave Guide Rod, carefully release the vice grips and then gently assist the rod to move against the buffer plate/washer under spring pressure. In this picture you can see the trimmed pin, mine is maybe 0.02" above the spring. It has to be close to flush in order to allow the Slave Guide Rod to move far enough into the breech block to allow for reinstallation.
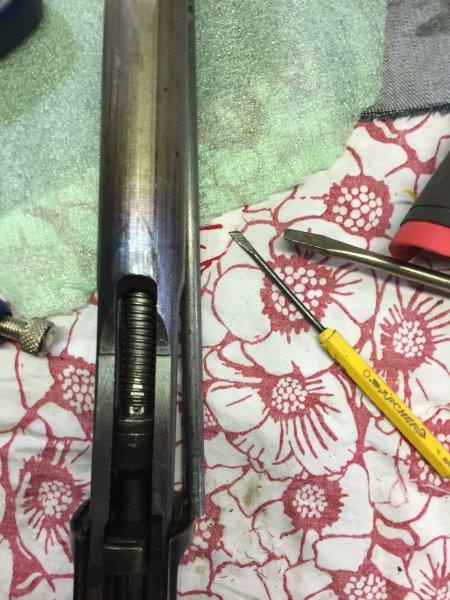
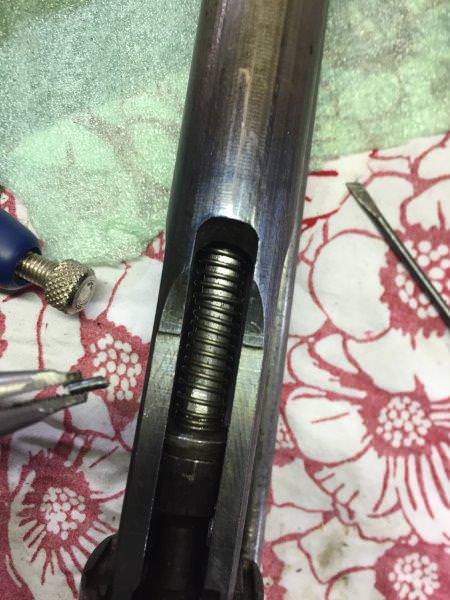
5) Remove the pin. I ground some needle nose pliers flat to make certain that I wouldn't deform it. Do NOT remove the Slave Guide Rod. Here you can see the pin removed and the spring holding correctly against the buffer plate/washer:
6) Sorry no pictures of this, but it is self explanatory: Fully compress the breechblock (just pull back on it); Keeping the breechblock compressed remove the Slave Guide Rod and then reinstall the Factory Guide Rod, keeping the breechblock compressed until you have threaded it in.
7) Here she is resintalled. As I say, that above is a LOT of writing for something that took me less than two minutes to install with that tool:

I hope this helps someone out!
NCBB
Taking it apart is easy enough. But getting the thing back together was proving a bit tricky. The best re-install tip seemed to be a YouTube fellow by the name of Logcabinlooms, who had a decent idea about running a cord through the spring and then pulling back. But I found it tough to get it compressed enough without breaking the cord and THEN you were left with the spring being all twisted up inside, and inevitably the da$$ thing would spring out on me as I tried to fight the guide rod back in. Most references I found were just to people cursing, swearing, giving up or generally just using brute force to get it in.
Well, I'm not a professional mechanic or gunsmith but I do love it all as a hobby and in my wrench turning experience, hobby or not, I've had to compress a lot of springs for different reasons. This to me seemed to be the same thing (?!) - and the problem of the spring being all twisted up seemed to me to be one of just having no way to maintain the spring straight without the guide rod in place.
Soooo after messing around with the cord method of compressing (which certainly got the spring IN there, but as I say the messing around after that was annoying as all get out), I thought "For Pete's sake this guide rod is basically just a 5/16" rod why can't I just do something to some scrap rod that will catch the spring and let me compress it..."? So I did, and I was able to install the spring AND GUIDE ROD in less than TWO MINUTES (so get ready for a lot of writing that makes it seem like two hours):
{CAUTION: WEAR EYE PROTECTION and whenever working with springs under pressure, take care that it won't launch anything in a dangerous direction. Also watch for PINCH POINTS there are some doozies in here}
1) Take a piece of 5/16" rod and drill a blind hole in the end the right size for a spring pin or whatever that is hard and durable (I used 3/32" because I had a scrap 3/32" spring pin right in front of me). Make sure it is far enough in the rod & tight enough fit that it can't pop out.

2) Install the pin in the rod (in this picture I haven't trimmed it but you will need to cut the pin to sit just slightly above the height of the spring on the rod) and then slip the spring over the rod; then slide that rod through the breech block.

3) (sorry no pictures of the compression but just pull up and then use vice grips or what have you to lock the rod in place). You will have to fully compress the spring to give your slave "guide rod" enough clearance to get past the buffer. Make sure you have the pin facing UP towards you so you can remove it. Install the breech block with the guide rod in place.

4a) No pictures of this, but reinstall the buffer plate/washer. DO NOT put your fingers in there. Use a magnet and/or pics etc because if that rod releases, you might lose a finger.
4b) Keeping forward pressure on the Slave Guide Rod, carefully release the vice grips and then gently assist the rod to move against the buffer plate/washer under spring pressure. In this picture you can see the trimmed pin, mine is maybe 0.02" above the spring. It has to be close to flush in order to allow the Slave Guide Rod to move far enough into the breech block to allow for reinstallation.

5) Remove the pin. I ground some needle nose pliers flat to make certain that I wouldn't deform it. Do NOT remove the Slave Guide Rod. Here you can see the pin removed and the spring holding correctly against the buffer plate/washer:

6) Sorry no pictures of this, but it is self explanatory: Fully compress the breechblock (just pull back on it); Keeping the breechblock compressed remove the Slave Guide Rod and then reinstall the Factory Guide Rod, keeping the breechblock compressed until you have threaded it in.
7) Here she is resintalled. As I say, that above is a LOT of writing for something that took me less than two minutes to install with that tool:

I hope this helps someone out!
NCBB
Last edited:


