












































You are using an out of date browser. It may not display this or other websites correctly.
You should upgrade or use an alternative browser.
You should upgrade or use an alternative browser.
Kirst convertors for Uberti
- Thread starter sjb2000k
- Start date

I have a Kirst .45 Colt conversion cylinder on a Pietta .44 Remington. Like it a lot.
what ammo are you using ?
I meant - are you re-loading, are you using the Cowboy Action ammo or a factory .45 Colt?...
what ammo are you using ?

I have a Uberti 1860 Army .44 with a Kirst converter. The conversion 5 shot cylinder and gated ring converts it to .45 Schofield. Some minor gunsmithing was required. The Kirst conversion cylinder was designed to shoot black powder or equivalent loads only which includes current Cowboy loads (what I shoot). 45 Schofield Cowboy ammo is really hard to find and has to be special ordered or roll your own. This is why I don't shoot it much anymore. I'm not set up for reloading although my brother was when he was alive. I also installed the ejector assembly.
The Kirst Konverters are to be installed on steel frame revolvers only, never on brass frames or 36 caliber pistols (mfg warning)
Here's mine
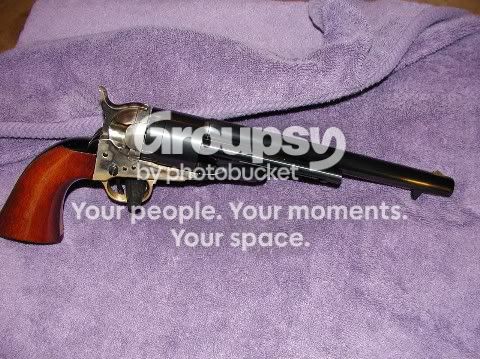
The Kirst Konverters are to be installed on steel frame revolvers only, never on brass frames or 36 caliber pistols (mfg warning)
Here's mine

Thanks for the pic and your comments. I have Walker, 1860 Army and Dragoon - and would like to be able to take them to the range on occasion and shoot without hassle. So Kirst appears to be a way to go but it also looks like I might have to take a look at reloading.
And on a side note - regarding gunsmithing - is it adjustment to the cylinder or to the gun ? - can you swap the cylinders and go back to the BP or this is it?
Thanks
And on a side note - regarding gunsmithing - is it adjustment to the cylinder or to the gun ? - can you swap the cylinders and go back to the BP or this is it?
Thanks
Thanks for the pic and your comments. I have Walker, 1860 Army and Dragoon - and would like to be able to take them to the range on occasion and shoot without hassle. So Kirst appears to be a way to go but it also looks like I might have to take a look at reloading.
And on a side note - regarding gunsmithing - is it adjustment to the cylinder or to the gun ? - can you swap the cylinders and go back to the BP or this is it?
Thanks
I did mine 6 or 7 years ago and went with the gated conversion ring because I liked the idea of reloading the cylinder without pulling the barrel and cylinder off. With the gated ring you have to use a Dremel tool with coarse and fine sanding drums to remove enough metal from the frame to allow the insertion of cartridges. Kirst supplies the template for your model revolver so you're not just eyeballing it.
Before getting to work removing metal you have to completely strip the frame otherwise you'll end up with metal grit inside the action, working against the moving parts. Also, once done you'll have to give the frame a good cleaning to remove and metal filings and residue.
In the pictures below you can see the amount of material I had to remove. The supplied template is only a guide and after you've been at it for a while you'll be able to fit the ring and cylinder from time to time to see how much metal you have left to remove.
After relieving enough metal to allow reloading and ejecting it's time to clean the frame. Any method that you favour for cleaning and degreasing will do. I usually blow as much crud out as I can with an air hose, clean and degrease then blow it out again. Once that's done it's time to reassemble.
Disassembly and reassembly is pretty straight forward and there's lots of instructions and youtube vids available if you need them. I only ran into one snag. My Uberti 1860 Army, while brand new, was an earlier model. I found that once it was reassembled the cylinder wouldn't advance far enough to lock when I cocked the hammer. I got a hold of one of the gunsmiths at Taylor & Co and he was aware of this problem with older models like mine. It turned out that the hand was a hair too short to work properly with the new generation Kirst Konverters.
There was two solutions. Stretch the hand or buy a replacement. Stretching the hand involves evenly tapping the side of the hand with a flat side of a tool and a hammer. I used the flat side of a center punch and tapped along the side of the hand thereby lengthening it a little less than a millimeter. However, just in case I screwed it up I had also ordered a replacement of the proper length. Once the new one arrived I compared it with the one I stretched and they matched perfectly. I tried them both and the revolver's timing and lock up were excellent. I kept the one I stretched as a spare. Below are a couple of pics showing where metal needs to be removed from the frame. As you can see it's the military model with the cut out for attaching a butt stock.


As I mentioned before I also installed the ejector assembly as I had no desire to return it to the BP configuration. But that's just me. In my case, since I lengthened the original hand, re-converting it to black powder is problematic.

Hope this helps.
Kirst
Hi,
I appreciate your detailed response!! - it will save me time and frustration once I get going with my project. Just to confirm :
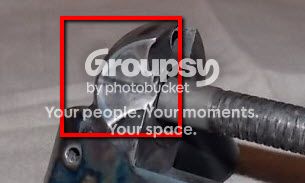
when you talk about grinding off you talking about this area ?
I am trying to add a picture directly to my post so it might not work out right at the first attempt. Lets see.
Hi,
I appreciate your detailed response!! - it will save me time and frustration once I get going with my project. Just to confirm :

when you talk about grinding off you talking about this area ?
I am trying to add a picture directly to my post so it might not work out right at the first attempt. Lets see.
Last edited:
and it did not work for a reason I do not get at this moment - so here is a link:
http://s479.photobucket.com/user/SJB2000K/library/Army?sort=3&page=1
that should work
Yes, that's the area. Here's a couple of pics I just took showing the area that was relieved. If you compare these pics with the bare frame (before) pictures you can see how much grinding was required. IIRC I used 10-12 rough sanding drums for the Dremel and 3 or 4 to finish the job. That is, once I had removed enough metal for the cartridges to get part way in before binding up, I finished the removal with the fine drums. I think it took a little over an hour, maybe more. I also had a magnet handy to pick up metal filings.


I see - it is the six to five shooter switch that messes up the angular alignment between the cylinder and loading gate.
I admire your mechanical skills - looks factory made and I do not think I will be brave enough to do it myself.
Did you case harden the frame after that or just let it be?- can't quite make it out from the picture. BTW - how did you post the pics ? - I see you have a link to your Photobucket. I was trying to link to my PB but somehow it did not work out for me (using the "Insert Image" icon).
And another BTW - I think your postings here should be a Sticki.
And I have some more homework to do.
Thanks!!
I admire your mechanical skills - looks factory made and I do not think I will be brave enough to do it myself.
Did you case harden the frame after that or just let it be?- can't quite make it out from the picture. BTW - how did you post the pics ? - I see you have a link to your Photobucket. I was trying to link to my PB but somehow it did not work out for me (using the "Insert Image" icon).
And another BTW - I think your postings here should be a Sticki.
And I have some more homework to do.
Thanks!!
Thank you. The Kirst conversion is probably the easiest of them all to do. I forget which one it is but there's one that involves drill jigs etc and a lot more work than the Kirst. If you're decent enough with a Dremel and have lots of patience it's fairly straight forward.
As far as being a 5 shot cylinder goes it's not really a problem because you load and eject with the revolver at half #### so the cylinder spins freely. I didn't case harden the area where I removed metal but I did learn a trick from a gunsmith here. I lightly brushed the loading area on the frame where I removed metal with a mini torch flame until the metal began to darken here and there. Once 2 or 3 blotches darkened I liberally dosed the area with gun oil and let it cool. The result was a near identical match to the already colour case hardened frame. When I say lightly brushed I mean just that. It doesn't take much heat to discolour the metal.
For posting pictures:
Once you've up loaded your picture to PB, hover over the top right corner of the thumbnail image. A small gear icon will appear and a menu will drop down. Click on the "Get Links" menu item. A box will appear with 4 different codes. You want to left click on the bottom one (image code). It automatically copies to your clipboard, then you can paste it to your forum post.
As far as being a 5 shot cylinder goes it's not really a problem because you load and eject with the revolver at half #### so the cylinder spins freely. I didn't case harden the area where I removed metal but I did learn a trick from a gunsmith here. I lightly brushed the loading area on the frame where I removed metal with a mini torch flame until the metal began to darken here and there. Once 2 or 3 blotches darkened I liberally dosed the area with gun oil and let it cool. The result was a near identical match to the already colour case hardened frame. When I say lightly brushed I mean just that. It doesn't take much heat to discolour the metal.
For posting pictures:
Once you've up loaded your picture to PB, hover over the top right corner of the thumbnail image. A small gear icon will appear and a menu will drop down. Click on the "Get Links" menu item. A box will appear with 4 different codes. You want to left click on the bottom one (image code). It automatically copies to your clipboard, then you can paste it to your forum post.
You are obviously not just another pretty face. Another question - there is an oversized (?) screw just above the trigger ? - your change, or is it factory?
BTW - thanks for the tip on the pics - finally can post the pictures here again - owe you one!!
BTW - thanks for the tip on the pics - finally can post the pictures here again - owe you one!!
You are obviously not just another pretty face. Another question - there is an oversized (?) screw just above the trigger ? - your change, or is it factory?
BTW - thanks for the tip on the pics - finally can post the pictures here again - owe you one!!
Uberti produces (or used to anyway) two models of the 1860 Army. A "Civilian" model and a "Military" model. Mine is the Military model and the oversized screws (both sides of the frame)are used for attaching a carbine shoulder stock (acts as pivot pins for some stocks). It would end up looking like this.

If you look at the bare frame "before" pictures or the one you posted you'll notice a cutout area (again, both sides of the frame) under the scalloped part of the frame. It's right above the large screw that protrudes. In the picture above you can see where the shoulder stock pivots on that screw and butts up against the ridge formed by the cutout.
The Civilian version of the Colt 1860 Army does not have the cutouts nor the oversized screws. If I had to do it all over again I'd go with the Civilian model as the end result would be a little cleaner looking. Besides, $250.00US for a shoulder stock is a wee bit expensive.






















