Delisle Carbine Project

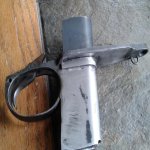
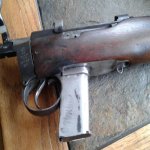
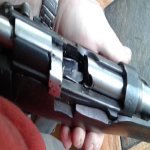
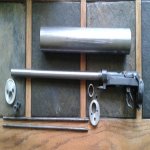
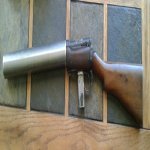
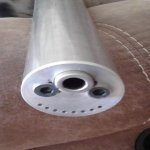
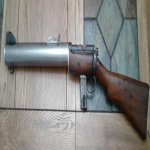
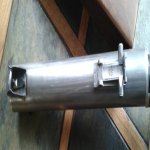
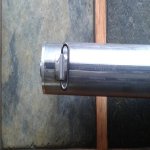
I think the key to getting good ejection is to make sure the extractor holds the case firmly in place. In hindsight I wish i had recessed the bolt slightly deeper to help with that. It is just barely deep enough. I had issue modifying the 303 extractor to work, so ended up making one from scratch, which seems to work better. Once the casing is held in place during extraction, getting it to eject is pretty easy.
 
Completed the new floorplate and mag holder today. I wanted to make sure the bend in the front of the mag holder closely matched the mag, and it came out good. Lots of filing and fitting to get things to fit, and to get the mag latching at the right height etc Others have said there are 3 really tricky parts to this build.
-boring out the action
-shortening the bolt
-and the mag/ mag holder/floor plate assembly

Well I'm glad to have this last of the tricky three done. First picture shows the mag holder in place, and welded to the trigger guard etc. Second picture is in the donor stock, which still needes to be cut down, And the last one shows a view of the mag in position from the open action.

Next step will be making the end plates, rods, and tubing for the faux suppressor.

20190606_165434.jpg
20190606_165349.jpg
20190606_165259.jpg
 

Attachments

  • 20190606_165434.jpg
    20190606_165434.jpg
    81.2 KB · Views: 563
  • 20190606_165349.jpg
    20190606_165349.jpg
    74.7 KB · Views: 562
  • 20190606_165259.jpg
    20190606_165259.jpg
    42 KB · Views: 560
Neat project.

Not to be that guy, but if that's a full length SMLE stock - instead of cutting it down, why not try and use an already sporterized stock? The full length stocks (especially original wartime production) are largely unobtanium.
 
Neat project.

Not to be that guy, but if that's a full length SMLE stock - instead of cutting it down, why not try and use an already sporterized stock? The full length stocks (especially original wartime production) are largely unobtanium.

Lol, yes its already a sporter stock. It also has four holes drilled into it for some strange reason, but luckily in the portion than will be cut off.
 
Finished the faux suppressor today, well mostly finished, still have some minor finishing touches to do. First picture shows the various parts. I welded a stud onto the recoil lug that prevents the rear cap from rotating. Shown beside that is the rear cap, a internally threaded retainer ring, and the nut for the stud.

Togother with thefront cap are the fasteners for it.

And of course the threaded rods and suppressor tube.

Second picture shows the gun assembled. The last pic is from the muzzle end. One of the things to keep in mind about Delisle's is they were all basically custom made, so some variety naturally crept into the finished product. All the Delisle reproductions I have seen spaced the threaded rods etc some distance from the barrel & muzzle port, and originals may have been produced this way at some point. But the original drawings clearly show the fasteners for the front cap so close to the muzzle port that the port needed to have scallops machined into it to provide clearance for the fasteners. I opted to follow the original drawings, and cut scallops into the muzzle accordingly. I plan on drilling the front cap fasteners in order to add the soldered retaining wires as well.

Anyway, after that will be the front and rear sights. But at least its starting to look like something. You purists will note the safety has been swithched out to the correct SMLE one, this is courtesy of Tiriaq.

20190612_113309.jpg
20190612_113219.jpg
20190612_112924.jpg
 

Attachments

  • 20190612_113309.jpg
    20190612_113309.jpg
    49.1 KB · Views: 482
  • 20190612_113219.jpg
    20190612_113219.jpg
    32.6 KB · Views: 481
  • 20190612_112924.jpg
    20190612_112924.jpg
    36.2 KB · Views: 482
Nice
Youre doing a great job

AirCav built one a few years ago. You could also ask him questions too if you need some answers.
 
Yes, its coming. I just started on the rear sight. It needs to have a concave cut in the base to match the 2" OD of the suppressor tube. I have it set up in the mill, with a boring head to cut that. Then will move on to the top features.

I know others have used a smle rear sight on their repros, and i have a couple spares. But I figure its worth the extra work to make the sight from scratch to better match the original sights. If I didn't, my ocd would kick in and drive me nuts, lol.
 
Just finished machining the rear site. Still needs a little polishing, but basically done. Not perfect by any means, but much better than using a totally different sight. It will pass inspection given enough distance, lol.


20190621_155855.jpg
 

Attachments

  • 20190621_155855.jpg
    20190621_155855.jpg
    72.6 KB · Views: 393
Impressive work thus far.

Always interesting to see the optimistic range/elevation scales on many of these weapons. Sort of like the 2800 yard volley sights on a SMLE.
 
well done! scratch making parts is both time consuming and very satisfying isnt it?

Yes indeed. The amount of time i spent on this sight was fairly ridiculous. I'm not by any means fast at machining, but there is a lot of fiddly features and odd angles to this sight. Can't be seen in the picture, but there are indentations along the side rails adjacent the yard marks. And a spring loaded detent in the slider that engages in them. Given the challenges, I'm pretty pleased with it.
 
Project is coming along, and i can almost see an end in sight. As per the first picture, all that is left is to add the handguard, and to smooth out any scratches on the metal, and refinish everything.

Second picture shows the front and rear sights mounted. On original guns the rear sights were riveted into place. I considered buying the tools to do that, but instead opted to drill and tap the holes, red loctite them in place, and file off the slots in the screw heads. Came out matching the look of the originals really well.

Third picture shows the front sling swivel mount, done the same way.

Off to the range tomorrow to see if any tweeks are needed before I do the finishing work. Then to tackle the handguard.

20190629_165417.jpg
20190629_165349.jpg
20190629_165302.jpg
 

Attachments

  • 20190629_165417.jpg
    20190629_165417.jpg
    36.4 KB · Views: 469
  • 20190629_165349.jpg
    20190629_165349.jpg
    31 KB · Views: 469
  • 20190629_165302.jpg
    20190629_165302.jpg
    45.6 KB · Views: 468
Last edited:
Instead of inletting the groove in the forend for the casing, the German chap on weaponsguild who made a Delisle bored a 2" hole through a block of wood, and then cut it. Instant inlet.
 
I had read that as well. I bought a 2" wood bit, thinking i would do the same. I just need to figure out which available wood would be the best match.
 
Cool thread.
I'm pondering putting a 45 ACP bbl on an 1889 Mauser in 7.65 x 53. Read an article concerning it in 'Rifle' magazine. Screw a 45 ACP bbl on, mount sights & stuff a wooden block in the mag well. Supposed to be the easiest action to do it to.
But sourcing a bbl and getting a gun plumber in my neck of the woods isn't easy ( SE AB).
Any steering on such things would be appreciated.
 
Congratulations on getting this far!

On my "one day..." list is a copy of William Godfray DeLisle's prototype based on the Browning SA-22 that was apparently not followed up on due to a perceived lack of power.

70Pd7VV.jpg
 
Back
Top Bottom