Query on re-loaded 30.06

Wallenstein

CGN Ultra frequent flyer
Rating - 100%
6   0   0
I have reloaded a set of once fired Federal cases, with CCI Large Rifle Primers and IMR 4895 powder (49 gr) and 147 gr FMJ Spire Point bullets.

I had checked case length before and after seating the bullets.

Following Lyman 50th Ed instructions.

The cartridges all loaded into my bolt action, but a couple of cases needed a bit of a push. They fired fine and ejected without any issue.

The results were about a 2 inch drop and an inch to the right of centre at 100 yds.

The right of centre could be just me though, I have noticed that I get that result with different rifles and may be down to me flinching or trigger control, especially once I have been through about 50 rds.

On cleaning the rifle I noticed some marks on the bolt face, round circular. The rifle has a couple of hundred rounds through it and this was the first re-loaded ammo I shot in it. Previously it had Barnaul and Federal through it. I can't be 100% sure the markings on the bolt face are new though.

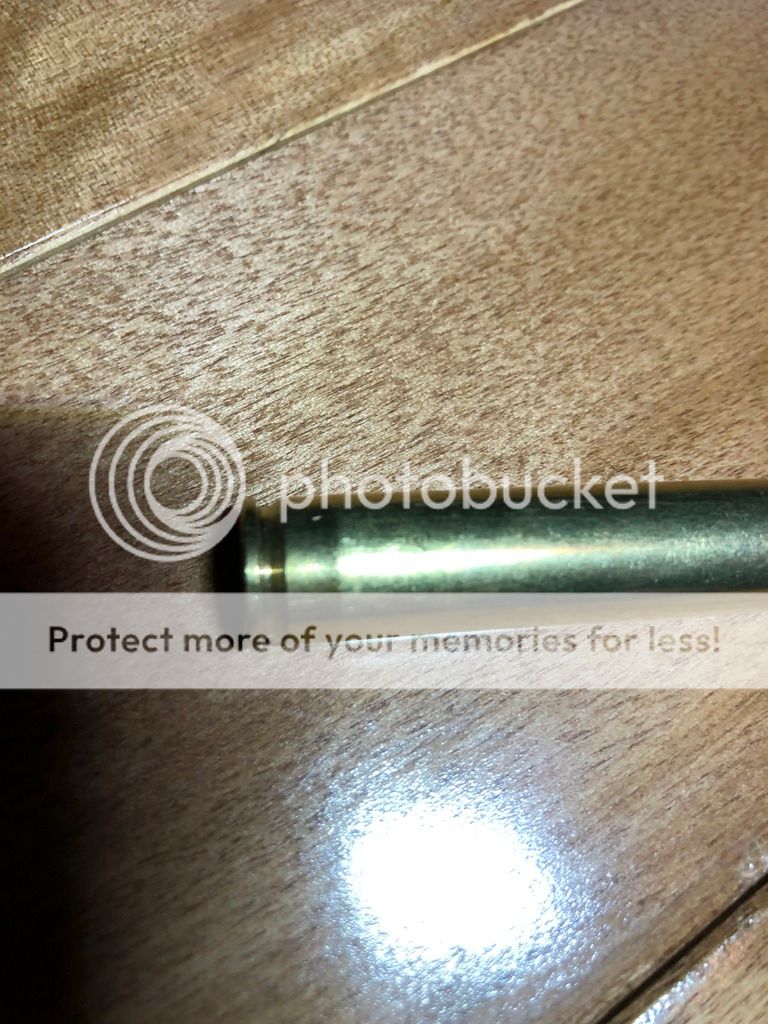
The brass looks as in the pictures below.

Is the shiny part towards the lower end of the brass and / or the Primer condition indication of an issue such as headspace and / or powder load ?


Last edited:
Others who know more may have different observations, but I will make two. The Lyman manual would have told you to "work up" to your load from a "Start" level - I checked Lyman 49 and do not see any loads for 147 grain bullets, but as per the 150 grain jacketed data given, the Start load for IMR 4895 is 46.0 and Max is given as 51.5. They used Winchester WLR primers for the loads they developed. They used Hornady Soft Point for their 150 grain bullets and Winchester cases. Any change from their "recipe" can result in different pressure results, hence the repeated advice to start at the Start level and work up - doubly so if you use differing components - you are using different bullets, different primers, different cases, and most likely, a different lot# of the powder.
If you would have "worked up", you would have a chance to see the signs change (or not). I believe that the "swelling" you are asking about on the case simply reflects the size of your chamber - if your dies fully smooth out that "swell", it will likely re-appear on the next firing - a most common place and cause of head separation.
I gave up on attempting to "read" pressure by looking at a fired primer, once I started using a chronograph. The muzzle velocity is accurately telling the shooter what his pressure is doing, as the load is worked up. Absolute velocity that is higher than published data can only be achieved by higher pressure than the published data achieved - differing barrel lengths being factored in.
 
Last edited:
well you jumped in with both feet... Welcome to the reloading ..... Fun times are just starting

90% chance the reason some of your rounds .. needed a extra push is when you sized your brass, you did not cam over.. on the press

Photobucket blows , so cant tell by your pictures what you are looking at

49g / 30-06 of IMR 4895 is close to a top load ... maybe even a over pressure load ... have you looked at your primers and the fired case heads ?

the rule is start at min charge ... or Max charge less 10%

Each rifle is different .. cases are different

I opened up http://www.hodgdonreloading.com/data/rifle

put in your data and came up with 2 loads

Case: WinchesterTwist: 1:10"Primer: Winchester LR, Large RifleBarrel Length: 24"Trim Length: 2.484"

BULLET WEIGHT 150 GR. NOS E-TIP
Starting LoadsMaximum Loads
Manufacturer Powder Bullet Diam. C.O.L. Grs. Vel. (ft/s) Pressure Grs. Vel. (ft/s) Pressure
IMR IMR 4895 .308" 3.300" 47.0 2,717 50,000 PSI 50.8 2,900 58,700 PSI

BULLET WEIGHT 150 GR. NOS BT
Starting LoadsMaximum Loads
Manufacturer Powder Bullet Diam. C.O.L. Grs. Vel. (ft/s) Pressure Grs. Vel. (ft/s) Pressure
IMR IMR 4895 .308" 3.250" 49.0 2,856 49,400 PSI 53.0 3,009 56,700 PSI


You either should have started at 47.0g (the min charge)... the 1st load (and worked up) or

2nd load 53.0 ( max charge) - 10% = 47.7g ................ and worked up

You have to adverage out loading data and maybe not use max data ... as it might not be safe

and if you look at 2 row of data ..... 3,009 fps 56,700 PSI ..... you know this is a hot load ....... 150g bullets do not go 3K fps in a 3006...... maybe in f class ...
but would be a barrel burner


You, I think are at max or over pressure
 
Last edited:
Thanks for the feedback, this is really useful.

I am suspecting that there is over pressure at play here.

The primers are kind of flat, although not as dramatic as some images on Google.

The cases have a very distinct shine to them from the bolt face side, of say 0.5 cm to 0.75 cm along the body, and then the surface is very different in its look for the rest of the body (matt / slightly blemished).

The neck area seems fine.

I'll have to go back to the start then, and go with the low load and work back up.
 
On the more positive side, I do not see any evidence of "brass flow" on your case head stamp area. When you get way too high - like into the 70,000 psi or more, the brass will "flow" into the ejector cuts on your bolt face. Opening the bolt tends to smooth out or shear off those "flows" - results in a very distinctive shiny spot. Not a level of pressure to aim for, just a sign to watch for of significantly too high pressure. Articles by John Barsness comparing "home" ways of guessing pressure versus actual pressure testing he did at the Western Powder lab pretty much discount bolt lift, extraction or primer look as dependable signs of high pressure, whereas his chronograph results were consistent with the lab's pressure results. A new custom bolt rifle with no burrs may open and extract very high pressure loads easily, but those loads are still "too high pressure".
 
I don't see any startling pressure signs. Primers are flattened to some extent but they aren't flowing. How do they compare to factory ammo fired primers from the same rifle?

The point of impact on the target varies between loads. Adjust the scope to centre it. No worries here.

The marks you see on the case look to be normal chamber marks but the pics aren't real clear. Do you have any factory cases that were fired in the same rifle to compare with your reloads? That's usually helpful and gives you a reference point.

The part of your post that might be worthy of concern is resistance in chambering. Could be a few different causes for that and some are possibly hazardous:
- bullet is running into lands
- case is not fitting needs more sizing
- case neck is too thick
- case needs trimming

See if you can locate where the resistance is coming from by using a dummy cartridge (no powder, no live primer) and colour it with black marker, then chamber it. Check the bullet ogive for groove marks. The contact area should show where the marker is scuffed or rubbed off the case.
 
Last edited:
I don't see any startling pressure signs. Primers are flattened to some extent but they aren't flowing. How do they compare to factory ammo fired primers from the same rifle?

The point of impact on the target varies between loads. Adjust the scope to centre it. No worries here.

The marks you see on the case look to be normal chamber marks but the pics aren't real clear. Do you have any factory cases that were fired in the same rifle to compare with your reloads? That's usually helpful and gives you a reference point.

The part of your post that might be worthy of concern is resistance in chambering. Could be a few different causes for that and some are possibly hazardous:
- bullet is running into lands
- case is not fitting needs more sizing
- case neck is too thick
- case needs trimming

See if you can locate where the resistance is coming from by using a dummy cartridge (no powder, no live primer) and colour it with black marker, then chamber it. Check the bullet ogive for groove marks. The contact area should show where the marker is scuffed or rubbed off the case.

I fired factory ammo first that day, to sight in a new Scope. I should be able to set both the new & re-loaded cases against each other for a more in depth analysis.

As for the chambering, perhaps the bullet was not seated deeply enough. I'll give the dummy a test run to see if that may be the issue (by replicating the seating depth).

I don't recall if anyone has mentioned this but you REQUIRE decent calipers. If you can see differences visually then you have far more serious problems than can be fixed by seating a bullet a little deeper.

You need to know how long the case is after full length resizing to ensure it is not projecting into the barrel past where it should be. If so it absolutely requires trimming to length. You need to know where your lands are in relation to the boltface to ensure that the projectile is not jammed dangerously into the lands. If so it needs to be seated deeper. None of these items can be identified by 'eyeing' it up / visually comparing cases.

Some preliminary info can be cleaned from the sharpie method posted previously.
 
Last edited:
I don't recall if anyone has mentioned this but you REQUIRE decent calipers. If you can see differences visually then you have far more serious problems than can be fixed by seating a bullet a little deeper.

You need to know how long the case is after full length resizing to ensure it is not projecting into the barrel past where it should be. If so it absolutely requires trimming to length. You need to know where your lands are in relation to the boltface to ensure that the projectile is not jammed dangerously into the lands. If so it needs to be seated deeper. None of these items can be identified by 'eyeing' it up / visually comparing cases.

Some preliminary info can be cleaned from the sharpie method posted previously.

Calipers I have and used. On that point at least I was careful to follow the Lyman instructions.

I suppose I jumped too far ahead with this re-load on the powder charge, i.e. : need to take a step back and re-start at the min end.

That said, next re-load will see more double checking of case length, too.
 
I'd lean much more towards cases not fully resized than bullets pushed into lands. A factory SAAMI chamber has generous freebore and light for cal fmj's do not put the ogive very far forward when loaded to a standard OAL. Typically the bullet will fall out of the case before it touches the lands. When you resize, have a look between the shell holder and die at the top of the stroke. Make sure they are making contact, you will see light between them if they are not. If you set the dies by the included instructions it is sometimes not enough to fully resize cases due to flex in the press. It's not uncommon to have to screw the die in a little more. Keep in mind that during full length sizing the shoulder is first pushed forward as the diameter of the case is squeezed down, then it is pushed back by the die near the top of the stroke. You can actually set an FL or body die to make fire formed cases too long for the chamber they were fired in. Screwing the die in further is the cure. Anyways, hope this helps and happy reloading!
 
OK - After 25 years of reloading, you learn a few things. When sizing a batch of brass, always check for trim length, and always try a few brass in your chamber(s) before further loading efforts.
 
QUESTION, are your primers slightly protruding from the base of the case? Lay a straight edge on the primer and see if you see daylight around its edges.

As stated in other postings here the bulge you see around the base of the case is where the case expanded outward to contact the chamber walls.

Below both of these .303 British cases were fired in the same No.4 Enfield rifle. The HXP case was smaller in diameter than the Prvi case and its base expansion was more pronounced. You have plus and minus chamber and case diameter manufacturing tolerances and many times American made cases are on the smaller side. Meaning what you are seeing is normal.

eM3H3ls.jpg


Below you can see where the base of the case stopped expanding to contact the chamber walls. And normally a case head separation occurs above this point as you can see below.

DVy4C4T.jpg


And now some advice, any time I start reloading a new rifle I start at the suggested start load and work up. Normally around the mid-load point, the primers become flush with the base of the case. This means the chamber pressure was great enough to push the case back into the bolt face. And this is the point where the brass is stretching and thinning and you have reached the elastic limits of the brass. Below this pressure point the primers will protrude from the base of the case and above this point, the primers will be flush. And this point will vary with different brands of brass and give you an idea of the strength of the cases.

Below is a example, Lake City brass is harder and stronger than other makes of brass. Meaning the other brands of brass will start to stretch and show pressure signs sooner.

4kXrGuI.png
 
QUESTION, are your primers slightly protruding from the base of the case? Lay a straight edge on the primer and see if you see daylight around its edges.

As stated in other postings here the bulge you see around the base of the case is where the case expanded outward to contact the chamber walls.

Below both of these .303 British cases were fired in the same No.4 Enfield rifle. The HXP case was smaller in diameter than the Prvi case and its base expansion was more pronounced. You have plus and minus chamber and case diameter manufacturing tolerances and many times American made cases are on the smaller side. Meaning what you are seeing is normal.

Below you can see where the base of the case stopped expanding to contact the chamber walls. And normally a case head separation occurs above this point as you can see below.

And now some advice, any time I start reloading a new rifle I start at the suggested start load and work up. Normally around the mid-load point, the primers become flush with the base of the case. This means the chamber pressure was great enough to push the case back into the bolt face. And this is the point where the brass is stretching and thinning and you have reached the elastic limits of the brass. Below this pressure point the primers will protrude from the base of the case and above this point, the primers will be flush. And this point will vary with different brands of brass and give you an idea of the strength of the cases.

Below is a example, Lake City brass is harder and stronger than other makes of brass. Meaning the other brands of brass will start to stretch and show pressure signs sooner.

4kXrGuI.png

This is really useful. I believe that what you are describing fits well with what I have observed on the brass and the bolt face.

I'll make good use of this going forward.
 
Back
Top Bottom