Questions about a custom Mauser Mod 1910

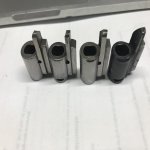
From "The Mauser Bolt Actions; A Shop Manual" by Jerry Kuhnhausen. pp 214, 215 - at least 5 (?) different lengths of mauser actions listed, 7 or 8 lengths of firing pins, etc. Page 43 - sketches of firing pins and cocking pieces - three firing pin variations shown - a military cocking piece, that might be yours, referred to as Long M98 cocking piece as opposed to "Standard M98 cocking piece" shown in my picture above (on the firing pin). The flat bottom one is apparently a "Commercial M98 cocking piece", and he shows a fourth one, with longer nose called a "Mark X speed lock cocking piece". Fun and games with milsurps - you have some information about what that receiver might have been. Somebody put a bolt in it - several original bolts from other series of M98 rifles could have worked - assuming no markings to show the bolt started with the receiver?. The firing pin, firing pin spring, cocking piece and original shroud went with the bolt, not the receiver. So a bit like a Chev front end grafted onto a Dodge vehicle and now looking for a headlight for it - and hoping somebody didn't use some handy Ford parts in that area...
 
Thank you once again! Such a wealth of knowledge here. I’m really glad I bid on this sporter and will do my best to get it to safe form before taking it out. I see that Tradexx has some spare cocking pieces. Any other good sources of old Mauser parts in Canada?
 
To help identify what that is - reading some more in Military Mauser Rifles of the World - page 109 - the Costa Rica Model 1910 made at Oberndorf : "The major, and outstanding difference is the shrouded bolt face enclosing the cartridge case rim. Patented in Germany in 1898, but rarely used on military weapons..... The face of the chamber has a machined recess for the extractor, making barrel alignment and any repairs extremely critical." There was also a Mexico Model of 1910, but not by Orbendorf - was made in Mexico by "Fabrica Nacionale De Armes". You said it is a 308 Win, now, and the barrel is in no way a military or ex-military barrel, so might want to look at the bolt face to see what you might be able to tell about it. Going to be very hard to find parts, if you can not nail down what it is or was...

I tend to toddle off into the "make it genuine" or "make it original" - I am sure that you are more interested in just making it "work". There will be people on this site that know how to make that cocking piece soft by heating - allows filing or whatever, and then can be re-hardened - all way over my head, but I have gunsmith books from the 1920's and 1930's where that sort of thing was considered an ordinary and not very remarkable thing to be able to do. Like making and tempering ones own springs...
 
Last edited:
Yes, like the old case hardening trick of using molten potassium cyanide. Good ventilation recommended.
 
Something else to consider. I have at least a couple of those "BOLD" triggers and at least one Timney - were listed for M96, and/or for M98 Mauser. Given what I just read about the number of different lengths of Mauser actions made, and at so many different plants around the world over a 50 odd year period, it seems incredible to me that every one of them would have exact same placement of the hinge pin for attaching a trigger? Maybe they did, but something to investigate in your case? In other words, perhaps an assumption being made that the BOLD trigger is correct for that receiver with that cocking piece?
 
As I understand it, the sear must hold the cocking piece in such a position that the safety is able to engage the cocking piece, cam it back off the sear, and hold it securely in that position. Doesn't matter if the cocking piece is military notched or commercial flat bottomed.
Adjusting this relationship is complicated because the cocking piece, safety and sear are all hardened. It is also a critical relationship, because an unintended discharge is to be avoided. I have seen a number of Winchester Model 70 rifles with inoperative safeties. There was enough wear - or wobble in the safety axle - that the safety could not engage the cocking piece and cam it back.
Techball - your are going to have to determine exactly what the problem is, and then determine what the remedy will be.
 
I really believe that the trigger is the issue here. The top sear is around 1mm too far back and therefore the safety cannot cam it back. So when the trigger is pulled and the sear drops, the cocking piece jumps forward 1mm and seats on the safety. Now the safety is the sear and will acts as the trigger. Not safe at all! I could try to find another trigger and see If the hinge pin is closer to the sear (aka bring the sear forward) or I can modify the relative position of the cocking piece by grinding the engagement surface back 1mm. I think this may be the easier option as the cocking piece is cheap to replace versus a new trigger (that may or may not have a different sear to hinge distance). Just need to figure out how to harden that engagement surface. Probably possible with a torch and quench.
 
Well, thanks to all the help here, I found the real problem! I disassembly the bolt completely and realized that the cocking piece was ground at the safety engagement surface and too much material was removed by the gunsmith. This makes so much sense now. I need to find me another cocking piece and start from scratch.

NbOTeDR.jpg
 
Last edited:
Picture below shows a few "commercial" style cocking pieces that I dug out. Left one pretty much untouched. Then seem to show a bit more grind to right front edge as you go to the right. None had anywhere near what OP has had removed. An "old guy" thing - can not remember if these were "rejects' from my own projects, or if they were just random that showed up in parts lots that I bought? But gives OP an idea what removing "a little bit" might look like, if needed. I am quite sure that the ones that needed "adjustment" in my own rifles were done with a bench sharpening stone - held by hand - cocking piece in vice. Has enough "bite" to remove a very small amount of metal. Can not imagine having enough control at a bench grinder, or using a dremel tool, but I am pretty "old school" that way...

IMG_3563.jpg
 

Attachments

  • IMG_3563.jpg
    IMG_3563.jpg
    38.8 KB · Views: 39
I might be getting a bit mixed up with P14 - three different makers - cocking piece to firing pin engagement almost identical arrangement to a Mauser, though. But, several instances where "a" random cocking piece will not turn on to a random other firing pin - spacing of the notches, sizing of the notches can be different. So, no real assurance that any random replacement cocking piece will go onto any random firing pin - may need grind or lap to "make work", but then that is also making a "one of a kind" that won't easily be replaced.
 
If positive safety operation with the M70 style bolt sleeve and safety is elusive, a completely different remedy would to be to install a commercial style bolt sleeve, cocking piece and a trigger mechanism with a side safety. This would require a bit of inletting, to clear the thumb safety.
The M70 style unit is a nice custom feature, though, so getting it working reliably might be the first choice.
 
I will sound like heretic, I am sure, to those that rely on trigger blocking safeties, like on Remington 700 or the Savage bolt actions that I have had here, but I prefer that Mauser style, also as used on Win M70, where the safety actually grabs and holds back the firing pin assembly, completely separately from the trigger and it's sear. With the trigger block safety - still relying on only the trigger's sear engagement to hold back the firing pin - often ground away, etc. to "improve" the trigger pull. Also, there has been some military rifles made - French MAS(?) that had no safety at all - was considered to exist between the user's ears. My Schultz and Larson M61 (.22 target rifle) does not have a safety either, but my S&L M60 (7x61 S&H) has the three position horizontal swing safety as seen on OP's rifle. So for hard use, I look at Mauser designs, Lee Enfields, as adopted onto P14 and M1917 and others - their safety grabs the firing pin as complete separate mechanism from the trigger and its sear. Having said that, I did most of my deer hunting in past 20 years with a Ruger #1 - a trigger blocking safety, I believe... Not sure I understand the role or purpose of a safety on a range-only, target shooting rifle - seems to me either rifle is "hot" and going to be fired, or the action is open?
 
Last edited:
I would imagine the far right is what was needed but the previous “gunsmith” went overboard. My understanding between the different length of cocking piece is that the longer piece was to add mass to the assembly for more force on the primer. Looking at the engagement notched between the firing pin and the cocking piece I would tend to agree with that logic. This means if the notches matches with a shorter cocking piece, it should still work with the same firing pin and there just will be more pin sticking out from the back of the cocking piece. Of course, test firing will tell if the striking forces are adequate. Right now, I’m going to play with grinding the engagement front edge of the cocking piece to get the safety to work. Knowing that this will shorten the firing pin travel and therefore also reduce the striking forces and increase risk of failed strikes. I will order a spare cocking piece from tradexx and work with that to get it proper. I also figured that a commercial flat bottom will greatly reduce the bolt lift forces. Right now the cocking piece has to push the sear down on the bolt lift as the notch in the cocking piece backs out over the sear.
 
There is a lot of mass in a Mauser firing pin assembly. I very much doubt that shortening the fall will result in misfires.
 
I think you might find that only a few thousands of inch removal might be required to make your safety work. Will have no effect on firing pin fall distance, because that is set by that lower face on the cocking piece sitting on the trigger sear. That will not change. But the exact placement / positioning of the top shoulder of that cocking piece might need adjustment to allow the safety to grab it and pull back, then return the assembly back onto the trigger mechanism.

I can not do the math, but it was a thing to reduce weight of firing pin by cutting long grooves; also have seen "sporter" and commercial mods to 96 cocking pieces that cut off 1/4" or more of the rear end - results in lighter weight striker assembly, which flies forward faster under the same main spring pressure. Not sure if "lighter and faster" delivers better energy to the primer than "heavier and slower", but many examples out there that both are working fine. Lighter can be seen as improvement (reduction) in "lock time" - time between trigger sear release and the primer going off, but I am not the type of shooter who would even notice such subtleties...
 
Last edited:
I had to remove a lot of the cocking piece to bring that sloped surface (Done by the previous gunsmith) to the safety so that it will be ramped back and release pressure on the trigger sear. And now the safety works! Firing pin fall distance is reduced by around 2mm. Will need to test for misfires but everything is working as it should and I can see the sear in the trigger being lifted by the safety! I’m lucky to have machining capability to perform the grinding in a mill. Checking hardness with a file suggest that the cocking piece is still hardened despite the material removed.

I still want to try fitting a commercial cocking piece to have the flat bottom. I still think that will greatly reduce my current bolt lift forces.

i4GaX7H.jpg

Spg1ret.jpg
 
Not real sure what you mean by "I can see the sear in the trigger being lifted by the safety"? You should see the rear end of the cocking piece move slightly to the rear as the safety is engaged. Cocking piece would be held by the trigger sear when safety is "off", then the safety is pulling that cocking piece off the sear as the safety lever is swung to "safe". Might be what you meant to say, but I don't think the safety will act on the trigger - they both are acting on the cocking pieces, on different surfaces.

So "normal" function test is to #### the rifle, then swing safety to "ON" - then pull the trigger. Nothing should move; nothing should happen. Then swing the safety to "OFF" - should see the cocking piece move forward very slightly, but that is all. Then pull trigger and firing pin assembly should release. Usually at same time, #### the rifle with safety "OFF" - tap butt of rifle on floor, or give the butt plate a couple of good hard "smacks" - the firing pin should not release - proves that the sear to trigger engagement is as it should be.

Sounds like you are ahead of where you were yesterday. Good on you!!
 
The cocking piece is moved back a tiny amount. It’s hard to notice but it is noticeable when looking at the hole on the side of the BOLD trigger (is the term the trigger sear?). In that hole, you can see the pressure on the sear is reduced and there’s a gap so the trigger can be pulled and the sear is not going to know as it’s held back.

Picture is worth more. Haha
ZvfCEAj.jpg
 
Back
Top Bottom