1022 trigger question

Peace River

Regular
EE Expired
Rating - 0%
0   0   0
Hi all, cleaning up my newish takedown.
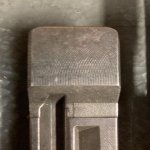
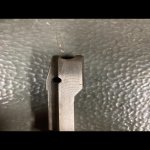
Thinking of doing a bit of trigger cleanup (factory trigger) and with the t group out i notice the trigger return spring is not drilled square behind the trigger but is actually angled a bit to the left, so when the trigger is squeezed the spring pin actually rides across the back of the trigger, sort of slides a bit. I can feel it when I squeeze the trigger... maybe it smooths out with use?

Normal?

I’ve got a couple of other 1022’s but none here to compare.

Never noticed that before, thanks in advance.
 
It’s the plastic trigger group housing and plastic trigger, I won’t call it polymer, that would be an insult to glock.
Just seems wrong, the pin/spring is not normal to the trigger, ie. Right angles. Don’t see how I can smooth the trigger with that abomination. Looks like they couldn’t figure out how to drill into the back of the trigger assembly, it’s like they used a hand drill at an angle...
If anybody can have a close look at yours to check, I’d appreciate it.
Thanks
 
Get yourself a Trigger Kit.
Use it how it is till the kit comes in.

U5gEUDy.jpg
 
I have done a few trigger jobs on 10/22’s. My bog standard one I have the trigger lightened to 1 pound 14oz and one thing I worked over was the trigger return plunger and spring (I do it to every one I work on). They are drilled at an angle. I chuck the plunger in a cordless drill and round the edges off making it dome shaped and then polish it up to about 1200 grit. I shortened the spring a half coil and then dab a little moly paste on the plunger before installation.

Edit: not saying that yours will required the half coil cut off. Mine did and others I have done may or may not need it. Depends on what you are looking for in trigger pull weight. What is your goal if I may ask? Just smoother or lighter? I will admit that 1lbs 14oz is a very light trigger and not for everyone. I just wanted to see how light I could go and still have a drop safe trigger. My preference is around 2.5lbs.
 
Last edited:
Thanks for the reply,

I was just looking at a light polish on the engagement surfaces as the trigger, after a few hundred rounds, still seemed boggy.
Take up is like overcoming a bunch of burs, not gritty, weird soft plastic grit feeling. Once i stripped it down, I noticed the off piste return spring pin. Loading a linear spring pin with a side load, seems a little not right, maybe get away with it metal on metal, but metal to plastic is a recipe for nastiness. Which I’ve got, the sear and hammer contact points are relatively good, but no matter what I do, without fixing the side loading on the plastic, I’m not going to win any prizes for smooth trigger pull.
You mentioned that they are all drilled at an angle? Wow. That seems goofy.
I may have to go with a metal trigger...
got a email into Ruger, they replied right away asking for pictures. Sent. Will let you know what I hear.
Cheers!
 
They are indeed all drilled at an angle. Seems Ruger didn't want to drill from the front of the trigger guard, so they used a long skinny drill to go in from just to the right side of the guard. With the rounding and polishing as outlined by Tinner4 above it seems any sliding across the back of the trigger is made relatively smooth, so not really a worry in terms of overall trigger weight or feel. On mine, with the aluminum block and trigger, I just rounded over the tip of the piston and polished it nicely, going to the buffing wheel with some green wax block on cotton to make it mirror smooth while spinning in the hand drill. Also found that clipping a whole coil of spring helped, wasn't too much in my case - but I have lots of little springs on hand so wasn't worried if I went too far and had to replace it.

I also polished about a half dozen places where steel rubs on steel in the trigger group. Rubbing faces/corners of the reset lever, sear and trigger, sharp stamped edges on the bolt lock and secondary extractor, face and sides of the magazine retaining plunger... anything which could drag, I made shiny. In the process I also flattened out the sear face from the undercut approximately 80 degrees from the factory to 90 degrees, and made it slightly shallower, perhaps reducing the height of that step by about 30%. Hammer face made shiny and bolt interface along that back corner rounded over more so sliding the bolt back is smoother. In the end my trigger weight went down from about something over 7lbs to about 3.5lbs.

I also put in a little grub screw through the trigger, just below the bend, adjustable so I could find where it started failing to engage the sear then backing off a turn or so from there to be safe. Full travel of the bottom of the trigger is about 3mm total now with marginal travel after the break. Feels as close to a match trigger as I'd want on a plinking 10/22. I like the 525gram trigger on my Pardini, but that's a match pistol, not for shooting in the field. With half the pull and the shortened travel of the Ruger trigger my groups shrank considerably with offhand shooting. Good enough.
 
Seems to me that it would not be that hard to drill the hole straight and put a liner of brass in, to have the plunger riding on metal too.

Find a piece of K&S brass tubing with the correct inside diameter. Hobby shops that deal in train stuff and rc airplanes etc., will have it.
Find a drill bit, either a stub length one, or cut a standard length one to size. Wrap some tape around it as a grip. You will need to twist it with fingertips. While keeping the drill from following the angled hole. You will be cutting plastic. It'll take some time, but not long.
Epoxy a section of brass tubing in place in the newly drilled hole. Probably wouldn't hurt to roughen up the outer surface with a bit of sandpaper.
Clean up the outer end with a fine file, check for any epoxy having stayed in the tube by running a right sized drill into it.

Assemble and see if a new trigger is in your future...

If you have a metal lathe, making the plunger tube from solid would be a cakewalk.
'Course, with a lathe and milling machine, making a all metal trigger housing and trigger can be done too.
 
They are indeed all drilled at an angle. Seems Ruger didn't want to drill from the front of the trigger guard, so they used a long skinny drill to go in from just to the right side of the guard. With the rounding and polishing as outlined by Tinner4 above it seems any sliding across the back of the trigger is made relatively smooth, so not really a worry in terms of overall trigger weight or feel. On mine, with the aluminum block and trigger, I just rounded over the tip of the piston and polished it nicely, going to the buffing wheel with some green wax block on cotton to make it mirror smooth while spinning in the hand drill. Also found that clipping a whole coil of spring helped, wasn't too much in my case - but I have lots of little springs on hand so wasn't worried if I went too far and had to replace it.

I also polished about a half dozen places where steel rubs on steel in the trigger group. Rubbing faces/corners of the reset lever, sear and trigger, sharp stamped edges on the bolt lock and secondary extractor, face and sides of the magazine retaining plunger... anything which could drag, I made shiny. In the process I also flattened out the sear face from the undercut approximately 80 degrees from the factory to 90 degrees, and made it slightly shallower, perhaps reducing the height of that step by about 30%. Hammer face made shiny and bolt interface along that back corner rounded over more so sliding the bolt back is smoother. In the end my trigger weight went down from about something over 7lbs to about 3.5lbs.

I also put in a little grub screw through the trigger, just below the bend, adjustable so I could find where it started failing to engage the sear then backing off a turn or so from there to be safe. Full travel of the bottom of the trigger is about 3mm total now with marginal travel after the break. Feels as close to a match trigger as I'd want on a plinking 10/22. I like the 525gram trigger on my Pardini, but that's a match pistol, not for shooting in the field. With half the pull and the shortened travel of the Ruger trigger my groups shrank considerably with offhand shooting. Good enough.


Great minds think alike Gerard. Sounds exactly like what I try to accomplish, including the trigger overtravel grub screw. When doing the first couple of triggers I refered to some great videos by Brimstone Gunsmithing on youtube. Another great resource is Rimfire Central ,which if I am correct, started out as a Ruger 10/22 enthusiest site and expanded to cover other rimfires. If I have time today I’ll pay RFC a visit because if I remember correctly there was a poster there that did a mod with a repurposed spring to make the trigger reset internal instead of the plunger in the trigger guard. Might be a good solution to the OP’s problem, although the polish and lightening of the spring did the trick for me and there are no new parts to source.

I also do the auto bolt release while I have it out of the trigger group. Funny enough it is usually that mod that gets my buddies asking if I can do theirs which leads down the road to more improvements. Have a stainless 10/22 in a Hogue overmold stock waiting for me today as a matter of fact.

D827B6DC-CCA4-4A5D-9A17-9710F8E3081A.jpg

A pic of the grub screw placement
 

Attachments

  • D827B6DC-CCA4-4A5D-9A17-9710F8E3081A.jpg
    D827B6DC-CCA4-4A5D-9A17-9710F8E3081A.jpg
    87.2 KB · Views: 224
Last edited:
Yup, Youtube is incredibly helpful with any number of pursuits. Just takes the right search string and practically anything can be found, often with very easy to follow instructions. Recently restored an old pocket watch for my son thanks to enthusiasts sharing their knowledge on Youtube, and on a couple of forums. Went from ugly and stopping frequently to looking lovely and keeping time within a minute per day.

I put the grub screw through my aluminum trigger instead of the guard, but it makes no difference - both approaches stop travel where one wants it stopped.

And yeah, as this is my first 10/22 the bolt release fuss was a bit of a surprise, bothered me quite a bit how fiddly that little lever could be to get the bolt to drop. A few Youtube tutorials and auto release was working great. A friend had me do that mod on his as well. I've also made a simple but fairly tidy mag release, forming a section of a 6061 aluminum tube into a sort of S shape such that it could be bolted on to the existing recessed mag release on my stainless model. Once I had it working as I liked, a dab of JB Weld between the new metal and old reinforces the bolt going into the tapped hole I made in the release tab, so the extended release can't swing to the side. My trigger finger easily extends to push it forward and drop the mag. Tried a couple of other shapes but this one seems least likely to get caught on something accidentally.

1022_trigger_stop_and_magazine_release.jpg
 
Interesting QC observation today. I have worked on two stainless versions of the 10/22 this month. One a takedown model and todays victim a non-takedown. Both are 50th anniversary editions and I own one myself that is not stainless. Presumably all made in 2014. Both of the stainless versions had casting imperfections on the interior of the receiver that I found when I smoothed them out. No big deal just a little more elbow grease to slick up. Don’t remember mine having any casting marks.

But the stainless takedowns bolt was the real QC miss. Machining marks all over it. I took a before picture of it but forgot afters and didn’t take pictures of todays work because the bolt was so smooth it was pretty effortless to get it polished up. I always have the best of intentions to take pictures as I go along but never seem to take them. Get too wrapped up in the job I guess.

Here’s the bolt. Must have been made on a Monday or Friday
61430989-8CDC-4E88-BEF5-B31D0AAE4CEF.jpg
59623330-EE8E-4B7F-9C6F-01AA6D12732C.jpg
 

Attachments

  • 61430989-8CDC-4E88-BEF5-B31D0AAE4CEF.jpg
    61430989-8CDC-4E88-BEF5-B31D0AAE4CEF.jpg
    49.8 KB · Views: 100
  • 59623330-EE8E-4B7F-9C6F-01AA6D12732C.jpg
    59623330-EE8E-4B7F-9C6F-01AA6D12732C.jpg
    46.9 KB · Views: 101
A little searching and I found the RFC thread on the trigger reset. Might have to try this myself.

ht tps://www.rimfirecentral.com/forums/showthread.php?t=167898&highlight=Trigger+reset+plunger

Broke the link. Just take the space out between the T’s
 
Thanks gentlemen, I really appreciate your advice. Done a fair bit of smithy work, but the gopher guns just didn’t seem to rate the effort!
I’ve got the Dremel fired up for the rough bits, and the mini mill for the bolt stop mod - I know, quicker with a file, but I need an excuse to use the power tools...
No reply from the Ruger factory, after initial response, they probably think I’m a bit retarded not knowing they could do something so ridiculous as to load a spring pin at an angle on a plastic surface. The pin itself is nicely rounded, and quite smooth, the problem is the contact point drags over the casting mark and soft plastic of the trigger.
I’m going to do what I can with the other bits, including coil cut. But it does seem to me that it’s a bit of a turd sandwich design. No matter what I do with the rest of it, it’s still going to stink. Only option is a Teflon insert in the back of the trigger, or a decent metal trigger. I like your overtravel setups, and mag releases, great ideas and doable.
I’ve got some ptfe sheet floating around, I keep leaning to an insert on the trigger back, but that seems like a lot of shop time.
Thinking of using some headlight compound on the back of the trigger to smooth it out... have to watch the heat tho. Anybody try cleaning up the poly trigger? Or are bare metal triggers (with stop screw) available anywhere in Canada? BX trigger groups are $140 at cabelas, but that seems like surrender!
Cheers, and thanks again for the great advice.

And bonus note, a Q tip shaft is perfect for a cheater pin in the trigger group!
 
Lol. I do the same with the Qtip shaft. My wife got me a few packs of the long wooden shaft ones a couple of Christmas’ ago.

I haven’t done too much to smooth out a poly trigger other than skin the casting lines off with an exacto knife. I would venture a guess that a high grit sandpaper and maybe lube it with some diluted dish soap would work to sort of polish the poly without friction heating it up and causing a mess. The headlight compound sounds like a winner too. You could also mill (a little jealous you have a mini mill) out the area where the plunger contacts and JB weld a small piece metal that you could then polish up as a bearing surface for the plunger. Doesn’t solve the problem of the plunger being at an angle and binding.

* Outside the box idea time: You could driil a blind hole in the back of trigger and a hole lined up in the guard directly adjacent and glue in two opposing magnets to push the trigger to reset. Spitballing. Fun thread.

Edit: could glue the magnet to the end of the set screw and achieve both a reset and an overtravel stop.
 
Last edited:
O boy, now you got me thinking... bump stock with magnets... hah hah.
Just finished up polishing engagements and cutting out the bolt hold open. Don’t be too jealous about the mini mill- one of them princess auto units, came in a big box at a garage sale. Guy had blown the gears by changing speed while spinning. Sourced the gears, then the fun began. Not sure why he had to strip it down to individual screws ( including table!) for a blown gear... but it was a puzzle to reassemble. Funner than ikea bunk beds tho. Takes me longer to get things set up than to do the work, but very... soothing? Just feels good to do something using more than a keyboard these days.

The back of the trigger is a bit humped where the pin rests, I like the mill flat and jb weld a small plate. Hmmm... And I get to use the mini mill... I’ll let you know in a few minutes if my polish/coil cut don’t work out.
 
Well then... the good:
Bolt release works perfect, I’m going to do this to all my 1022’s, why I didn’t earlier idk.
Polish really helped the actual release, crisp but a bit heavy still, only cut 1/4 coil off.

The bad:
Still plastic, galling feel leading up to let off. Trigger pin on plastic for sure. Gets worse the closer you get to hammer drop, makes sense.
I am still trying to wrap my head around the off normal trigger pin and spring. Kind of totally makes a nice straight back trigger finger pull useless, as the angled pin is floating across the back of the trigger and forcing it sideways. Wtf, over!
Pulling it apart and cutting another part coil off, and will see if I can “melt” the trigger contact surface smooth. Think I will try the dish soap and dremel cotton bur, Leary of embedding any kind of grit in that soft plastic.
 
Yeah, all Ruger had to do was drill a second hole in the trigger guard to facilitate drilling the plunger hole straight and the issue would be moot. I looked tonight and they did the same with the trigger pack for the PCC.
 
Well that solves my desire for a PCC in 45.
Tried a cotton bur with soap on the back of the trigger. Nada.
So naturally I got rammy, put a dry 3/8 bur on and went to town. Thermoset plastics are interesting. Went from doing nothing to liquid in no time flat! Thought I was in the market for a new trigger. But a bit less elbow grease and I managed to smooth the central contact point out nicely.
Getting quick at reassembly.
Note to tinkerers, always change more than one thing at a time, so I cut a bit more coil off, about one turn total.
Not bad, consistent break, a bit heavy, still a little “plasticky” take up, but a huge improvement.
Took off my Burris fastfire red dot barrel mount (magpul stock) and threw on a utg low receiver rail with a bug buster scope.
Red dot was just a little coarse for gophers/crows. Have to see if I can get it to hold zero after takedown.
Looks great, fde stock, fits in my pack...
But I do suspect melting the plastic was a bad idea in the long run. But it will let me test out accuracy without that abysmal trigger to decide if I want to take it any farther.
Cheers!

Ps, definitely need to figure an overtravel stop. That trigger after let off is like throwing a hot dog down an alley!
 
Yeah, all Ruger had to do was drill a second hole in the trigger guard to facilitate drilling the plunger hole straight and the issue would be moot. I looked tonight and they did the same with the trigger pack for the PCC.

Well if you're doing a bunch of work on it anyway, and that angle bothers you... why not make a little plastic dowel the right size for the hole and use a bit of JB Weld to glue it in? Then drill that hole from the front of the trigger guard and drill into the now hole-less back of the guard for a new, correctly angled trigger reset piston? Just a thought. Probably wouldn't do it for mine as with the steel-on-aluminum the feel isn't too bad and my biggest concern is long term wear of the surface on the upper back of the trigger. But if it ever galls I'll just put in a hard steel plate, polish it nicely and forget about it. A short section of the right size of drill rod would do.
 
Back
Top Bottom