Show me some custom DIY rebuilt stocks

bigHUN

Regular
Rating - 100%
2   0   0
Location
Aurora/ON
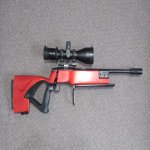
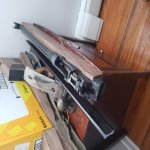
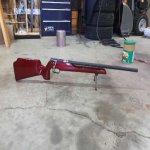
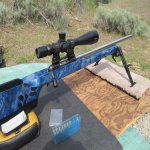
I am taking over one unfinished 308 project from an older fella he cannot work on it any longer. The goal was to build it for F-class, and now I will finish it, some day, hopefully.
I am absolutely not a fan of furniture stocks, but this is what it is as a package deal.
For first step I will make it competition ready, but as a second step my focus will be re-adjusting the wooden stock or replace it completely. I know what chassis I would like to get but for now I want to stay away from that expense until I confirm the precision and handling meets my liking.
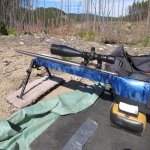
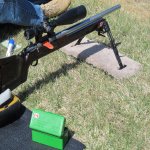
I have seen add on arca rail to the bottom, but also I would prefer an extended rail above the barrel as well down the road. This project will have limited use, for competition only not for every day shooting, I have other guns to burn the $ for training and practice.
Anybody can post some pictures about DIY wooden stock rebuilds? I have access to CNC machine shops so re-cutting the existing is not an issue.
 
:) Thanks for pics, keep them coming
btw, I am not a fan of using bipods, more into tripods. But a sled or over the barrel mount would work.
Mysticprecision.... how did you came up with that stock shape? I think I like it.
 
Last edited:
Not really a F class build at all, but is my “biggest” stock Iv built/own. I find it quite steady on the bench vs my lighter builds. I had it for sale but decided to keep it now for a range rifle as it’s shooting quite well. This spring Iv been playing on our 1000 yard range (only ever shot to the 600 yard board), I think I’ll enter the annual 1000 yard shoot next month with it. I won’t stand with the “shooters”, but I’ll go have some fun anyway :).


My Sako Vixen in a home made walnut stock.

fQ1221Dh.jpg


Back in the 80's, I bought a dozen M38 Swedish Mausers for $85.00 each. All but one were in very good to excellent condition. I worst condition one I sporterized and put in a home made walnut stock. I kept the best one in it's original issued condition and sold the other 10 for a decent profit over the years. I still have the sporter and the original condition rifle.

3AAoYmGh.jpg
 
Last edited:
Crude start testing which stock shapes work better. Start of small scale stock manufacture.

jRQ8ADY.jpg


A little later converted a few one off stocks by hand as special... "favours"

RPA Quadlock FTR
RAibVsV.jpg


one off Savage FTR
nhapeel.jpg


King of one mile France if I remember right
E0OKMkT.jpg


edi
 
Removed the screws but the bushings still won't move. How to remove without making much damage?

https://www.dropbox.com/scl/fi/4l46...ey=r7b5hk2sxgrx0a5w9usptzag3&st=8s7sl4wt&dl=0

Those flush cups (why do you want to remove them?) are glued in at a guess. get a brass rod with around 9.5mm diameter or good fit in the flush cups, heat up with a torch and stick the hot rod into the flush cup wobble a bit and pull out when loose. Can use a sling QD to finally pull out. Fill with bedding compound to make flush.
edi
 
Those flush cups (why do you want to remove them?) are glued in at a guess...edi

Right now the stock surface finish feels like " rough grainy" and very rounded typical more for hunting stocks. I don't need those cups for BR.
I want to sand down to smooth, and build up with epoxy more for flats...
Not sure yet I would paint spray it or just hydro dip.
I have air dry ceracoating locally but for unusual colours there would be a wait time, for hydrodip I need to drive 2 hrs A to B. But these down the road for now.

Consider 2 pack car paint after using high build filler + loads of sanding.
edi
 
Flush cups as you described, minimum deformation around holes. Tomorrow I will start the sanding, found two full cans of body repair epoxies in garage, probably many years old, will see if any aging issues.
 
Sanded today for couple hours just a roughout ... OMG how many layers of truck bed liner paint to reshape .... tomorrow will be a better day :)
 
Started adding fiberglass layers yesterday, and I just made a mistake with a last mix ... it was curing too fast so I added way less activator...now I will need couple days to harden... hopefully...

20240509_080602.jpg
 

Attachments

  • 20240509_080602.jpg
    20240509_080602.jpg
    62.8 KB · Views: 112
Back
Top Bottom