


You are using an out of date browser. It may not display this or other websites correctly.
You should upgrade or use an alternative browser.
You should upgrade or use an alternative browser.
Flip-Flop recoil pad
- Thread starter Why not?
- Start date
Good Job ! RJ
So I went and bought a pair of size 12 black flip flop for $5.25 all in, prep them so I could glue them face to face to make a nice thick pad! Ground off the “threads” on one of them to glue onto the stock. I have enough for an other pad!
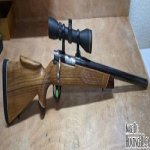
Anyway here is some pictures of my process! It is going on a 303 improved made on a Globe no1 mkIII!
https://photos.app.goo.gl/8nPxZ3bGZFkcM1ds7
That turned out well, good job. - dan
So I went and bought a pair of size 12 black flip flop for $5.25 all in, prep them so I could glue them face to face to make a nice thick pad! Ground off the “threads” on one of them to glue onto the stock. I have enough for an other pad!
Anyway here is some pictures of my process! It is going on a 303 improved made on a Globe no1 mkIII!
https://photos.app.goo.gl/8nPxZ3bGZFkcM1ds7
looking great!
- Location
- Southern Vancouver Island
FFRP's are the new thing now...................
Perfect for dumpster divers. Cheap solutions abound these days.

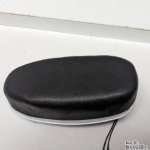
A similar idea I did for a guy last year but leather wrapped. Cut the old 50 year old hardened pad off the backing plate, aply the spongey stuff of choice soak and stretch the leather, let dry then contact cement on.


Attachments
Last edited:
A similar idea I did for a guy last year but leather wrapped. Cut the old 50 year old hardened pad off the backing plate, aply the spongey stuff of choice soak and stretch the leather, let dry then contact cement on.
View attachment 771600
View attachment 771603
That too is nice work. - dan
how did I miss this thread back in 2022
I was just looking at an old shotgun thinking... what am I going to do with this??? well now I know
its getting some foam floor mat, I have a faded red and yellow to choose from
J
I also have some black rubber stair tread that is more dense that might work out
How did you miss it back in 2011?

Please post report on how easy it was. And pictures, we need pictures! You could even do a double thickness pad, one thickness red and one yellow. Why not?
Ted
- Location
- Western Manitoba
I finally did one - some pictures below - might need more than one posting for all of them - I put some words BELOW the picture. The rifle was a push feed Winchester Model 70 that was received without a butt plate or recoil pad - rear face of the stock was more or less dead flat - I used some 100 grit sandpaper on a 2x4 block to "freshen it up" a bit before I applied the contact cement.

I set up the stock about as "red neck" as I could come up with - the barrel's muzzle is on a couple 2x4 blocks on concrete floor - then I used a pair of "squeeze clamps - one set to grab onto the stock, and other set to anchor tail of first clamp to the "sit down when working" work bench.
Image shows really roughly chopped out chunk of flip-flop and the butt soaking with contact cement partially dried - I let that go until neither would stick to clean paper set on them - then stuck them together.
Contrary to earlier posts - I could not find water based contact cement in our small town stores - so I ended up to use "LePage" brand Contact Cement - "Heavy Duty", which I found at local Home Hardware store. Most definitely a solvent based stuff - good fumes coming off it when that can was opened. I can not smell anything at all now that it is all dried and finished.
By the way - that is "three" layers of masking tape - a 1/2" wide light green layer, a 1.5" off-white layer and a 2" wide dark green layer. Was a royal PITA to get the edges to match up with the wood edge of the butt - so I had left some a bit proud and cleaned it off with the sandpaper on the wood block.

That is the irregular shaped thing stuck onto the wood - just pressed down really snug - used a 1/2" dowel end to get every square centimetre squeezed together - was LOTS of excess to be trimmed off.

I stood the thing butt down on the work bench and sliced away with my "workshop special" butcher knife to get the worse of the excess removed. By the way, the metal parts of the rifle had been removed from the wood stock - was just the wood part that I was handling.


These are the "source" of the material used - had been in my drawer waiting for this, since those thread was first written - however long ago that was ...

This is the belt sander that I used - I think it was 80 grit on the belt - bolted to the "stand up when working" work bench - dust and crap flying all over - I do not have a dust control system for it ...
I set up the stock about as "red neck" as I could come up with - the barrel's muzzle is on a couple 2x4 blocks on concrete floor - then I used a pair of "squeeze clamps - one set to grab onto the stock, and other set to anchor tail of first clamp to the "sit down when working" work bench.
Image shows really roughly chopped out chunk of flip-flop and the butt soaking with contact cement partially dried - I let that go until neither would stick to clean paper set on them - then stuck them together.
Contrary to earlier posts - I could not find water based contact cement in our small town stores - so I ended up to use "LePage" brand Contact Cement - "Heavy Duty", which I found at local Home Hardware store. Most definitely a solvent based stuff - good fumes coming off it when that can was opened. I can not smell anything at all now that it is all dried and finished.
By the way - that is "three" layers of masking tape - a 1/2" wide light green layer, a 1.5" off-white layer and a 2" wide dark green layer. Was a royal PITA to get the edges to match up with the wood edge of the butt - so I had left some a bit proud and cleaned it off with the sandpaper on the wood block.
That is the irregular shaped thing stuck onto the wood - just pressed down really snug - used a 1/2" dowel end to get every square centimetre squeezed together - was LOTS of excess to be trimmed off.
I stood the thing butt down on the work bench and sliced away with my "workshop special" butcher knife to get the worse of the excess removed. By the way, the metal parts of the rifle had been removed from the wood stock - was just the wood part that I was handling.
These are the "source" of the material used - had been in my drawer waiting for this, since those thread was first written - however long ago that was ...
This is the belt sander that I used - I think it was 80 grit on the belt - bolted to the "stand up when working" work bench - dust and crap flying all over - I do not have a dust control system for it ...
- Location
- Western Manitoba
Pictorial continued ...

I used that belt to get so that it would scuff that first layer of masking tape - to expose the second layer - or at least that was my plan...

That plan seemed to be working so I got "brave" and removed the two outer layers of masking tape - down to that last 1/2" wide layer - and managed to scuff through it to hit the wood, which I was hoping not to do. I must be getting old or weaker or something ...

You should be able to see the white marks where I managed to scuff that wood - did not really want to completely refinish that stock, so thought I would try to "touch that up".

I used an artist small paint brush and sloshed on a line of some MinWax brand "Gunstock" stain - #231 - seemed to have quite a bit of red in it - I intended to rub that off, but forgot about it - so what you see is just that stain sloshed on full strength - likely should have a varnish or something as a filler to match up to the shiny factory finish on the stock, but what you see will have to be "good enough" for what I intend for this rifle.
Many thanks for advice and encouragement from CGN'r DGY - you can read his posts earlier in this thread.
I used that belt to get so that it would scuff that first layer of masking tape - to expose the second layer - or at least that was my plan...
That plan seemed to be working so I got "brave" and removed the two outer layers of masking tape - down to that last 1/2" wide layer - and managed to scuff through it to hit the wood, which I was hoping not to do. I must be getting old or weaker or something ...
You should be able to see the white marks where I managed to scuff that wood - did not really want to completely refinish that stock, so thought I would try to "touch that up".
I used an artist small paint brush and sloshed on a line of some MinWax brand "Gunstock" stain - #231 - seemed to have quite a bit of red in it - I intended to rub that off, but forgot about it - so what you see is just that stain sloshed on full strength - likely should have a varnish or something as a filler to match up to the shiny factory finish on the stock, but what you see will have to be "good enough" for what I intend for this rifle.
Many thanks for advice and encouragement from CGN'r DGY - you can read his posts earlier in this thread.
I know I posted about this earlier, but it needs to be put up again. My wife and I were staying in Dawson Creek for a few days. We searched all the usual places, but most were either too stiff or too much dinero. Dollar Tree had the cheapest and the softest. Not sure what it's like now.
 ..........
- Location
- Western Manitoba
Okay. Did my first ever flip=flop recoil pad. Not as easy as it may seem. Put it on a resurrected BSA sporter M1917 30-06 that kicked like a mule. Basically traced the butt plate and cut out the rough pattern with scissors. Trimmed it with scissors to a point as close as I dared, then glued it on with Shoe Goo. Set the rifle against the wall, barrel down and weighted a board on the pad with a couple of boxes of shotgun shells, then let it sit for a couple days. I wrapped the stock with a couple rounds of electrical tape. Today I sanded the edges to as close to the tape as I could. I removed the tape, and found that the pattern (little round dots) keeps the pad away from the stock enough to leave a gap all the way around with little bits of glue showing.
Hmm. I guess a body needs to find material that is flat on one side. The side showing on mine has a nice pattern that doesn't look at all out of place. If care was taken when cutting out the rough pattern, the lines on the showing side could be straight across. Mine aren't exactly straight, though.
Any ideas? How did you people trim to a rough size? I am thinking the orthopedic foam might be smooth on at least one side? ed99??
p.s. I won't be entering my first one in the best flip flop recoil pad contest. After all, it was a trial run.

So that you know - it was this post of yours that caused me to sand down the face of the flip flop that went against the wood - turned out to be like a cloth (with Toronto Maple Leaf logo) or something embedded in the flipflop material - I think it "stuck" better once I had sanded it - might be the roughness created, might be the inner surface exposed - not really sure. But it seems to have "stuck on" fairly well, for whatever was the reason.
Pictorial continued ...
View attachment 776207
I used that belt to get so that it would scuff that first layer of masking tape - to expose the second layer - or at least that was my plan...
View attachment 776208
That plan seemed to be working so I got "brave" and removed the two outer layers of masking tape - down to that last 1/2" wide layer - and managed to scuff through it to hit the wood, which I was hoping not to do. I must be getting old or weaker or something ...
View attachment 776209
You should be able to see the white marks where I managed to scuff that wood - did not really want to completely refinish that stock, so thought I would try to "touch that up".
View attachment 776210
I used an artist small paint brush and sloshed on a line of some MinWax brand "Gunstock" stain - #231 - seemed to have quite a bit of red in it - I intended to rub that off, but forgot about it - so what you see is just that stain sloshed on full strength - likely should have a varnish or something as a filler to match up to the shiny factory finish on the stock, but what you see will have to be "good enough" for what I intend for this rifle.
Many thanks for advice and encouragement from CGN'r DGY - you can read his posts earlier in this thread.
Nice job. - dan


