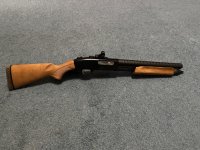
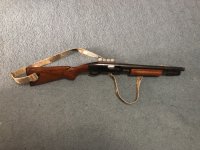
Heat shield on 14" Supernova

F22_RaptoR

CGN Ultra frequent flyer
Rating - 100%
12   0   0
So I've wanted to do this forever, and I finally managed to get a steel heat shield that wasn't 100 bucks o_O

I had previously attached a 4-shot Mesa Tactical shell carrier into the stock because I wanted this thing to fit into a scabbard, and the side shell carrier wouldn't let it fit. Cut down the top rail so the little Bushnell TRS25 actually co-witnesses, as the original Mesa top rail just sat way too high.

Last thing I did was modify the trigger components so it unlocks the pump when you release the trigger, it's so much nicer when you have a pull-grip on the pump to not have to 'reverse' pump it just to unlock the bolt. An absolute huge amount of work to get it to lock fully and safely and then release as soon as the trigger is released, but very satisfying. That was my biggest complaint about the supernva.

Anyways, enough blabbing and some pics! :cool:

IuK3R4X.jpeg


YuvKIVw.jpeg
 
It looks great, and I'll be looking to do something similar to a 1301 Mod 2.

Details though, where'd you get it, what did you have to do to it to get fitment, and finally, is it solid, like Mossberg 590A1 solid?

I've done this to my frankenberg, and it's solid enough. After several hundred heavy loads it hasn't moved and it does keep my hand from burning on the barrel, but it's a reinforced plastic. A steel shield would be so much better.

I also have an 870 who could benefit from the treatment.
Mossberg 835.jpg

14_ Remington 870 Wingmaster (1970's).jpg
 
Last edited:
How long did it take you to get the pump/trigger work completed and working 100%?

It was a couple hours of work, mostly taking parts out, fitting then putting back in test the function. At first I had thought I only needed to modify the bolt stop lever, but once you get it to drop even with pump under pressure, the pump will unlock immediately after the hammer falls, which I felt wasn't completely safe....

I needed to modify the bolt carrier (very minor), bolt stop lever (minor), trigger bar and sear (fairly major)

The sear and trigger bar are what keeps the bolt stop lever locked upwards, but they have a 90 degree engagement angle so the bolt stop just pops up with the hammer spring plunger once the hammer falls. I needed to change the engagement angle on both parts so it physically locked it as long as pressure is on the trigger, so I changed the engagement angle to about 5 degrees. This way if you have pressure on the trigger you can push down on the bolt lock lever (with the trigger group out) and it can't pop down out of the way until you release the trigger. This felt a lot safer to me as you have to completely release the trigger before you can start moving the slide back (combined with the rotating bolt that needs 1/8th inch of travel before the bolt even starts unlocking), but it's completely smooth and no jankiness. After the process was done, I can pull back forcefully on the pump and it won't unlock until I pull the trigger and release it, and it immediately unlocks.

All in all, I would say don't attempt it unless you're VERY experienced with fitting parts, as you can definitely screw up the trigger group. I can go and take a bunch of pics and do a write up if anyone's interested in the process, but I would say this is definitely into the realm of proper gunsmithing territory...
 
It looks great, and I'll be looking to do something similar to a 1301 Mod 2.

Details though, where'd you get it, what did you have to do to it to get fitment, and finally, is it solid, like Mossberg 590A1 solid?

I've done this to my frankenberg, and it's solid enough. After several hundred heavy loads it hasn't moved and it does keep my hand from burning on the barrel, but it's a reinforced plastic. A steel shield would be so much better.

I also have an 870 who could benefit from the treatment.
View attachment 979848

View attachment 979849

Thank you! Both your little shorties look fantastic as well, I love the wood stocks :cool:

I got the heat shield from Slade Street Tactical in the USA, it was about 80-ish bucks CDN shipped, which is a lot better than any I could find locally. (I think 100 bucks plus shipping is lowest I could find in stock?) They sell the polymer and steel ones for a few models, so I got one of the steel ones.

The distance between the barrel extension ring and the front sight base was right about 11 inches (heat shield was 13.75) , so I cut it just longer than that (there was a row of vents about 1/4" longer) so I could cut a notch into the front of the heat shield to index on the front sight. I ended up removing the front steel band and riveting it onto the front of the heat shield to act as a standoff, then I attached the little 'ramp' to the heat shield so I could put a screw into the front sight base to attach it at the front. It's completely solid (had to pinch the rear prongs of the heat shield to fit solidly at the back of the barrel too) and it doesn't have any movement at all, I ended up painting the entire thing after smoothing out all the sharp edges and bits, so it's not actually metal on metal, which should prevent any metal scratching damage. I also needed to cut little notches into the back of the pump to clear the tabs at the back of the heat shield, but that was super easy with a dremel.

As a note, the Krylon Fusion primer/paint combo in flat black is a perfect match for the Benelli plastic components, even better than the ultra-flat Kyrlon camo that I usually use. It's pretty close in the pictures, but in person it looks like the exact same material!
Found them. Thank you. I've made an inquiry as to whether a certain steel shield will fit the models I'm looking to put shields on.
 
Thank you! Both your little shorties look fantastic as well, I love the wood stocks :cool:

I got the heat shield from Slade Street Tactical in the USA, it was about 80-ish bucks CDN shipped, which is a lot better than any I could find locally. (I think 100 bucks plus shipping is lowest I could find in stock?) They sell the polymer and steel ones for a few models, so I got one of the steel ones.

The distance between the barrel extension ring and the front sight base was right about 11 inches (heat shield was 13.75) , so I cut it just longer than that (there was a row of vents about 1/4" longer) so I could cut a notch into the front of the heat shield to index on the front sight. I ended up removing the front steel band and riveting it onto the front of the heat shield to act as a standoff, then I attached the little 'ramp' to the heat shield so I could put a screw into the front sight base to attach it at the front. It's completely solid (had to pinch the rear prongs of the heat shield to fit solidly at the back of the barrel too) and it doesn't have any movement at all, I ended up painting the entire thing after smoothing out all the sharp edges and bits, so it's not actually metal on metal, which should prevent any metal scratching damage. I also needed to cut little notches into the back of the pump to clear the tabs at the back of the heat shield, but that was super easy with a dremel.

As a note, the Krylon Fusion primer/paint combo in flat black is a perfect match for the Benelli plastic components, even better than the ultra-flat Kyrlon camo that I usually use. It's pretty close in the pictures, but in person it looks like the exact same material!
I have found using engline block enamel matt black paint (i.e Dupili-Color DE1634) works well with firearms, since it is oil and fluid resistent and good for up to 260C (500F) and does not flake off. It has ceramic hardeners
 
Back
Top Bottom