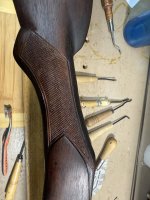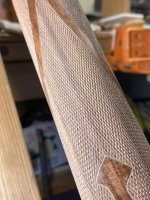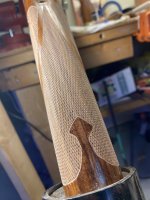











































First crack at checkering

flying pig

CGN Ultra frequent flyer
Uber Super GunNutz
Rating - 100%
115   0   0
Thought I’d post a pic and share some of what I learned.

Your master lines should work with the rear line of your grip pattern, or have somewhere to properly terminate or it will look funny.

Wide borders are ugly.

Old oil soaked wood is not your friend.


All in though, this one has somewhat was necessary and now I know I can do it. More time, patience and a fresh oil free stock next time and it should come together nicely.
 

Attachments

  • IMG_2953.jpeg
    IMG_2953.jpeg
    138.6 KB · Views: 183
  • IMG_2952.jpeg
    IMG_2952.jpeg
    125.1 KB · Views: 183
When I checkered my first stock I made a couple of diamonds out of stiff cardboard ( flexible plastic would have been better ) I made one up at a 3-1 ratio, and another at 3 1/2 - 1, that is 1 inch wide and 3 inches long. I used this to do my layout on the stock, so the points of the pattern would correspond to the diamonds of the checkering. I still haven't used the 3 1/2-1.

I found it easier to apply the finish to the stock first; it makes it easier to keep track of your lines.

It takes a lot of care when spacing out the lines so you don't skip out of the guide line. The first couple of passes also demand a lot of attention to keep them straight and in their proper lane. Trying to fix those mistakes is apt to create a fuzzy mess. A jointer is your friend.

Recutting existing checkering is good practice.
 
You do get better with each job you do... but you should be doing one a month until you burn out.

This was as good as I ever got... no where close to what my stockmaking instructor did. He was so fast and so good.

View attachment 1041915
I could see that for sure. There are a few ‘practice’ pieces here before I dig into a good one. It’s like anything, if you don’t use it you lose it. I used to be pretty decent at stockmaking and fitting but have lost a bunch of that in the 15 years since I did it last. Just now gaining interest in doing it again. Thankfully I kept my blanks and tooling.
 
I’m still learning here. I’m not sure anything tests my patients and skills as much as checkering does? Tedious, but I love tedious lol

This is the only round Iv tried checkering, just playing on a big semi inlet stock.

If you plan to keep going and doing a bunch of checkering, I highly recommend checking out Ullman precision carbide cutters. They’r pricy to start but will outlast the dembart / gun line cutters by a lot ime, so cheaper in the long run. I find them easier to control, and Ullmans see through handle is a gem to use too.

Iv been prepping wood with spar urethane diluted a touch with oil, I find it builds up quicker (doesn’t look nice of course) but gets a guy a nice hard surface to scratch on pretty quick for practicing.

If anyone’s on IG, I suggest checking out etkhandmade, probably the best custom checkering Iv ever seen.

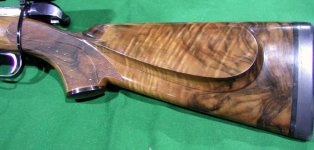
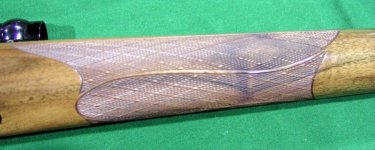
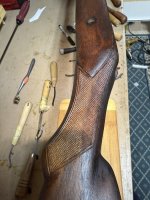
IMG_3524.jpegIMG_3398.jpegIMG_3397.jpeg
 
I’m just trying my hand at it now and have a new found appreciation for those that do it.
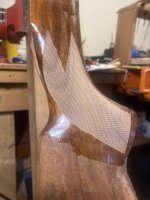
It is one of the most difficult things I’ve ever attempted to do and is taking far longer than I anticipated (and I knew it would be time consuming). The hand eye coordination required on an unforgiving material is right up there and now when I look at a checkered panel I’m looking at it in a whole new light and appreciate the effort at a whole different level recognizing the mad skills required of the craftsmen to pull off such perfect execution of a tedious task.
Knowing I’ll never attain that level of skill I still decided to try resurrecting the checkering on a stock that is borderline firewood; years of oil soaking, damages and a prior bubba redo that sanded too much material away including about half the pattern of the original checkering have made it a challenging learning opportunity. After stripping it, then thoroughly pulling as much oil out of it as I could, steaming out dents and resurfacing (sanding) I just couldn’t live with leaving a ghost pattern behind so I decided to tackle it myself.
4 panels already half laid out and nothing to lose but time and money…if I destroy the stock I’m not out much -$500 would get a whole replacement rifle in better shape than what this is.
The first shocker was the absolutely insane cost of the tools, even a limited amount was way more than realistic, “a reasonable amount” wasn’t even in the rear view mirror…if you add today’s exchange rate and tariffs I’m thinking you burn money for heating…
The next lesson learned was one of those magnifying lighted headsets is an absolute must.
I also found it is a very focused activity for me (which I like, shuts the noise off) but my hands, back and attention can only do about an hour before fatigue sets in and mistakes start happening. My brain likes the activity and wants to continue as I see the progress but the result degrades and the body complains afterwards so now I’m trying to do less of it more often and this approach seems to be working as my work is far from good but improving.
Something I plan to do is to get a clean piece of new walnut and cut a pattern on it because I think the old saturated wood I’m working on now is a major contributor to the difficulty. Even after pulling out as much oil as I could the wood just doesn’t seem the same as good wood, it isn’t as hard in some places as I think it should be, I’d almost describe it as punky…like I said it should likely have wound up in the burn pit but I’m too far in for that now.

Knowing what I know now if I was 30 (or 40) years younger for the small amount and cost of the tooling, minimal space required to do it and the lack of people still doing it I would go all in on it as a sideline business as I think a guy could make a fair buck at it in the off hours. Also as difficult as it is I find it very enjoyable to do and I have no doubt with young eyes and stamina the skills and speed would quickly develop.
For me though I’m a panel and a half in and looking forward to my final result in the distant future…
 
Making a straight and parallel line is the easy part, keeping it clean at the borders, separates those that have it sussed, from those that don't, IMO.

Gonna suggest that 1/4 of your benchtime spends on the main body of the pattern, the remainder, on getting the pattern clean at the edges without over-run!

Also, in my admittedly limited experiences, don't even TRY, to make it one pass and done, figure three or more passes to get to depth, then add in the time to make the borders clean.
 
Back
Top Bottom