












































This came up in an online conversation the other day: What I've dubbed "zipper bolt". The person complained that the bolt, when worked fore to aft, kinda' "buzzed" like a zipper.
This is the solution.
First, we have to understand how the bolt rides in the receiver:
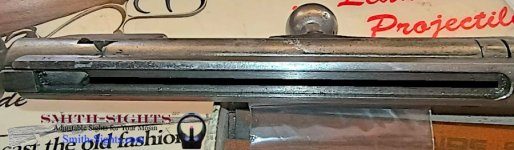
This is the bolt connector. All the bolt parts ride on it.
You'll notice the cutout I've marked with a black line. That is where the bolt stop (on top of the trigger) and sear ride. The bolt stop snags the end of the bolt connector (right side in this picture) and keeps it from coming out of the rifle. This is why you pull the trigger all the way to the rear to remove the bolt; this moves the bolt stop on top out of the way so it no longer retains the bolt.
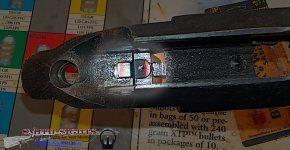
Sear (left) and bolt stop (right), both marked with red lines. (Your trigger won't have the set screw; the one shown is one of my adjustable two-stage trigger sets.)
Neither the top of the sear, nor the top of the trigger bolt stop, should contact the underside of the bolt connector cutout. However, for various reasons, they sometimes do. Combined with roughly-finished connector slots common during wartime manufacture, and this causes rough operation, "zipper bolt".
The safest fix is simply this:
1. Polish along the black line shown in the first picture to reduce machining marks.
2. Polish the tops of the trigger and sear along the red lines shown in the second picture.
Do NOT reduce the height of either the trigger bolt stop nor the sear. While tempting, if you don't look at the system as a whole and adjust it as a whole, reducing the top of the trigger bolt stop may allow the bolt to continue out instead of stopping when you work the action, and reducing the sear may cause a dangerous trigger condition. Don't do it.
Polish it all until it shines, apply grease, and your "zipper bolt" will be greatly reduced.
Regards,
Josh
This is the solution.
First, we have to understand how the bolt rides in the receiver:
This is the bolt connector. All the bolt parts ride on it.
You'll notice the cutout I've marked with a black line. That is where the bolt stop (on top of the trigger) and sear ride. The bolt stop snags the end of the bolt connector (right side in this picture) and keeps it from coming out of the rifle. This is why you pull the trigger all the way to the rear to remove the bolt; this moves the bolt stop on top out of the way so it no longer retains the bolt.
Sear (left) and bolt stop (right), both marked with red lines. (Your trigger won't have the set screw; the one shown is one of my adjustable two-stage trigger sets.)
Neither the top of the sear, nor the top of the trigger bolt stop, should contact the underside of the bolt connector cutout. However, for various reasons, they sometimes do. Combined with roughly-finished connector slots common during wartime manufacture, and this causes rough operation, "zipper bolt".
The safest fix is simply this:
1. Polish along the black line shown in the first picture to reduce machining marks.
2. Polish the tops of the trigger and sear along the red lines shown in the second picture.
Do NOT reduce the height of either the trigger bolt stop nor the sear. While tempting, if you don't look at the system as a whole and adjust it as a whole, reducing the top of the trigger bolt stop may allow the bolt to continue out instead of stopping when you work the action, and reducing the sear may cause a dangerous trigger condition. Don't do it.
Polish it all until it shines, apply grease, and your "zipper bolt" will be greatly reduced.
Regards,
Josh