- Location
- WMU203, Alberta (YCT)


You are using an out of date browser. It may not display this or other websites correctly.
You should upgrade or use an alternative browser.
You should upgrade or use an alternative browser.
.303 Lee Enfield Accuracy Problems....
- Thread starter angrygopher
- Start date

I have cleaned out the crack with lighter fluid and compressed air repeatedly, then used a 2 part epoxy and kinda stuffed er in there..then clamped for 24 hours. My no1 mk3 is still holding up and that has been for over year.
Something liquidy..ish makes the job easier.
Something liquidy..ish makes the job easier.
- Location
- WMU203, Alberta (YCT)
Thanks, I was wondering if anyone had done a mechanical repair using pins or splices. There is so much grease and oil in the crack I don't think I would be confident of epoxy holding. Also, if I do use epoxy - I would prefer to use something with strands, I think that would be a lot stronger and without much additional cost.
I have the same problems. My No 5 is at best a 5 or 6 inch rifle at 100 yds, 5 shots (benched). At 200 yds it's not worth shooting as the group seems to settle into 2 distinct patterns.
It seems to me the first 3 shots cold bore are reasonable going into 3 inches or so at 100 yds and shots after that blow open the group to 5 or 6 inches. That would indicate to me the problem is heating of the skinny barrel combined with questionable bedding around the barrel and action.
Point of zero is fine so I don't get the issue of a wandering zero that is sometimes spoken about.
In summary, the rifle is what it is, inherent to its design and I've given up trying to make a silk purse out of a sow's ear. I appreciate it for its other qualities - light weight, short overall length, handiness and good fire power with the 10 rd mag. It's always been reliable and very fast to acquire a sight picture thanks to an excellent combat sight.
A target rifle however it will never be.
- Location
- WMU203, Alberta (YCT)
It does make a great deer gun in the bush when a single shot at less than 100 yds is a reasonable expectation. On the great northern prairies of Canada, meh bad choice LOL
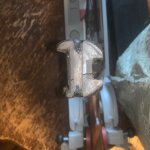
ETA: How the heck do I get that band out of the way to fix the crack? It seems to be put in place with nails or something like that.
ETA: How the heck do I get that band out of the way to fix the crack? It seems to be put in place with nails or something like that.
- Location
- Western Manitoba
ETA: How the heck do I get that band out of the way to fix the crack? It seems to be put in place with nails or something like that.
Not nails - that is a wire going all the way through, riveted on each end. Grind off a rivet end, pull it out, replace when re-assembling. FYI, British armourer repairs almost always have a hardwood (oak) peg or two going through at right angles to anything that was glued into place. The pegs were apparently mostly "hand made" - i.e. whittled, not turned dowel stock.
- Location
- WMU203, Alberta (YCT)
Is there a spec on the wire I need to use when I replace it? Or will 16 gauge bar tie wire work in its place? Also, I've never done an old school rivet before, what do I need for tools?
- Location
- Western Manitoba
If there is a spec (and no doubt the British army had one!), I have never seen it. Thinking you would pull out the old one, measure it for diameter and search. My riveting experience kind of limited - set wire in vise with "a bit" protruding - gently start tapping with the ball end of a ball and peen hammer - end of wire starts to mush out. Continue tapping until shaped as desired. Insert into position and "eye ball" how much is needed to protrude on other side. Repeat with the tapping with far end against something solid. Way more "art" than science to it. Keep flipping over to check how other rivet is forming or flattening. This also acts to pull that strap together - by continuing peening, the cross pin eventually ends up under tension, held by the riveted ends that you have formed. I have heard of it done with punches as well, to precisely place the strikes. I suspect a hollow dome end punch would help, but I have never seen one.
- Location
- Western Manitoba
Couple more thoughts - would be good idea to take real good pictures to the rivets in place now,so you can refer back to what "good" looks like. Maybe takes you several attempts - I think British armourers apprenticed for years to do their things. Also, will want to do careful trouble shoot how come that cracked - it should have been tightly fitted onto a flat wrist - hard to imagine how / what kind of force cause that crack to occur?? I am thinking improper dis-assembly, at some point, not firing...
- Location
- WMU203, Alberta (YCT)
Thanks for the advice! I think I may be able to accomplish a proper domed rivet with a cheap punch and drill out the face so it's 'dome-ish' and after that a lot of experimentation and practice. I already have access to 16 gauge mech wire, that's what I'll try first, even though I think its too soft.


