A Complex Solution to a Simple Quest - Survival Shotgun

pj551016

Member
Rating - 100%
18   0   0
Before I start, I know the term "survival" contains a lot of hypothetical, imaginary, or fantasized needs/elements. Let's just say I started this project for fun, you know, Lego or gaming type of fun.

Here are some of my considerations before I started.

1. I need this shotgun to be legal under the most stringent conditions.
2. I need this shotgun to be reliable, durable and practical.
3. I need this shotgun to be easy to carry.
4. I want this shotgun to be compatible with a variety of calibers, in case of ammo shortage.
5. I want this shotgun to be optics and flashlight compatible.
6. I want the optics to be QD attachable, and use common sized batteries that can be changed without tools.
7. I want some extra utilities out of the shotgun build if possible, such as shell holder, paracord, etc.
8. Finally, I want this build to look cool, something I can carry and be proud of.

OK, now that we've established some qualitative parameters, here's my solution step by step:

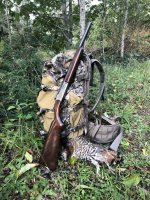
1. I chose to start with Mossberg Maverick HS-12 O/U 12GA Shotgun, my specific version has 18.5" barrel with top picatinny rails for optics, interchangeable choke tubes, and synthetic stock. This resolves all legality issues and if this gun gets banned, we are in much bigger trouble. (photo courtesy of The Hunting Gear Guy adriel )
Mossberg-Maverick-Over-Under.jpg
2. The construction of this shotgun is quite sturdy with steel receivers and everything, the only issue is the pendulum safety within the trigger mechanism, which I manually removed. Now it can fire with the barrel pointing downward beyond 45 degrees, or at any angle for that matter.
IMG_0479.jpg
3. This shotgun is not very easy to carry, because it doesn't have any sling mounting hardware, and with synthetic furniture, it's not easy to attach sling swivel studs without some risks involved (we'll get to this later). Therefore I went for the interim solution of getting a shotgun sling that can be mounted without any screws (friction based).
IMG_0483.jpg
4. Now, the multi-caliber compatibility, this was actually a primary consideration that kicked off this little project. I went with the 8-piece Chiappa X-Caliber kit, which allows a variety of calibers to be fired via a 12GA break action shotgun. All but one barrel inserts are rifled, and being 8" long overall, it's pretty solid and have good accuracy potential. I may consider getting a barrel insert for some rifle calibers too, but they are usually much more expensive and harder to carry.
IMG_0484.jpg
IMG_0485.jpg
IMG_0486.jpg
IMG_0487.jpg
5. This version of the HS-12 has top picatinny rail for optics, but it's not very long and there's no space for a flashlight. Unfortunately, I think this is an earlier version of this model and it doesn't have any bottom or side picatinny rails either, so flashlight mounting is now a serious challenge. I looked for mounting solutions for quite a while and most are not feasible because the O/U barrels are welded together and most barrel mounted flashlights use hardware that wraps around the barrel, SINGLE BARREL. Finally, I was able to get this resolved by getting the Fenix ALG-18 barrel flashlight mount, which clamps to the under barrel without interfering with anything else. Thank you Fenix!
IMG_0488.jpg
6. Choosing optics for this shotgun is a challenge too. For shotgun calibers and the pistol calibers, I technically don't need an optic anyway, but it'd be nice to have a backup optic in case someone else needs to use the shotgun, or just to provide some convenience. I narrowed my selection criteria to a red dot with QD lever using AA or AAA batteries, hopefully within $500. Well, I got lucky and found Romeo 7 with all the criteria satisfied. Furthermore, it comes with lens caps on both sides, extra points scored!
IMG_0480.jpg
IMG_0481.jpg
IMG_0482.jpg
7. A paracord based sling and a stock mounted shell sleeve/shell holder would be ideal, but the sling thing goes back to the problem with the lack of mounting points. This is when I decided to embark on the second half of my journey.
8. I think so far the shotgun build sounds pretty cool already, I guess I can make it even better with an Olight Warrior Ultra, which can be perfectly mounted with the Fenix ALG-18.

I was happy with this build after completing it. However, the sling thing kept bothering my and I really want a better sling with it. So far all the challenges have been resolved with research and $, but I don't think I can resolve the sling thing without some deeper research, some handyman work, and some guts.

To be continued...
 
Last edited:
I went and bought a pack of sling swivel stud screws, and asked for some gunsmithing advice on working with synthetic furniture. The advice I got was it'd be best to use machine screw and nut to install the sling swivel studs. This would work great for the butt stock because it's all hollow and there's plenty of room to work with, but with the forend it's quite tricky. The synthetic forend is about 10mm thick, and there's about 2mm of clearance between the top of the inside of the forend and the underside of the barrel. It'd be really hard to fit in a machine nut into that space, even with countersinking. I also don't want to drill too much into the 10mm thick forend to make room for the nut, because I fear that it could make the structure too weak. That leaves me with only one solution. Treat the synthetic forend as if it's wood, and use the 1/2" wood screw with epoxy to make it work. Sounds like it's time to break out all my tools. drill, hand dremel, caliper, ruler, vice, punch kit, craft knife kit, everything.
I marked 1.0" from top of the forend (because the forend is quite short, the distance from front sling stud to trigger is about 13") and 2.5" from butt end of stock.
IMG_0424.jpg
IMG_0433.jpg
I then drilled pilot holes at both locations with 1/16" drill bits, and enlarged the forend hole to 5/32". The stock hole was enlarged to 3/16" to accommodate the machine screw, which is exactly 3/16" wide including the threads. I cleaned the burr at both locations with a carving knife.
IMG_0434.jpg
IMG_0435.jpg
IMG_0437.jpg
Now both locations are preped, it's time for the difficult part.
The wood screw has a total width of 0.212" including threads, so I figured 5/32" should be small enough to have full thread engagement, yet not too small that I may crack the base material. Luckily I think I'm correct. I primed the forend screw hole with epoxy and drove in the first stud nicely. I used a punch as my wrench, during the driving process I felt enough resistance to make me feel that the thread engagement is proper. After the forend swivel stud is in, I fitted the forend to the barrel to see how everything interacts. It appeared that if I hold and squeeze the forend, I could make the top of the wood crew touch the underside of the barrel. This was not unexpected and I broke out my dremel and had it taken care of.
IMG_0449.jpg
IMG_0454.jpg
IMG_0455.jpg
IMG_0459.jpg
The stock screw was much easier. I had the dimensions correct, and did the screw/nut combo easily with the help of a set of pliers and some blue loctite. I also did two nuts on the inside instead of one to provide extra support.
IMG_0451.jpg
IMG_0452.jpg

To be continued...(only 11 photos allowed)
 
Now it's time to assemble everything together. The forend, the stock, the paracord sling, everything.
IMG_0468.jpg
It looks pretty formidable at this point, but wait, something still feels off.
Urrrh damn! the sling swivel studs are in there very rigidly, and the paracord sling I got only allows movement at the hinge in one dimension, which is up and down. That means all side to side movements and rotary movements will translate into torque or side to side load at the studs, which could either work the studs loose or worse, shear it.
IMG_0494.jpg
So, what should I do? It feels like most rifles and shotguns with wood stocks or even synthetic stocks that come with fixed sling swivel studs work just fine, but for some reason this just makes me uncomfortable. My solution is to try to introduce extra degrees of freedom in the sling's ability to move side to side and rotate, but how do I do that? How about some QD cups and a clip on sling? Here we go again, back to the market search.
IMG_0493.jpg
IMG_0492.jpg
IMG_0495.jpg
Well, I got lucky and found everything I was looking for, all in black too. Hopefully this could resolve all the residual issues I'm having. In the last photo, the pair of QD studs are designed to work with my original paracord sling, which I may keep as a spare, but then again, I already have the other sling that doesn't require any attachment hardware as a backup. Oh well, having leftover material is part of any gun project I guess.

The rest of the parts will arrive tomorrow, and I'll provide the final update then. It's been a super fun journey so far and I got to play with a lot of my tools that I haven't touched in a while.

To be continued...
 
Last edited:
Final update now ready, in post #18.

While the final update won't come until tomorrow, here's what it might look like, as per The Hunting Gear Guy LOL
tactical-OU-1.jpg

I find it hilarious that while he put this package together with a good sense of humour and some sarcasm, I'm actually making a serious effort to achieve something similar, hopefully not as outrageous and ridiculous as his rendering LOL.

I also recommend reading and watching his review of this shotgun, very interesting review.
https://www.huntinggearguy.com/shotgun-reviews/mossberg-maverick-hs12-review/

Later versions of the HS12 have picatinny rails, either under the barrel or on the sides of the barrels. Stoeger now makes a similar model named Double Defense, and I think "tactical O/U and SxS" is a real thing by now.
 
Last edited:
Nice post and nice setup.

But a gun is only as good as it shoots.

1.) So now you have to post some pictures of the patterns you are getting with that shotgun ....

2.) And how far apart the 2 shotgun barrels group with slugs at 50 meters.

3.) And what kind of groups you are getting with those adapters at 50 meters .... and how far off those groups are from point of aim. Those adapters will not shoot to point of aim.
 
I like the idea of shorter barrel iron sighted over unders, but of the four I've had only one half ass regulated at 50 m with irons
 
Love it, I did something similar with my little badger.
Out of curiosity, have you considered mounting a physically smaller light and an optic like the holosun hs403 or vortex sparc aR for weight savings?

Pretty sure almost all sig optics come from the same factory holosuns are made in, some do get completed in japan for the glass install though.
 
Looks like a fun project.
I have played with some inserts in my build and as has been noted, they do NOT hit the same point of aim as eachother, not by a fair margin so in my build, which is decidedly less tech, i went with a simple bead site, just as it had when it was originally built.

I get good accuracy with the 9mm insert out to 50yards or so. (Centre mass 6x6” is what I’m talking about).

The 22lr is good to 20 yards and the 22wmr is about the same.

The 20ga and 410 inserts are great and pattern much like the original 12 but with fewer pellets and a lot less recoil.

12ga buck and slugs are NOT recommended!

Started with a CDN classic Cooey 84 (pre-winchester) and had it cut to 18.5” and threaded for chokes with a simple bead site.

Its not a perfect EOTW gun but it will take 7 calibres/guages at this point and if I can get my hands on a 223 insert i will add that.

Its dead simple and reliable for sure.

Pretty too, if you ask me.

Would love to get a 9mm flobert insert for it. The only downside to the rimfires is they are bored off-centre so u have to be careful about inaerting them the same each time.
 

Attachments

  • IMG_7929.jpeg
    IMG_7929.jpeg
    283.1 KB · Views: 28
Nice post and nice setup.

But a gun is only as good as it shoots.

1.) So now you have to post some pictures of the patterns you are getting with that shotgun ....

2.) And how far apart the 2 shotgun barrels group with slugs at 50 meters.

3.) And what kind of groups you are getting with those adapters at 50 meters .... and how far off those groups are from point of aim. Those adapters will not shoot to point of aim.
Thank you 0faustus0. I'll certainly post some range photos next time I go. With the adapters, that's actually another reason, a more important reason, to get a red dot for the setup, because each time an adapter is inserted, it needs to be rezeroed so I could have the POA and POI match, say at 25 meters or something. The POA/POI will be different for each adapter and will even change with the same adapter each time it is inserted. There's an o-ring to secure the adapter so I don't think the POA/POI will change much without the adapter being removed.

WTF? I've never heard of such a thing.
Yeah, I only learned about it after getting the shotgun myself. I tried dry firing with the muzzle pointed to the ground and the trigger got locked up. Apparently this is to prevent accidental discharge to the foot. I feel that this could become an inconvenience when I'm on a tree stand trying to defend against approaching wildlife for example, or say if I'm in a home defense situation where I'm trying to aim downstairs.

I wish I could find a photo of the mechanism but I can't seem to find one and I'm too lazy to take the stock down to take a photo myself at the moment lol. Basically it's a piece of swinging weight that can swing over to block the trigger mechanism when the muzzle is pointed down beyond roughly 40 degrees or so, quite an interesting engineering design actually, and for its intended purpose it works well and gets activated consistently.

Where did you find this in Canada and what did it cost?
I bought mine locally at Swamp Donkey Outdoors, they may have changed their name by now. This kit used to be hard to find in Canada, but I think it's now available at most online retailers. The price ranges from low $600 to around $800 for the 8-piece set.
 
Last edited:
Out of curiosity, have you considered mounting a physically smaller light and an optic like the holosun hs403 or vortex sparc aR for weight savings?
I have considered that actually. I'm a die hard Holosun fan and all but this red dot I have are Holosuns. I've seriously considered the Holosun SCRS and Olight BALDR S for the red dot and flashlight combo, heck BALDR S even has laser covered too, but I'm prioritizing QD lever and easy to find easy to replace battery, which made me rule out Holosun. Also, mounting a flashlight this far from the muzzle feels a little ineffective.

Personally, if SHTF my 1301T is coming with me for sure.
1301T would make a very competent candidate for that job(y)

Looks like a fun project.
I have played with some inserts in my build and as has been noted, they do NOT hit the same point of aim as eachother, not by a fair margin so in my build, which is decidedly less tech, i went with a simple bead site, just as it had when it was originally built.

I get good accuracy with the 9mm insert out to 50yards or so. (Centre mass 6x6” is what I’m talking about).

The 22lr is good to 20 yards and the 22wmr is about the same.

The 20ga and 410 inserts are great and pattern much like the original 12 but with fewer pellets and a lot less recoil.
Oh 100%, the adapters needs to be individually zeroed every time it is inserted, hence the need for the red dot. Which brand of adapters did you use and how long are they? I'm a little surprised that the 22LR didn't perform better.

Started with a CDN classic Cooey 84 (pre-winchester) and had it cut to 18.5” and threaded for chokes with a simple bead site.

Its not a perfect EOTW gun but it will take 7 calibres/guages at this point and if I can get my hands on a 223 insert i will add that.

Its dead simple and reliable for sure.

Pretty too, if you ask me.

Would love to get a 9mm flobert insert for it. The only downside to the rimfires is they are bored off-centre so u have to be careful about inaerting them the same each time.
That's a beautiful hunting shotgun you got right there, with real world harvest too lol. Yeah I've checked out the 3" adapters by The Shooter's Box, they make some for rimfired cartridges, but I didn't pull the trigger on those because I felt that the X-Caliber kit has better accuracy potential. The adapters by The Shooter's Box are certainly much more compact and easy to carry though. They can literally go on a sling with shell holders or be stored with other gear.
 
I have considered that actually. I'm a die hard Holosun fan and all but this red dot I have are Holosuns. I've seriously considered the Holosun SCRS and Olight BALDR S for the red dot and flashlight combo, heck BALDR S even has laser covered too, but I'm prioritizing QD lever and easy to find easy to replace battery, which made me rule out Holosun. Also, mounting a flashlight this far from the muzzle feels a little ineffective.
Olight Baldr Pro R is what I run on my Glocks/little badger and Odin in various sizes for my rifles. The odins can swap batteries, the Baldr cannot but I believe there are pistols lights with removable batteries (CR123)
You can also be an absolute chad and mount something like a baton pro on it for troll factor.

As for the QD optic, why not grab a QD rail to rail mount and then run the holosun its low mount on it? I had that setup on my PC9 takedown for storage/ backpacking ability. Seemed to hold a zero with removal within2-3 moa but I'm sure the takedown and bulk 9mm ammo had a role in that too
1756596568792.png
 
To me a “survival” shotgun isn’t one all tacticooled up ready for the apocalypse
I see a survival shotgun as one like the M6 that takes down, is an combo over/under that shoots something like a 410 and a 22 hornet like the originals were
Can get 12 gauge ones too plus they stored the ammo in the buttstock so everything is there and handy
I've owned the M6 12GA/22LR complete with X-caliber adapter kit before (twice actually). I liked the concept a lot, but Chiappa really cheaped out on the execution. It's VERY low quality (fragile trigger mechanism, plastic rails, weak screws, waxy foam stock, poor sights). That's actually another reason why I decided to do my own build. At one point I thought it'd be nice to have a Henry AR-7 coupled with this HS-12 to cover the 22LR basis. I like the AR-7 quite a bit too, very light, easy to carry, versatile, and much higher quality than any 22LR in the same price range. Now I'm thinking maybe I could get away with just buying a 22LR barrel adapter, but like Beeron mentioned, rimfired cartridges can be a little tricky to work with as a barrel insert. I'm also not sure how useful 22LR will be in a hunting/defensive situation. Then again, much of this is brainstorming and hypothesis.

If Ruger, Henry or another reputable company makes a quality break action combo gun 12GA/22LR, I think I'd still be tempted.
 
The one I have is the 410/22hornet but it’s made by a company in the US
I’m not a fan of the trigger style on it but the rest of it is built like a tank and is not cheaply built
 
Alright gentlemen, here comes the final update.

I received all the QD stuff, the new paracord sling and the Olight Warrior Ultra today. The QD cups are of very sturdy steel construction and so are the QD studs.
IMG_0518.jpg
IMG_0519.jpg
I put on the shell sleeve and it fits the stock nicely. The design is so that each velcro elastic strap is shorter than the next, so it grabs on to the stock or the support wrist/forearm securely.
IMG_0521.jpg
Flashlight mounting was also a breeze, and while the Warrior Ultra came longer than I had expected, it actually blends in with the build with good harmony. The bezel is just behind the muzzle. It'll probably be carboned up a bit once I start shooting, but oh well, that's about as far back as I could put it without it interfering with the forend takedown.
IMG_0522.jpg
After some experimenting I went back to my previous paracord sling coupled with the QD studs. This sling feels sturdier and wider, and this sling setup is less cumbersome than with another set of clips and such. With this QD sling set up, I can now have rotary and side to side movement too without putting on excessive stress on the sling swivel studs.
IMG_0523.jpg
IMG_0531.jpg
Here's an overall view of the build, a very rough photo taken in the basement. I'm no photographer by any means, and I guarantee you it looks better in real life than it does here.
IMG_0525.jpg
Finally, a demo of how the light works and how the red dot works with the light on.
IMG_0529.jpg
IMG_0530.jpg

That's it! That summarizes my journey that started over a year ago with just the HS-12. I've learned some lessons from this project, and I'm happy and proud of what I got out of it.

Have a good one everyone.

Cheers

PJ
 
Last edited:
Back
Top Bottom