Advice needed re: fitting TRW bolt to Norinco receiver

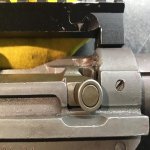
Appreciate this input Claven. I took a hard look at how the original bolt traveled in the receiver and didn't see an issue with removing metal there (the OEM parts have a good 1/16th of wiggle room and there's no sign of metal-on-metal contact during cycling) but this confirmation is a big confidence builder.

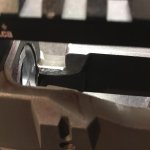
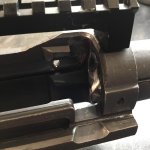
Have been using a sharpie to ID high spots and then carefully hitting then with some 1000 grit paper. Slow work but it's moving in the right direction.

Will update again after tonight's effort.
 
So I finally got this done, main requirement was to relieve areas on the receiver to eliminate binding. My copy of the M14 Assembly Guide was big help here.

After that was done the bolt would close on an empty chamber but, with my go-gauge inserted I could see that it was about 5-6 thou too tight. I lapped that in by hand and now have excellent contact on both lugs. This was the only area where contact surfaces were affected and that would have been a minimal 2-3 thou from the the receiver and bolt lugs.

Here’s some pics of where the receiver was relieved.

7C7A856A-1884-404A-9A83-354F7A49D7E6.jpg

5954B0A3-387E-4796-A3A0-DC8A165C3E91.jpg

Here’s with the Go Gauge in.

52AA7FA4-06A7-42E4-9E70-5197B577947E.jpg

... and the No Go.

02682AAE-1A03-4625-8210-E1633BA8CCB9.jpg

Right now my headspace is looking to be about 1.630-1... pretty burned out with lapping so my leave it like that, tight chambers seem to work pretty could in my precision bolt guns after all. I’m thinking it might make the gun a little less hard on brass too.

Really want to thank everyone for their help on this one, feels great to have this job done and to be planning the next one!
 

Attachments

  • 7C7A856A-1884-404A-9A83-354F7A49D7E6.jpg
    7C7A856A-1884-404A-9A83-354F7A49D7E6.jpg
    35.6 KB · Views: 110
  • 5954B0A3-387E-4796-A3A0-DC8A165C3E91.jpg
    5954B0A3-387E-4796-A3A0-DC8A165C3E91.jpg
    53 KB · Views: 110
  • 52AA7FA4-06A7-42E4-9E70-5197B577947E.jpg
    52AA7FA4-06A7-42E4-9E70-5197B577947E.jpg
    94 KB · Views: 110
  • 02682AAE-1A03-4625-8210-E1633BA8CCB9.jpg
    02682AAE-1A03-4625-8210-E1633BA8CCB9.jpg
    79.9 KB · Views: 110
So I finally got this done, main requirement was to relieve areas on the receiver to eliminate binding. My copy of the M14 Assembly Guide was big help here.

After that was done the bolt would close on an empty chamber but, with my go-gauge inserted I could see that it was about 5-6 thou too tight. I lapped that in by hand and now have excellent contact on both lugs. This was the only area where contact surfaces were affected and that would have been a minimal 2-3 thou from the the receiver and bolt lugs.

Here’s some pics of where the receiver was relieved.

View attachment 178834

View attachment 178835

Here’s with the Go Gauge in.

View attachment 178837

... and the No Go.

View attachment 178839

Right now my headspace is looking to be about 1.630-1... pretty burned out with lapping so my leave it like that, tight chambers seem to work pretty could in my precision bolt guns after all. I’m thinking it might make the gun a little less hard on brass too.

Really want to thank everyone for their help on this one, feels great to have this job done and to be planning the next one!

Congrats on getting it done. I have an M14 with a chamber that tight. I find that I have to use a small-base resizing die to make reliable reloads. Just saying.... You're talking about a semi, not a bolt gun. Factory ammo should work though.
 
Roger that, I’ve got good lug contact on both sides (about 80% on right, slightly less on left) so am gonna call it good-to-go. Spent today polishing my gas system and the National Match tigger mods from the Assembly Guide... really looking forward to hitting the range and seeing how it all comes together on paper.
 
What did you need to polish in the gas system?

Gas systems don't typically need anything polished...

Is it a GI gas system or chinese?
 
It’s a Norinco gas system, this is what I did an why...

Gas piston - polished to a mirror finish with buffing wheel. There was some imperfections left over from machining, very minor but the buffing smoothed them out + in my experience this slows the rate of carbon fouling.

Gas cylinder - removed minor burring around the opening for the piston. This was showing signs of friction when I tilt tested the gas assemby.

Cylinder and gas lock - removed the parkerization and uniformed the mating surfaces. This makes for a perfectly flat, metal on metal seal between the two.... probably a completely unnecessary step but I had the tools out so decided I’d see how it went.

All of the above are just minor tweaks in all honesty. Basically I wasn’t happy with the way the piston was sliding in and out of the cylinder under the weight of gravity so I just smoothed things out. That is now rectified.

My whole concept to tuning this rifle is to optimize and create consistency by eliminating variables wherever possible. Hopefully the totality of all these minor mods will add up to repeatable accuracy. This approach has been a tenant of generating performance in my work related training since leaving school, it’s served well in that environment so I’m to employ the same approach to the M14.... also, I enjoying working on a gun as much as I enjoy shooting it so I’m keeping myself entertained. ;-)
 
The Norinco pistons are NOT stainless steel like USGI versions. The shiny areas are chromed, and as they age, it sometimes chips or flakes off.

You want the piston to slide slowly down when the installed gas system is held upright. There should be a vacuum effect, since the only air that can draw in behind the piston is from the small gas port in the bore. The corresponding opening on the outside bottom of the cylinder isn't aligned to a hole in the piston itself.

Truthfully, if you want a much better gas system, the fix is to get a USGI, Fulton, SAI or SEI gas system and install it on the rifle. The Norinco one is functional, but prone to corrosion and piston chrome chipping. The Norinco cylinder are also larger diameter because they are cast, not forged. So if you NM mod your ferrule, you have to remove more material.
 
You want the piston to slide slowly down when the installed gas system is held upright. There should be a vacuum effect, since the only air that can draw in behind the piston is from the small gas port in the bore.

This is what it does now, before hand the piston would drop but not smoothly + it was binding slightly at the very bottom of the travel.

Now that I’ve got the USGI bolt my next upgrade will be a new gas system but I gotta plug away some cash first... so the Norinco will have to do for bit.
 
Back
Top Bottom