When I got my 1927A1 said:Model 1927A1 Semi-Auto Thompson
Barrel Removal
QUESTION : How does one remove a Thompson barrel, particularly from a parts kit receiver nose section?
ANSWER: Actually, removing a Thompson barrel is quite easy as long as the barrel is to be scrapped. If the barrel is to be saved, which is invariably the case today, there is just no easy way. The two worst aspects of the Thompson design are the 1 in 10 pitch square barrel threads and the grip mount not being removable without first removing the barrel. There is no excuse for the barrel thread design. It is difficult to manufacture and gage and requires tremendous force to tighten or, especially, loosen the barrel. Although Auto-Ordnance came up with several alternative grip mount designs that enabled the grip mount to be removed without removing the barrel, apparently, none proved to be as good as the one used. The result is that the grip mount is always in the way of trying to remove an already problematic barrel. The best advice I can give is to refer to an article I wrote entitled “Barrel Removal”.
Barrel Removal
According to Army Technical Manual TM 9-1215 on the Thompson Submachine Gun, “To remove barrel, disassemble the gun, wedge a block of hard wood in receiver to prevent springing of the side, clamp receiver in a vise with leather jaws and unscrew the barrel from receiver, using a strap wrench. If a barrel is to be scrapped, a pipe wrench may be used.”
Follow those instructions and you will very likely destroy your gun. The receiver is just not strong enough to withstand the twisting force of barrel removal when held in a vise as described. And no block of hardwood will prevent a vise from collapsing the sides of the receiver. The writer of those instructions was most likely relying more on imagination than experience.
Some barrels, particularly on World War II guns which have seen abuse, are very stubborn and refuse to yield to anything but great force. When that situation is encountered, there is little possibility of removing the barrel without proper equipment. Other times, the barrels may be little more than hand tight.
There are two approaches to removing the barrel: 1. Hold the receiver and turn the barrel or, 2. Hold the barrel and turn the receiver. The method chosen is primarily based on the tools and equipment available. In the home shop and without professional tools, it is best to hold the barrel and turn the receiver. This is because it is easier to hold the barrel in a vise than to grip it with a wrench. Holding the barrel is the main problem. Strap wrenches tend to slip or crush the fins on finned barrels. A pipe wrench does work well but goodbye barrel.
To begin, strip down the gun to the bare receiver/barrel/grip mount assembly. Using the biggest wrench vise available, grip the barrel in the vise jaws between blocks of soft wood like pine. The receiver assembly must be upside-down with the vise jaws close to the receiver. With the receiver upright in the vise. Note that the grip mount is trapped between the vise jaws/blocks with very little clearance on either side. Since the grip mount is attached to the receiver, it will turn with the receiver as the receiver is turned. It is obvious that before the receiver has turned very far, the grip mount will be stopped by the block and will be bent. Therefore position the receiver assembly so that the grip mount is above the blocks and next to the block away from which the grip mount will be turning as the receiver is turned. Tighten the vise. In the case of finned barrels, the wood blocks should go all the way to the base of the fins with the fins cutting into the blocks.
Grasp the receiver nose with a large adjustable open end wrench with a piece of leather between the receiver and wrench in order to protect the receiver. Tighten the wrench to avoid having the wrench engage the corners of the receiver nose. NEVER GRIP THE RECEIVER ANYWHERE OTHER THAN BY ITS NOSE END. With luck the receiver can be unscrewed approximately 1/8 of a turn before the grip mount contacts the other block. It may be necessary to reposition the receiver/barrel/grip mount assembly in order to gain another 1/8 turn which should be sufficient. If the barrel will not turn, it is sometimes helpful to soak the receiver/barrel assembly in gasoline over night. If a parts kit cut-off receiver nose is involved, the receiver nose can be heated red hot with an acetylene torch. Care must be taken not to apply the flame to the barrel or grip mount and not to allow those parts to be over heated. Let the assembly completely cool before again trying to unscrew the barrel. Some barrels will resist all efforts toward removal without special tools. Thompsons have a 1 in 10 square (not acme) thread that is a fairly loose fit, so a 1/4 turn of the barrel should loosen the barrel sufficiently for hand removal. A strap wrench can be used at this point because the force applied to the barrel will be minimal. Remove the assembly from the vise.
Screw a horizontal foregrip screw into the grip mount. Position the claw of a carpenter’s claw hammer around the grip screw as though the screw were a nail to be removed. Pull back on the hammer just enough to force the grip mount away from the barrel and unscrew the barrel by hand.
Barrel Torquing Specification
QUESTION: What is the proper torque requirement when installing a Thompson barrel?
ANSWER: There is no torquing specification that I am aware of and it would not be relevant if there was one. There must have been some figure used at Savage and Auto-Ordnance when the guns were made. It would only make a difference if very powerful and expensive machines were used, and they must have had them. From a practical stand point, it is virtually impossible for an individual to over tighten a Thompson barrel. This is because of two factors. The 1 in 10 pitch of the Thompson square barrel thread does not allow any “tweaking”. The barrel goes from loose to tight in just a few degrees of rotation. The barrel does not get tighter and tighter as is the case with V-threads where the external part (nut) actually expands as the tightening force is increased. If it were possible to measure the torque it would go from 0 to off the scale instantly, making a meaningful measurement unobtainable. The other factor is that it is impossible with reasonably available tools to hold the barrel tight enough to be able to over tighten it. Getting the barrel as tight as possible becomes the goal
Worn Barrels
QUESTION : How does one know if a Thompson barrel is worn out?
ANSWER: When the lands and grooves are no longer distinct, the barrel is worn out. Another indication is that shooting accuracy has fallen off. However, very few Thompson guns will reach the point where the barrel is worn out if military specification barrels are fitted. Unfortunately, most new-made barrels are not made to military specifications, so wear may be more of a problem in the future. A much more likely problem will be bore damage. WW2 guns will often show the affects of corrosive ammunition. This is indicated when the bore appears to be worn (actually eroded) at the breech end rather than over its full length. What is a more worrisome possibility is a ringed or bulged bore caused by defective ammunition. Being a machine gun, a bullet that does not make it out the end of the barrel is immediately follow by more bullets that jam in the barrel, destroying it. At the prices Thompsons are selling for, damaging a barrel becomes a catastrophic loss. Therefore, if a nice condition, all original gun is to be shot, I recommend replacing the barrel assembly so that there is no chance of damaging the original one.


You are using an out of date browser. It may not display this or other websites correctly.
You should upgrade or use an alternative browser.
You should upgrade or use an alternative browser.
Any Thompson collector here
- Thread starter audetnelson1
- Start date
stencollector
CGN Ultra frequent flyer
- Location
- shilo MB, the armpit of Canada
The Winnipeg Police still had Thompsons in service until around 1980 IIRC. They were original Colt 1927 model guns, which over the years had been converted over to full auto. One of them featured in a shoot-out near Portage and Main in Winnipeg in the late 70s, and ended up spraying some second floor windows where secretaries and clerks had gathered to watch the shootout. With that, the fate of the Winnipeg Police Service Thompson SMGs was sealed, and they were withdrawn from operational status. Two of them eventually found their way into the Winnipeg Police Museum, and their curator told me that one or two still existed in the police armories.
Personally, I have a military issue Thompson in the gunroom somewhere, but sadly deactivated.
Personally, I have a military issue Thompson in the gunroom somewhere, but sadly deactivated.
Diamondback Six
CGN frequent flyer
Not an owner but a student... if memory serves, the FBI ordered up one last run in 10mm before West Hurley closed the full-auto line in '86 thanks to that syphilitic #### Hughes and the dirty-dealing that illegally passed his Amendment to FOPA.
Someday, one with Da Switch is on my bucket list... and with how Washington State's going I'm starting to think if I want even a Krappy Kahr I better get the budget together and make it happen before the Seattle billionaires get their ban-by-initiative bought.
Someday, one with Da Switch is on my bucket list... and with how Washington State's going I'm starting to think if I want even a Krappy Kahr I better get the budget together and make it happen before the Seattle billionaires get their ban-by-initiative bought.
Another faux Thompson option..the Volunteer Commando chassis for the M1 Carbine. If you can find one!
View attachment 188056
View attachment 188056
AOC certainly could have used the United States Postal Service motto for flat rate shipping - “If it fits, it ships.” Standardization is not a word normally used by WH owners. Each WH Thompson is truly unique when it comes to fit, function AND parts. There is no WH specific production year or serial number range that is the best to buy - or any to be avoided. A NIB (New in the Box) WH is not a guarantee a WH Thompson will run; it only means no one has tried it out.
The majority of WH parts examined for this story are of low quality investment casting and do not conform to original ordnance specifications. Even when manufactured correctly, the resulting part is much rougher and softer than an original Colt or GI part. Many WH parts are easy to identify because of the purplish hue. Some cast parts are challenging to properly blue because of silicone that is added to the steel alloy to improve the flow when the molten steel is poured into the mold.
The saving grace is all the WH parts will interchange with GI manufactured parts. Replacement for most is always the best option.
Love the part "A NIB (New in the Box) WH is not a guarantee a WH Thompson will run; it only means no one has tried it out."
1928 is west hurley they are talking about 1976 to 1997
Diamondback Six
CGN frequent flyer
Basically, when talking Westies you're best off to only keep the receiver and swap in GI parts wherever possible--some things don't interchange, as the semi- and full-auto Westies use two completely different raw blanks. (This is why original Colt 1927 Overstamps are so cheap--they have to be registered as machineguns since they're de-select-fired 1921's, but you don't get Select Fire fun. You have a Semi with all the nuisance of a real MG., and Numrich had to redesign the receiver for closed-bolt fire and inability to take a select-fire FCG in order to get their version off the Naughty List.) Dan Block was handmaking truer-to-spec TSMG furniture fifteen years ago when I was in college, dunno if he still does.
Best bet for Thompson info is the Iannamico brothers' old joint at machinegunboards dot com--back in the day Mike Hensley of Mike's Machine Guns was a blast too, guy's the caretaker of four intercepted 1921AC's that were going to be shipped to the IRA back in the Roaring Twenties.
Best bet for Thompson info is the Iannamico brothers' old joint at machinegunboards dot com--back in the day Mike Hensley of Mike's Machine Guns was a blast too, guy's the caretaker of four intercepted 1921AC's that were going to be shipped to the IRA back in the Roaring Twenties.
Halger280HVMag
CGN Ultra frequent flyer
- Location
- B.C. XMU Local .454
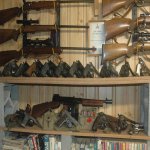
Here is my Thompson 1928A1. Made by Auto Ordnance.
Marked "Tommy Gun" on receiver.
Returned from war service.
I restored the gun including new barrel.
I gave it to my Father as a place keeper for the Thompson shot out of his grasp at Dieppe 19 August 1942.
I regained possession after my Dad passed in 1997.
also in the photo are some other guns Dad used in service.
Attachments
I own a west hurley 1927. One day I want to change out the barrel for the 10.5
Got the barrel just havent had the time. Dont want to damage it.
When I got my 1927A1, it came with a special-edition Canada-length barrel to make it non-restricted. Our government decided it still looked like a Thompson, so it prohibited it anyway. They applied the same logic to the .22 rimfire version.
I also have new 1928A1 barrel I'd like to install. I hope that doesn't make it any more prohibited. I haven't gotten around to unwrapping the 1928A1 barrel or unscrewing the 1927A1 barrel (I'm also afraid of damage) to compare the threads. Does anyone know if the barrels are interchangeable? It seems to me that when the 1927A1 was designed, the maker went to a lot of trouble to reassure the ATF that no full-auto Thompson parts would fit. I wonder if that included the barrel.
from what I recall the threads are not identical, it can be made to fit and keep in mind you can not shoot it so recut the threads or JB weld adhesive works
from what I recall the threads are not identical, it can be made to fit and keep in mind you can not shoot it so recut the threads or JB weld adhesive works
Pretty sure I read guys doing it down south. Will inquire again. I cant see that numrich would of changed the threads. There was a issue with the sharp cuts but they were grinding them down as they went. No JB weld.
Here is my Thompson 1928A1. Made by Auto Ordnance.
Marked "Tommy Gun" on receiver.
Returned from war service.
I restored the gun including new barrel.
I gave it to my Father as a place keeper for the Thompson shot out of his grasp at Dieppe 19 August 1942.
I regained possession after my Dad passed in 1997.
also in the photo are some other guns Dad used in service.
View attachment 188429
Fabulous collection , I would be interested to hear how you Father accquired his Thompson for the Dieppe raid, I believe the Sten gun was first used in action by the Canadian on the Dieppe raid, though the Thompson SMG was also issued early in the war, i have read that the Canadians used them at Hong Kong in Dec 1941
I bought 2 of those 10/22 Thompson "Trooper" kits that were made in Canada by a CGN'er and available on CGN about 10 years or so ago. 1 is an M1A1 and the other is the 1921 "Chicago Typewriter" kit. I know, I know....not the real thing...but as close as I can get up here as I'm not 12.x anything and they are pretty faithful copies. They're real head turners at the range.
For the real experience whenever we're in Vegas or Montana I always stop in to my favorite machine gun range a put a couple of magazines down.
For the real experience whenever we're in Vegas or Montana I always stop in to my favorite machine gun range a put a couple of magazines down.
Halger280HVMag
CGN Ultra frequent flyer
- Location
- B.C. XMU Local .454
As OC of the Fusilliers du Mont Royal, he had his pick.
Although he carried only twenty round magazines, and normal use was semi auto.
He also carried the 1911 chambered in .455 in the photo at Dieppe.
Purchased from stores paid out of pocket, as was then the custom.
My Father drew and used the 1911 lefthanded after losing use of his right arm to machinegun fire.
Fabulous collection , I would be interested to hear how you Father accquired his Thompson for the Dieppe raid, I believe the Sten gun was first used in action by the Canadian on the Dieppe raid, though the Thompson SMG was also issued early in the war, i have read that the Canadians used them at Hong Kong in Dec 1941
fingers284
CGN Ultra frequent flyer
- Location
- Alberta Cowboy Ranges
Another faux Thompson option..the Volunteer Commando chassis for the M1 Carbine. If you can find one!
View attachment 188056
I have one of those, the Mark 1 converter kit. The only one I have ever seen or heard of. It looks/works ok but I bought a GI replacement stock for the carbine action


