IzzyTheGreat
Regular
- Location
- SE Alberta
Last summer I picked up a Browning Auto-5 in fair condition, it caught my eye in the LGS, the price was right so I picked it up on a whim. Typically I do my research before buying but when I got it home I looked up the disassembly procedures, the most notable feature of which is the proprietary screw slots. Seeing as how everything seemed perfectly functional and I wasn't willing at the time to spend the money on a specialized screwdriver kit until I knew if I liked the gun enough to keep it.
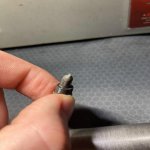
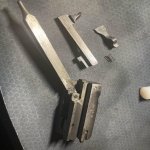
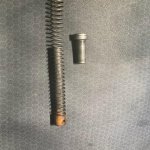
I took it to the range shortly after and ran about 100 rounds of target load through it which it cycled with no complaints. Didn't really use it again until a recent range trip where it was failing to extract (likely culprit is friction rings set improperly or too little/too much lubrication) but after that, I decided I should probably take it apart, and make sure everything else looked good internally. In the interest of frugality, I still did not want to spend the money on specialized screwdrivers, I had read that you can grind your own screwdrivers to fit the slots for less money and a little of your time. So I went off to Princess Auto and came back with some appropriately sized slot-head screwdrivers and ground them to fit with my Dremel. All was going well, the screwdrivers seemed to be working well but I ran into a problem when I had to remove the carrier.
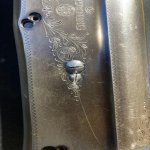
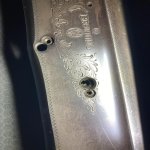
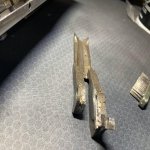
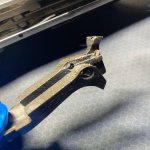
One of the lock screws on the carrier does not want to budge, it is frozen in place. By now I've likely stripped it out as well with my attempts to remove it. The screwdriver wasn't strong enough and bent before camming out of the screw. I was able to get it straightened out to a degree but haven't had any luck getting the screw to budge. I then tried clamping the receiver in a vise, trying to spray lubricant to loosen the screw, and heating it up with a heat gun to no avail. I ground a driver bit to fit and tried using an impact driver but all that accomplished was scratching the side of the receiver. Most recently I tried Screwgrab which really helped with cam-out but my ground-to-fit screwdriver snapped from the extra torque that could be applied.
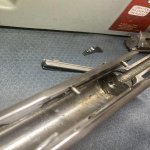
I'm kind of at a loss for what to do now, hindsight being 20/20 I should have just bought the damn screwdriver set but I may have ended up having this exact same problem. I'm used to working on modern firearms without this problem so I apologize to any Auto-5 enthusiasts who may be sneering at me right now") . Unfortunately, I can't bring myself to put the gun back together as now I've seen the inside of the receiver is absolutely filthy and looks like it's never been cleaned (there was a lot of debris including parts of a feather inside). I'm considering simply sending this into a gunsmith to be fully stripped, cleaned, and overhauled with any new parts that may be needed at this point but that would be an expensive venture.
. Unfortunately, I can't bring myself to put the gun back together as now I've seen the inside of the receiver is absolutely filthy and looks like it's never been cleaned (there was a lot of debris including parts of a feather inside). I'm considering simply sending this into a gunsmith to be fully stripped, cleaned, and overhauled with any new parts that may be needed at this point but that would be an expensive venture.
Does anybody have any suggestions for anything I could try to get the screw out? At this point the lock screw will likely have to be replaced so I'm considering using a screw extractor to get it out and then ordering a replacement.
Also even if I get this taken care of myself at home I would appreciate recommendations on any gunsmiths who would be able to do some work on my gun as I'm thinking it may need some other parts replaced.
Thanks in advance,
Here is a pic, as you can see the head is quite stripped and you can see some of the Screwgrab and shards of my screwdriver as well.

I took it to the range shortly after and ran about 100 rounds of target load through it which it cycled with no complaints. Didn't really use it again until a recent range trip where it was failing to extract (likely culprit is friction rings set improperly or too little/too much lubrication) but after that, I decided I should probably take it apart, and make sure everything else looked good internally. In the interest of frugality, I still did not want to spend the money on specialized screwdrivers, I had read that you can grind your own screwdrivers to fit the slots for less money and a little of your time. So I went off to Princess Auto and came back with some appropriately sized slot-head screwdrivers and ground them to fit with my Dremel. All was going well, the screwdrivers seemed to be working well but I ran into a problem when I had to remove the carrier.
One of the lock screws on the carrier does not want to budge, it is frozen in place. By now I've likely stripped it out as well with my attempts to remove it. The screwdriver wasn't strong enough and bent before camming out of the screw. I was able to get it straightened out to a degree but haven't had any luck getting the screw to budge. I then tried clamping the receiver in a vise, trying to spray lubricant to loosen the screw, and heating it up with a heat gun to no avail. I ground a driver bit to fit and tried using an impact driver but all that accomplished was scratching the side of the receiver. Most recently I tried Screwgrab which really helped with cam-out but my ground-to-fit screwdriver snapped from the extra torque that could be applied.
I'm kind of at a loss for what to do now, hindsight being 20/20 I should have just bought the damn screwdriver set but I may have ended up having this exact same problem. I'm used to working on modern firearms without this problem so I apologize to any Auto-5 enthusiasts who may be sneering at me right now
. Unfortunately, I can't bring myself to put the gun back together as now I've seen the inside of the receiver is absolutely filthy and looks like it's never been cleaned (there was a lot of debris including parts of a feather inside). I'm considering simply sending this into a gunsmith to be fully stripped, cleaned, and overhauled with any new parts that may be needed at this point but that would be an expensive venture. Does anybody have any suggestions for anything I could try to get the screw out? At this point the lock screw will likely have to be replaced so I'm considering using a screw extractor to get it out and then ordering a replacement.
Also even if I get this taken care of myself at home I would appreciate recommendations on any gunsmiths who would be able to do some work on my gun as I'm thinking it may need some other parts replaced.
Thanks in advance,
Here is a pic, as you can see the head is quite stripped and you can see some of the Screwgrab and shards of my screwdriver as well.