


- Location
- Central AB
Well, after a long delay, I'm finally getting around to finishing this project. How time flies!
Anyway, went in search of an appropriate block of wood, that would have grain similar to what is commonly on Enfields, and would be stainable to match as well. Not alot of options locally, but I found a supplier that had Osage Orange pieces 8" x 8" x 3". The forend needed to be 8" long, and the grain seemed good.
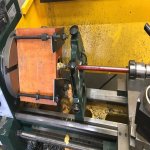
As suggested in earlier posts I wanted to drill a 2" hole down the middle of the block, and split the block to create an inlet. This hole needed to be straight, so I opted to use my metal lathe rather than attempting to freehand it. So I made a mounting fixture to attach the block to the lathe faceplate. And made a long mandrel for the 2" wood bit. I was concerned how much the bit could wonder given the mandrel length, so used a steady rest as close to the workpiece as possible. This picture shows the setup.

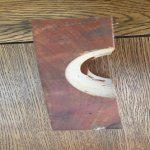
This worked well, and the hole was dead straight. I then split the block into two. With one half shown in this picture.

Drew out some guidlines on the half to be used, and removed most of the excess with a bandsaw. Then did the bulk of the sanding with a belt sander using various grits. Finished the sanding by hand. And drilled the hole for the machine screw that will attach the forend.
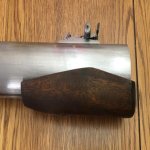
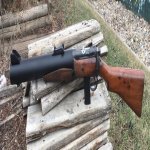
I tried a standard stain on the forend, but the wood wouldn't accept it. I'm thinking this must be a trait of this species of wood. Anyway, I keep dye's on hand, and this worked really well, applying several coats and tweaking the color mix a little each time until I had a good match. Below is the finished hand guard.

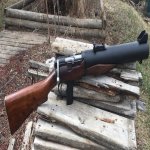
Now Im just waiting for a warmer day, so I can sand blast various metal pieces, and Armacoat them flat black, and will finally have this project behind me.
Anyway, went in search of an appropriate block of wood, that would have grain similar to what is commonly on Enfields, and would be stainable to match as well. Not alot of options locally, but I found a supplier that had Osage Orange pieces 8" x 8" x 3". The forend needed to be 8" long, and the grain seemed good.
As suggested in earlier posts I wanted to drill a 2" hole down the middle of the block, and split the block to create an inlet. This hole needed to be straight, so I opted to use my metal lathe rather than attempting to freehand it. So I made a mounting fixture to attach the block to the lathe faceplate. And made a long mandrel for the 2" wood bit. I was concerned how much the bit could wonder given the mandrel length, so used a steady rest as close to the workpiece as possible. This picture shows the setup.
This worked well, and the hole was dead straight. I then split the block into two. With one half shown in this picture.
Drew out some guidlines on the half to be used, and removed most of the excess with a bandsaw. Then did the bulk of the sanding with a belt sander using various grits. Finished the sanding by hand. And drilled the hole for the machine screw that will attach the forend.
I tried a standard stain on the forend, but the wood wouldn't accept it. I'm thinking this must be a trait of this species of wood. Anyway, I keep dye's on hand, and this worked really well, applying several coats and tweaking the color mix a little each time until I had a good match. Below is the finished hand guard.
Now Im just waiting for a warmer day, so I can sand blast various metal pieces, and Armacoat them flat black, and will finally have this project behind me.
Attachments
Last edited:


")


