Ya it’s crazy that prices have been going up with everything. I bought 2 years ago. I can’t imagine in another year. Prices of rifles have gun up as well.That list is already closer to $300 on Amazon!


You are using an out of date browser. It may not display this or other websites correctly.
You should upgrade or use an alternative browser.
You should upgrade or use an alternative browser.
DIY brass annealing setup?
- Thread starter bigHUN
- Start date
I made my own induction annealer, it continues to work well:
https://www.canadiangunnutz.com/forum/threads/showing-off-my-homemade-induction-annealer.2550112/
https://www.canadiangunnutz.com/forum/threads/showing-off-my-homemade-induction-annealer.2550112/
If you’re switching the dc supply to the ZVS I recommend using a power MOSFET instead of a relay. The switching time will be more precise and repeatable and it will dissipate heat easier and offer less resistance to the high current. My 2¢
You've convinced not to waste anymore time and placed my Amazon order!Ya it’s crazy that prices have been going up with everything. I bought 2 years ago. I can’t imagine in another year. Prices of rifles have gun up as well.
Ill see. If I can take pic of setup.You've convinced not to waste anymore time and placed my Amazon order!
Go to the dollar store and buy a candle. Light the candle. Hold the brass by the primer end and roll the brass between your fingers with the flame on the neck shoulder area and keep doing it for about 40sec it works out to be or until you can't hold on anymore. Ive bin doing it for a very long time and it work awesome.
Got all my parts. Now I have a project for tomorrow!Ill see. If I can take pic of setup.
Easy Annealing, Tools required.
1. Television
2. Netflix password (you can use your brother-in-laws)
3. Search for a Clint Eastwood western movie of your choice... I recommend, "The Outlaw Josey Wales."
4. Propane solder torch, most people have them, if not they are cheap.
5. A bucket of cold water
6. A pair of leather gloves
7. A match
Step by step instructions;
- go to fridge, grab a beer
- go to cupboard grab a bag of Doritos
- sit in recliner and turn on movie
- place bucket and torch and bucket of brass at your feet
- take a sip of beer and a couple Doritos
- use match to light torch
- put on gloves, pick up brass between fingers and twirl it slowly with flame at shoulder junction for 6 seconds or until it starts to turn red, then drop in bucket of cold water
- take sip of beer and a couple Doritos
- repeat until brass is done, if your fingers get hot, lean back in recliner and take a few sips of beer and a few Doritos, and listen to old Indian say "You must endeavor to persevere."
- repeat until bucket of brass and beer and Doritos are empty
Congrats all your brass is annealed... and you are fat.
Special note; if you are right handed, place bucket of water to the right of the torch, if you are left handed place bucket of water to the left of the torch, if you like the smell of burnt hair, disregard this special note.
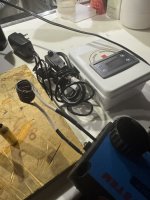
Made timer, using fan in front to keep everything cool. Hold the coil to cover the neck shoulder and half the case.Ill see. If I can take pic of setup.
Attachments

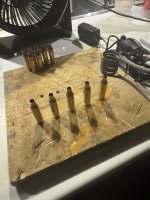

Annealer works pretty slick. Shortened and reformed the coil for .308 size casings. Sacrificed a couple older casings to get me in the ball park and ended up with 3.5 sec as the perfect time per casings. Just annealed a bunch of .358 Win casings that I had reformed from .308 Win yesterday.
The fabric covering over coils is good. As it give separation on each loop but over time it will disintegrate and eventually peel off which is ok but then you will have to twist and also separate the loops so it’s not touching. It will still work if it touches. Also the tighter the coil and less gap the faster the brass heats up. So every time you make adjustment the time on timer need to be adjusted.I’ve hooked up the timer but haven’t setup the coil or tried it yet. Maybe tomorrow.
Also I use different wooden dowels to make coils. The premade coils such as one in your pic can be recoiled to fit it more coils and cover more of the brass. The more you use the easier it gets. I don’t use timer now as I’m so good I know by color also counting in my head when to remove coil. Finally the most important thing is to use fan. If I was really good I would mod the internal fan and put more sturdier one. But instead I hold the device in front of fan after during as much time so that the device never over heats. I have had for three years and never over heats or stop. I do max 100 pieces a sitting. Good luck
Ya, I used the pre-made coil and re-wound it a bit tighter and cut it much shorter to come up with 3.5 sec.The fabric covering over coils is good. As it give separation on each loop but over time it will disintegrate and eventually peel off which is ok but then you will have to twist and also separate the loops so it’s not touching. It will still work if it touches. Also the tighter the coil and less gap the faster the brass heats up. So every time you make adjustment the time on timer need to be adjusted.
Also I use different wooden dowels to make coils. The premade coils such as one in your pic can be recoiled to fit it more coils and cover more of the brass. The more you use the easier it gets. I don’t use timer now as I’m so good I know by color also counting in my head when to remove coil. Finally the most important thing is to use fan. If I was really good I would mod the internal fan and put more sturdier one. But instead I hold the device in front of fan after during as much time so that the device never over heats. I have had for three years and never over heats or stop. I do max 100 pieces a sitting. Good luck
Forgot to also mention I have a coil for caliber that way I don’t need to retighten just change the coil for new caliber. I bought from Amazon a set of spare coils. Some times when you buy the annealer it comes with extra but it’s always good to have extra on extra lol. 3.5 sec is awesome time. Now all my brass looks like lapua. But not even the looks I anneal after tumbling/cleaning brass and before sizing. Every time. Make brass last longer. Also I don’t dump in water I let air dry as I don’t size until next day. My order for once fired or fired brass is lee de prime, tumble, anneal, clean primer pocket, size, then oal trim and chamfer in and out on my giraud. Sizing has few steps including full and bushing and expander mandrel also if I’m necking down ie 6.5 to 25 cm or 6.5x47 to 6gt I neck turn. I have specific way of finding best sizing die adjustment also using Redding comp shell holders and Rcbs precision mic. Once all done I try a few in the chamber just making sure it fits perfectly. Got used to this as I used to just neck size. Again once all done I use my k&m priming tool that has a micrometer the only tool with micromoter to measure the primer pocket and also put the same pressure for each primer. Finally I seat the bullet with arbor press and Wilson arbor seating die. I used to use the Rcbs summit press only for seating but why not go all out with arbor with micrometer.Ya, I used the pre-made coil and re-wound it a bit tighter and cut it much shorter to come up with 3.5 sec.
Lot of work but a lot of fun.
I use a propane torch, variable speed drill and a cup of water for quenching, works great costs nothing, don't buy into the hype.I was asking around who is doing these annealing services in my area, and I got an impression that for my own convenience me better just get one setup for myself. My needs are not really some high volume, a couple hundreds of brass a year maybe.
A propane torch is not a safe way working with it in my garage, too many things can go wrong with that.
The induction heaters on the other side, according to my research, these are around for a quiet long time, and some people "fabricated" some pretty impressive brass annealing setups from aliexpress parts.
I am not an electrician but looking at the online pictures doesn't seem to me terribly hard to make it, also doesn't need to cost arms and legs.
Anybody with experience and ideas?
Browsing now the aliexpress, plenty of variations.
That is what I want to do but I’m not a modder you should make and sell cheap good price I’m sure people will buy. The hand held ones has more control kind of like hand primer and I assume you change that metal piece that aligns the brass at bottom of coil especially with different sized brass. But awesome idea. That is a thick ass coil must be very strong to run those coils. I spent total 200 dollars 3 years ago most went to hand held annealer. Can I ask how much for that mod? I’m sure it’s cheaper than amp annealer.
how much more?recoiled to fit it more coils and cover more of the brass.
iirc its recommended to heat the neck/shoulder only?
The work coil is 1/4” hollow tubing and has water running inside for coolingThat is what I want to do but I’m not a modder you should make and sell cheap good price I’m sure people will buy. The hand held ones has more control kind of like hand primer and I assume you change that metal piece that aligns the brass at bottom of coil especially with different sized brass. But awesome idea. That is a thick ass coil must be very strong to run those coils. I spent total 200 dollars 3 years ago most went to hand held annealer. Can I ask how much for that mod? I’m sure it’s cheaper than amp annealer.
") see my post for more data on the build the “shelf” adjusts up and down to align different cartridge lengths. https://www.canadiangunnutz.com/forum/threads/showing-off-my-homemade-induction-annealer.2550112/
see my post for more data on the build the “shelf” adjusts up and down to align different cartridge lengths. https://www.canadiangunnutz.com/forum/threads/showing-off-my-homemade-induction-annealer.2550112/ Ask away I’ll try to answer


