I am very much "amateur" so likely meet that qualification. I just did 3 "soldered on" sights in past two weeks - none fallen off yet. Everything I read leads me to "enough" flux is okay, "too much" flux does not exist , and not enough flux is a bad thing.
Solder - did many copper water line repairs using 50/50 or 40/60 plumbers solder (lead/tin) and Kester flux, in a flat red tin. Not sure how easy to find lead bearing solder any more? Was intrigued by Brownells "HI-Force 44" for gun work - turns out it is about 4% silver and the rest is more or less tin - no lead. Melting point posted as 475 Fahrenheit, so smidgeon warmer than old school 50/50 solder? Could order the solder, but they can not ship the flux. Found similar on Amazon.ca - 4/96 solder and the appropriate flux - Stay-Brite brand by Harris - instructions talk about using it on stainless steel, aluminum and "other solderable metals" - different flux specified for aluminum, than for the others. The box says this solder's melting point is 435 F.
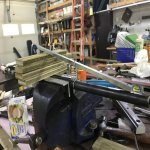
Made "soft jaws" for bench vise from lengths from old leather belt. Bolted a 12" length of 1/8" thick 1 1/2" x 1 1/2" angle iron, at right angle to action - under the flat behind the recoil lug - set level on the angle iron and back and forth to get the action sitting "level" within the vice. One sight was a banded rear sight - from a rotted out Swede M94 barrel going onto a NOS M94 Swede barrel. Fussed quite a bit with emory cloth and wood dowels to get the old solder out of that old sight base - loose fit onto the NOS barrel. Lots of flux on barrel, then heated and spread a very thin layer of that 4/96 solder - to "tin" it. Did same inside the sight base - was able to grab that with welding glove and shake most of the molten solder out of there. With minor effort was able to slide the tinned sight back onto the tinned seat on the barrel - lots of flux applied again before putting the two together. Multiple fussing to get level reading same across rear sight compared to what it read on that angle iron. Could not use the aligning hole for the rear sight screw - original barrel had one, but the NOS barrel did not. Heated up again and introduced a bit of solder inside the rear sight base against the barrel. Got it "stuck on there" Let it cool. Checked level again. Of course it moved - canted off one way. Re-heated and grabbed with welding glove and rotated. Let cool. Of course, too far. Took about 3 tries before the level read the same for receiver and rear sight. Front sight was a banded sight onto front end - essentially same commotion - level now reads the same on front sight, on rear sight and on receiver. As far as I got with that one.
A picture of the barrelled receiver in the vice soft jaws - the angle iron bolted on to create a "flat" to set a level on, to level out that action:

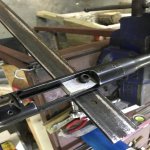
Earlier project was to install a front sight ramp onto a barrel. Set in place - traced with fine lead pencil - removed - scraped, sanded, etc. to get inside that outline bright and shiny - no bluing - used acetone to "degrease", then fluxed, then tinned that area. Cleaned underside of ramp same way - tinned it as well. Made a stack of wood blocks on my vice. Used about 12" or 14" length of 5/16" key stock from top of wood pile to the front sight ramp. Found a spring that I could get hooked under barrel and over that key stock - made a "spring loaded" "puller downer" because I was sure that ramp would move as the solder "tinning" went to liquid - wanted it to be pulled straight down when that happened. My level says it is "level" with the receiver. Moderate taps with wood block and it does not fall off. As far as I have got with that one...
My "red neck" front sight ramp puller downer - did not take pictures of actually doing the deed - was my "concept" test to eyeball if it might work, and it did: