Method of punching a receiver Solved

Just trying to do metal punch work myself - there must be a knack that I have not really figured out - flat ended punch on a convex surface. Hard to get good clear numbers / letters stamped. Repeating patterns would be a challenge!!
 
Just trying to do metal punch work myself - there must be a knack that I have not really figured out - flat ended punch on a convex surface. Hard to get good clear numbers / letters stamped. Repeating patterns would be a challenge!!

The article actually says that you're not supposed to repeat patterns. They push on random stamping despite what the pictures would show
 
I watched a fellow do this once in Austria.

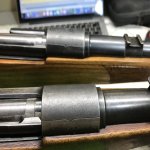
This is fairly important. You need to have a regular surface to start with. If your rifle's receiver has been aggressively ground, in an uneven manner, it will be next to impossible to hide.

The rifle I watched having its receiver peened, had the markings removed tastefully with a surface grinder. You could accomplish something similar with a belt sander.

In this case the engraver cut out a frame, around the area he was going to peen.

Next, he took a very coarse piece of emery cloth and with a small hammer used it to matte the surface of the area he intended to peen. I was a bit curious about that and he told me it was to make it easier to peen the surface.

He didn't use a punch. He had a special hammer (appx 3oz) with one end flat and the other tapered to a point, which as trevj mention was ground round. NOT A LARGE TIP. Almost like the tip had been slightly dulled after being ground to a fine point.

The receiver was being held in a cradle, which could be adjusted to get at the surface to be peened. There was good light, with a magnifying lens use to see the area.

The fellow, with very even and carefully practiced strokes proceeded to tap the pointed end onto the surface he wanted to leave a brinneled appearance. Took him about a half hour for each receiver.

This would take me half the day.

If your receiver has been taken down with a surface grinder or belt sander, place coarse emery cloth, grit side down over area you want to cover. Mask it off with tape first, to keep it neat. Use a small 3 oz flat face hammer to tap the grit side of the emery cloth against the receiver. Then apply cold blue. It actually gives quite a pleasant appearance.
 
...He had a special hammer (appx 3oz) with one end flat and the other tapered to a point, which as trevj mention was ground round. NOT A LARGE TIP. Almost like the tip had been slightly dulled after being ground to a fine point. ...

So basically a small hammer ground to a punch point. Clever! Less fuss than using a unch + hammer and better control:)
 
So basically a small hammer ground to a punch point. Clever! Less fuss than using a unch + hammer and better control:)

Possibly better control. If you are well practiced with the tool, and confident. You have to swing that hammer pretty sharply to make the mark, a misplaced hit, makes the mark anyways, where a missed swing with a hammer and punch gives you a thwap on the side of your hand.

Ever watch an engraving video where the engraver is using a hammer? He does all his work while NOT looking where he is striking, but has total control over where his cutting tool is at.

I strongly suspect that a fella trying to pattern a piece he actually wants to turn out OK, is better off using a hammer and punch, rather than a patterned hammer, simply because of the control over the location of the strike, esp. along the borders. It takes not very many misplaced shots to pretty much ruin the project.
 
Possibly better control. If you are well practiced with the tool, and confident. You have to swing that hammer pretty sharply to make the mark, a misplaced hit, makes the mark anyways, where a missed swing with a hammer and punch gives you a thwap on the side of your hand....

I think you're right. That hammer might be good for a practiced professional but dodgy for the rest of us. I found a reference to a powered graving machine (lost it now) which was like a miniature impact driver with a flex shaft and handpiece, for use by jewellers and metal smiths. Only $1900.00....
 
I think you're right. That hammer might be good for a practiced professional but dodgy for the rest of us. I found a reference to a powered graving machine (lost it now) which was like a miniature impact driver with a flex shaft and handpiece, for use by jewellers and metal smiths. Only $1900.00....

Hunt around and you can find videos on making a powered engraver from a cheap Chinese air pump. Essentially you disable the one way valves in the pump, add a hose that allows the piston of the pump to suck and blow air back and forth. The impact mechanism is a ball bearing being flung to and fro by that air, in a tube. The bearing hitting the engraving tool acts as a hammer.

Then you build a control system that allows you to limit the amount of movement, the speed of the strokes, etc.

The Gravermeister is the full on pro model.

Sorta sounds like a Jailhouse tattoo gun. Sewing machine motor and a Bic pen.
I'm going to go Trad I think. The author of the article says that he uses 1/2" rolled steel with a 1/8" hole drilled to fit drill stock. That way they are easily replaced like the tip on a box cutter. He uses 4 different shaped tips as well...but all single point. No pattern tips as suggested by some.
 
Foredom make a handpiece that works like a engraver but impacts the work, I use it to texture mold surfaces, its not as aggressive as the example but one could hit the same area several times to get it deeper, the handpiece fits any flexible shaft motor similar to the dremel setup

take a look h ttps://ww w.youtube.com/watch?v=cc30KC6bo8g
 
Sorta sounds like a Jailhouse tattoo gun. Sewing machine motor and a Bic pen.
I'm going to go Trad I think. The author of the article says that he uses 1/2" rolled steel with a 1/8" hole drilled to fit drill stock. That way they are easily replaced like the tip on a box cutter. He uses 4 different shaped tips as well...but all single point. No pattern tips as suggested by some.

Take a look at Dowel Pins. They are hardened and ground pins that are used in manufacturing to align parts. They have rounded or partially rounded ends, and best of all, they are cheap in boxes of 100.

For the extra frugal, the rollers out of roller bearings like the ones in U-joints.

Just two suggestions that might save you a wee bit of time, if you wish.

The cheap air pump gun is a lot less jailhouse than you'd think. It's pretty much the exact principle that the Gravermeister system works on.

For a completely different system, take a look at the engraving tools by Steve Lindsay https://www.airgraver.com/Hand_Engraving_Tools_Overview.htm , they operate like a proper air hammer in miniature.
 
You know, sometimes I wonder how things come about. Here we are discussing dimpling a receiver and last night a fellow brought over a lovely post WWI 98 Mauser that had been converted to a nice sporter.

Looks like one of the pieces done in the 1930s, maybe a bit earlier.

Instead of the normal random stippling, there was actually a "fish scale" type pattern, covering the top ninety degrees of the receiver radius. No edging at all. It was obviously done by hand as the edges weren't perfect, but definitely close enough.

From what I could see, the job was done with a chisel, ground with a radius. The metal was actually removed, but only around .005 deep.

Each scale was quite small and each scale was obviously done one at a time with a hammer and chisel.

The scales were as close to being identical in size and shape as a machine could have done the job.

The engraver's skills were very much to be admired.
 
I have two rifles here that are similar to each other but not identical. The matting on the receiver rings is much more subdued than earlier posted picture on this thread. No clue who made these. Rear one had been drilled and tapped for scope mount. Both are small ring mausers, but are M98 mausers - #### on open, third safety lug on bolt body. Both have double set triggers. German proof marks, that I believe are prior to 1912.

IMG_1454.jpg
 

Attachments

  • IMG_1454.jpg
    IMG_1454.jpg
    83.7 KB · Views: 61
Oh dear. Can you say "down the rabbit hole"? Neat-o!

Yeah, indeed!

Pretty neat system, his, the harder you push on the engraving tool, the harder the hammer strikes, so you have pretty much total control over metal removal.

Now, if only I had any artistic talents....
 
Back
Top Bottom