


You are using an out of date browser. It may not display this or other websites correctly.
You should upgrade or use an alternative browser.
You should upgrade or use an alternative browser.
Model 1917 build
- Thread starter cody c
- Start date

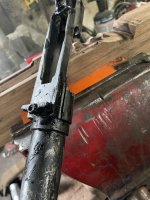
It’s an Eddystone 1917. It was gramp’s, he had it bored to .311-308 Norma mag. No one was interested in the caliber and I found myself in possession of it. After not doing anything in the safe for a decade it went for a drive to see RKS up in Wimborne AB.
I picked up a NECG front site for it and ordered it a bit bigger than I should have but Gerald accommodated. He also flattened the floor plate, mounted the front site and installed the Timney trigger I bought pretty cheap off the EE a long time ago.
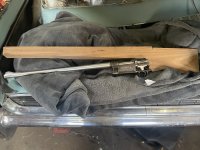
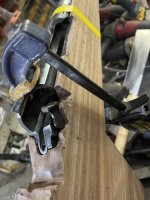
Now I’m working on inletting a piece of Walnut I’ve had for maybe 3-4 years. Almost done the top side. Floor plate next and then bedding. After that I can start shaping it. I’m a lefty so it will get sort of a classic profile that is ambidextrous. Custom swivel mounts and probably aluminum palm insert.
I picked up a NECG front site for it and ordered it a bit bigger than I should have but Gerald accommodated. He also flattened the floor plate, mounted the front site and installed the Timney trigger I bought pretty cheap off the EE a long time ago.
Now I’m working on inletting a piece of Walnut I’ve had for maybe 3-4 years. Almost done the top side. Floor plate next and then bedding. After that I can start shaping it. I’m a lefty so it will get sort of a classic profile that is ambidextrous. Custom swivel mounts and probably aluminum palm insert.
Attachments
- Location
- Van. Is. B.C.
If the bore is .311” wouldn’t it be a 1914 bored out from .303 Brit? Very ambitious project. Do you have the dies for it?
The old barrel was junk. The new one is a gain twist chambered in 458 Win Mag. You can see the size of it in contrast to the dime in the one photo
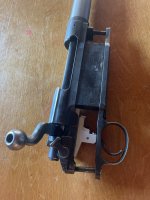
Steel work is almost done, I still need to do rear folding leaf or something.
The action is a model 1917, brother to the Pattern 14 aka P-14 but probably swapped to the P-14 bolt for sizing.
Undecided about the dog leg, I actually kind of like it. I am considering modifying the bottom metal to hinged with button release and over sizing the trigger guard slightly for gloves.
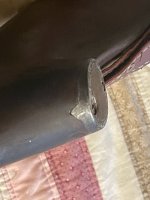
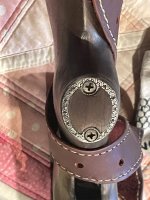
Edit, this is what I’m planning to use for sling mounts. I’m showing the 9.3x57 stock I did with them. I just screw them from the inside and then grind/sand the screw flat where it protrudes on the bottom. Debating about using this for palm swell cap or making a different style
Steel work is almost done, I still need to do rear folding leaf or something.
The action is a model 1917, brother to the Pattern 14 aka P-14 but probably swapped to the P-14 bolt for sizing.
Undecided about the dog leg, I actually kind of like it. I am considering modifying the bottom metal to hinged with button release and over sizing the trigger guard slightly for gloves.
Edit, this is what I’m planning to use for sling mounts. I’m showing the 9.3x57 stock I did with them. I just screw them from the inside and then grind/sand the screw flat where it protrudes on the bottom. Debating about using this for palm swell cap or making a different style
Attachments

Last edited:
fingers284
CGN Ultra frequent flyer
- Location
- Alberta Cowboy Ranges
I think you've only just began what can be done to that ol' girl to really make her pop as a custom rifle...you are going the full custom built stock for her so might as well "finish the job".Steel work is almost done,
first of all, that big ol dog leg bolt handle knob can be re-modeled into the perfect dangerous game buttter-knife bolt that will fit your thumb and hand perfectly....saw cut part way through the root of the knob ( saw so the cut intersects with the factory hole in the knob), now saw cut through the top of the bolt lengthwise with the factory hole to join the two cuts up. Now torch heat the two saw cut petals up and fold/bend them open so you are left with a "dish" for your thumb to grip into. Now use a Dremmel or other small grinder to smooth out all the rough/sharp edges of the petals & bolt root to whatever contour turns your crank. Leave the dog leg "as is" or, if you have access to a milling machine you could skeletonize the heavy parts with a small mill cutter to lighten it up a bit, your choice on this one.
Next job...that big ol obnoxious safety handle needs to be lightened up & downsized. I used to grind one of the lumps off and then grind the square edges completely off the rest of it from top to bottom and finish-grinding & contouring with a Dremmel and emery cloth. You can easily take 1/2 the weight off that safety and it will still be lots strong enough to do its job.
Next job is to round all the edges and lighten that catch retaining mechanism (especially that round knob that anchors the spring) on the other side of the action. this is just a grind-Dremmel finish & Emery cloth polish until you get to your preference of completeness.
There is one more change you can make to lighten up your rifle a bit as well. you have already ground or milled the "ears" off and there is a big chunk of un-needed iron at the back of the action around that bolt retaining mechanism that can be ground off without marginalizing the action strength at all. Pm me your phone # and I can send you a photo of an action that this is already done on if you like.
It might take all this winters evenings to do with small tooling but you will have a rifle that you will be proud of for the rest of your life.
Ohh ya, almost forgot the blueing of these old Enfields...you can "cold blue" an action to be very appealing but it may take a lot of experimental spotting with different commercial formula's ( their not all the same) before you get to a finish you like...or you can get it commercially hot blued but be aware the some of these hard actions dont blue, they come out of the tanks a dull to a very brilliant purple. Personally i find the purples very appealing in a finish but too each his own on this...you get what comes out of the tank with no choice on your part.
so why not just post up the pictures here so everone else can see what you are talking about?I think you've only just began what can be done to that ol' girl to really make her pop as a custom rifle...you are going the full custom built stock for her so might as well "finish the job".
first of all, that big ol dog leg bolt handle knob can be re-modeled into the perfect dangerous game buttter-knife bolt that will fit your thumb and hand perfectly....saw cut part way through the root of the knob ( saw so the cut intersects with the factory hole in the knob), now saw cut through the top of the bolt lengthwise with the factory hole to join the two cuts up. Now torch heat the two saw cut petals up and fold/bend them open so you are left with a "dish" for your thumb to grip into. Now use a Dremmel or other small grinder to smooth out all the rough/sharp edges of the petals & bolt root to whatever contour turns your crank. Leave the dog leg "as is" or, if you have access to a milling machine you could skeletonize the heavy parts with a small mill cutter to lighten it up a bit, your choice on this one.
Next job...that big ol obnoxious safety handle needs to be lightened up & downsized. I used to grind one of the lumps off and then grind the square edges completely off the rest of it from top to bottom and finish-grinding & contouring with a Dremmel and emery cloth. You can easily take 1/2 the weight off that safety and it will still be lots strong enough to do its job.
Next job is to round all the edges and lighten that catch retaining mechanism (especially that round knob that anchors the spring) on the other side of the action. this is just a grind-Dremmel finish & Emery cloth polish until you get to your preference of completeness.
There is one more change you can make to lighten up your rifle a bit as well. you have already ground or milled the "ears" off and there is a big chunk of un-needed iron at the back of the action around that bolt retaining mechanism that can be ground off without marginalizing the action strength at all. Pm me your phone # and I can send you a photo of an action that this is already done on if you like.
It might take all this winters evenings to do with small tooling but you will have a rifle that you will be proud of for the rest of your life.
Ohh ya, almost forgot the blueing of these old Enfields...you can "cold blue" an action to be very appealing but it may take a lot of experimental spotting with different commercial formula's ( their not all the same) before you get to a finish you like...or you can get it commercially hot blued but be aware the some of these hard actions dont blue, they come out of the tanks a dull to a very brilliant purple. Personally i find the purples very appealing in a finish but too each his own on this...you get what comes out of the tank with no choice on your part.
fingers284
CGN Ultra frequent flyer
- Location
- Alberta Cowboy Ranges
Any that got the "full treatment" are long gone and all I have left is 4 or 5 partly done actions...and i dont send photos into the clouds or anywhere else that I cant just single click one too like a text.
Cool project! There’s something special about packing a rifle you’ve had a hand in building! I’m almost finished the top inlet on my current project as well, a tedious job when done by hand, but an enjoyable tedious lol.
I look forward to following along!!
I look forward to following along!!
I’m curious about all the lightening up work you’ve done.
The barrel on this is already a touch heavy, and considering the caliber it might be better a bit on the heavy side.
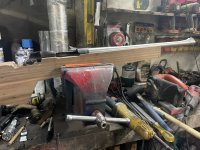
Almost finished inletting on the top side. Put some two part epoxy at the recoil lug and clamped it so as to make a divot where the front screw sits.
After it hardens and I drill it, I can start thinning out the bottom side for the bottom metal.
Also a picture of how to cheat inletting. My kids water based art paint on the bottom side to find points of contact to remove material
The barrel on this is already a touch heavy, and considering the caliber it might be better a bit on the heavy side.
Almost finished inletting on the top side. Put some two part epoxy at the recoil lug and clamped it so as to make a divot where the front screw sits.
After it hardens and I drill it, I can start thinning out the bottom side for the bottom metal.
Also a picture of how to cheat inletting. My kids water based art paint on the bottom side to find points of contact to remove material
Attachments
Can I ask why you straightened out the floorplate, as with the .458, you could've kept a 5 round magazine capacity, versus the 3 round you will have?
Google the work of Tom Burgess. He built some lovely rifles on P14/M17 actions. And he was a real gent to talk with. - danso why not just post up the pictures here so everone else can see what you are talking about?
fingers284
CGN Ultra frequent flyer
- Location
- Alberta Cowboy Ranges
Your rifle may have already been changed over but if not, if you would prefer a "#### on opening" bolt rather than the Push-cocking, I think Numerich still sells the speed lock firing pin/bolt shroud kits that are a basic drop-in to do the changeover. For a dangerous game .458 it would be a prudent change.
fingers284
CGN Ultra frequent flyer
- Location
- Alberta Cowboy Ranges
Quite simply a 'dangerous game" consideration, with "cocked on opening" you will have a good grip on the bolt knob or whatever handle form you prefer, you unlock the bolt and #### in one motion and there is not much resistance to the rest of the bolt throw but when you push #### you have to grip that bolt handle extra hard so it doesnt slip between your fingers accidently...a bad thing in a self defence situation....might be a small, insignificant reason for some...until your in a charge situation when EVERY advantage may be a lifesaver.
- Location
- Western Manitoba
Except the firing pin is not fully cocked with a "####-on-open" Mauser 98 - you finish the cocking as you close the bolt on the forward stroke - by pushing forward. "####-on-open" gets you like 95% of the way to cocked - not all the way there. Many British (?) shooters preferred the #### on close system - might actually be about what one gets used to.
Ok, I think I understand what you’re saying. I find that maybe I kind of “palm” the bolt knob rather than use the tip of a finger or something so with understanding that rationality I feel my preference is c on close, but appreciate you taking a minute to elaborate


