My Winter Project - Carbon Fibre Stock for Scout

Kody

Regular
Rating - 100%
24   0   0
Location
Manitoba
Last fall I decided to go ahead with a project to make a lightweight carbon fibre stock for our CZ452 Scout. The factory beech stock is fine as long as the kids can rest the rifle on bags or a bi-pod. However, they have a hard time shooting it off hand because it is too heavy. I also wanted to lengthen the stock by about 1 inch so I would have the option to use the Scout for hunting without a slip-on recoil pad and have a neat lightweight and accurate "survival 22". Another requirement for the project was the ability to use the stock for other 452s and possibly 455s.

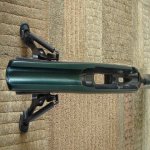
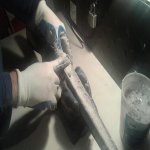
I have completed the first prototype build and have some pictures to share. My original plan was to build the first stock using fibreglass cloth instead of carbon fibre to evaluate the mold quality and layup technique, but I found some carbon fibre unidirectional tow from previous projects so I incorporated it into the prototype skins.

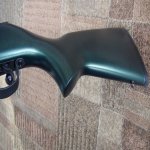
At this point I believe the first prototype is overbuilt. It's like a tank, I think I could suspend it between 2 chairs and sit on it and it won’t break. The second stock I will be making in the next couple of days will be made of a lightweight carbon fibre fabric that I should receive tomorrow. The layup will be altered to a degree to incorporate a few things I learned while making this first prototype. It should come out lighter.

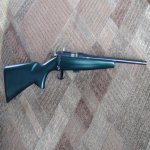
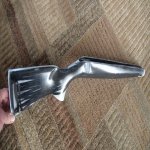
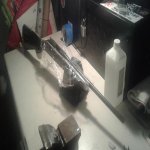
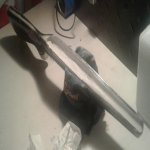
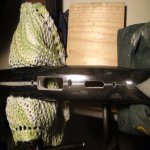
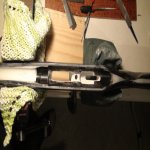
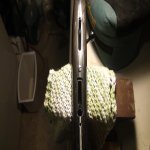
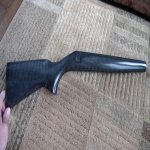
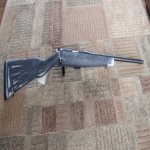
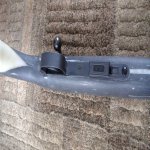
Here it is after being sanded down for the first application of filler and primer. I put it all together to check the overall weight and take some pictures. The action and a small portion of the barrel are epoxy bedded, the barrel is free floated and a (heavy) 5 oz. Pachmayr butt pad installed. The rifle cycles/feeds/ejects properly. I am at 4 lbs 1 oz. prior to primer/paint.

DSC03239.jpgDSC03242.jpg
 

Attachments

  • DSC03239.jpg
    DSC03239.jpg
    102.8 KB · Views: 35
  • DSC03242.jpg
    DSC03242.jpg
    123 KB · Views: 35
Last edited:
Thanks guys. I will probably wait with paint until I have the second full carbon stock version finished and paint them both together. My youngest one wants camo. Will see.
 
More pics

My order of carbon fibre fabric hasn't arrived yet so I went ahead and painted the first stock. I am not sure if I should polish it with 1000 grade wet paper plus wax or leave it as is:
Kody

DSC03268.jpgDSC03276.jpgDSC03255.jpg
 

Attachments

  • DSC03268.jpg
    DSC03268.jpg
    115.1 KB · Views: 35
  • DSC03276.jpg
    DSC03276.jpg
    99.3 KB · Views: 35
  • DSC03255.jpg
    DSC03255.jpg
    134.6 KB · Views: 35
Last edited:
That's really great!

Any chance of an Instructable on your construction technique?

I just put my Scout in a previously-loved 452 Lux stock and am always looking to "improve" things.
What was your solution for filling the dovetails?
 
Thanks guys.

I will do my best to describe the process at a high level. If something is not clear just let me know. The same basic steps of the fabrication process and materials are used across the industry.

1) I make a master model of the stock (the finish quality is important).
2) I build a two piece “female” composite mold using the master model and a split datum board. To make the mold, I use an epoxy tooling surface coat, fiberglass cloth and epoxy resin. The tooling surface coat makes the mold surface durable and free of air bubbles. The fiberglass cloth and epoxy resin are used to build up the thickness of the mold’s wall. Each half of the mold has a back up structure to prevent it from warping. Both halves have self aligning features and are bolted together to keep them nice and tight during the cure cycle.
3) I layup several layers of the composite material (fiberglass and carbon fibre) into each mold half using epoxy resin while controlling viscosity using additives. Some areas have more skins than others depending on the structural loads the stock will be exposed to.
4) Both halfs of the mold are joined together before the epoxy starts curing. The joint between both halves of the stock is strengthened from the inside of the mold using glass/carbon fibre cloth. This must be done before the complete layup starts curing.
5) After 24 hours, both mold halves are disassembled. The cured stock is nice and shiny, with only some epoxy resin extruded around the mold line.

DSC03176.jpg

6) The fore-end including the action area is completely stuffed with lightweight epoxy dough. The butt pad screw and sling stud locations are also strengthened with the dough to provide some meat for the screws. I compact everything using the action/barrel in order to create a rough inletting of the stock. Once I am happy with it, I put the stock back into the mold as the dough cures to prevent warping.

20170201_142845.jpg
20170201_145153.jpg

Curred:

20170201_145427.jpg

7 ) Once the dough is cured, I start inletting the barrel channel and the action. The lightweight epoxy material is easy to work with as it routs and sands easier than wood. However, it’s still strong enough to be threaded and the surface hardness is comparable to medium density wood. I then strengthen all the threaded holes and the action screw holes with a thin CA glue, but it’s not necessary.
8) I glass bed the action and a small part of the barrel.
9) I inlet the trigger group, the mag area and the bottom metal.

DSC03210.jpg[/ATTACH]DSC03216.jpg

Checking the fit prior to inletting the bottom metal and trigger plate:

DSC03222.jpg

10) I inject polyurethane foam into the hollow rear of the stock.
11) Butt pad installation: The end of the stock has a flange/end wall molded in, and both of the pad screw locations have backing from the epoxy dough. In addition to using two screws, I also apply epoxy to the butt pad to seal everything off/prevent water ingress. Grinding the hard Pachmayr pad is a little bit of a pain, so the next stock will have a flip-flop butt pad to save some weight and speed up the process.
12) There is a little bid of a “sand and fill” to do in order to eliminate pin holes in the surface. I then mask off the action area to keep the paint off the bedding. After, I prime, wet sand, then prime again until the surface is ready for the top coat (the painted stock shown in the previous post consists of a dark grey metallic base and two light coats of forest green). Finally, after painting the stock I finished it off with three light coats of clear coat.

Hopefully that gives you better ideas about the project. Let me know what you think, any feedback and new ideas are appreciated!
Kody
 

Attachments

  • DSC03176.jpg
    DSC03176.jpg
    137.9 KB · Views: 35
  • 20170201_142845.jpg
    20170201_142845.jpg
    49.9 KB · Views: 35
  • 20170201_145153.jpg
    20170201_145153.jpg
    53.8 KB · Views: 35
  • 20170201_145427.jpg
    20170201_145427.jpg
    42.7 KB · Views: 35
  • DSC03210.jpg
    DSC03210.jpg
    79.5 KB · Views: 35
  • DSC03216.jpg
    DSC03216.jpg
    70 KB · Views: 35
  • DSC03222.jpg
    DSC03222.jpg
    60.4 KB · Views: 35
Last edited:
Here is my first 100% carbon fibre stock fresh out of the mold. I think the surface quality and the carbon fibre pattern in the stock worked out quite well. I might keep this one naked without painting.

DSC03298.jpgDSC03304.jpg
 

Attachments

  • DSC03298.jpg
    DSC03298.jpg
    135.4 KB · Views: 20
  • DSC03304.jpg
    DSC03304.jpg
    123 KB · Views: 19
Last edited:
Thanks guys.
Here is a picture of the action bedding job. Things don't always work out 100% as you can see. The plumbers putty dam under the barrel didn't hold up so I will have to grind out the spillage gently.

20170219_080351.jpg

Thanks for the flip flop link elimsprint.
The flip flop material seems to bond nicely with contact cement and belt sander cuts through it well but I am having trouble sanding the last 1/32 when I get close to the stock. Palm sander doesn't seem to accomplish very much and sanding block doesn't work either. If anyone has some tips that would be much appreciated.
Thx
Kody
 

Attachments

  • 20170219_080351.jpg
    20170219_080351.jpg
    42.1 KB · Views: 186
Outstanding work. Personally, I would not cover that carbon fibre finish. It's nice looking and really distinctive.
Thanks for posting the top-level how-to. I really appreciate your generosity here.
 
Thanks guys.
Here is a picture of the action bedding job. Things don't always work out 100% as you can see. The plumbers putty dam under the barrel didn't hold up so I will have to grind out the spillage gently.

View attachment 86687

Thanks for the flip flop link elimsprint.
The flip flop material seems to bond nicely with contact cement and belt sander cuts through it well but I am having trouble sanding the last 1/32 when I get close to the stock. Palm sander doesn't seem to accomplish very much and sanding block doesn't work either. If anyone has some tips that would be much appreciated.
Thx
Kody

Since it's foam, have you tried using heat? Just a thought. Experiment first, obviously.
 
Back
Top Bottom