


You are using an out of date browser. It may not display this or other websites correctly.
You should upgrade or use an alternative browser.
You should upgrade or use an alternative browser.
No4 Mk1* Longbranch trigger job?
- Thread starter Guy JR
- Start date

maple_leaf_eh
CGN Ultra frequent flyer
The obvious suggestion is to get a spare set of trigger parts and start swapping out until you find a combination that gives you the pressure you like.
I'd be careful stoning down any parts.
Big Ed P51 (in all his generousity) mentions the collar on the King Screw. In or out, or shorten with a careful file or run over an emery cloth, give it a try.
I'd be careful stoning down any parts.
Big Ed P51 (in all his generousity) mentions the collar on the King Screw. In or out, or shorten with a careful file or run over an emery cloth, give it a try.
So I modified and swaped the cocking piece from a spare bolt I had laying around and what a difference it made, its no target rifle trigger but its much better than before. If anyone wants to see the cocking piece and the angle change I did chime in and I will take some pics and post them here. Thanks for the help guys.
What the heck is standing prone?
The position you take when you get the finger wave in the doctors office.
(the Italians call this an innuendo)

Here's something tangential to the discussion about trigger pull that may be helpful, specifically related to an original No.4 Enfield.
With thanks to Advisory Panel member Peter Laidler, there's an article on triggers presented in two parts which can be found in the Technical Articles for Milsurp Collectors and Re-loaders (click here)http://www.milsurps.com/content.php...esearch-for-milsurp-collectors-and-re-loaders.
"The Trigger Pull-Off" - Part 1 (By Peter Laidler) (click here)http://www.milsurps.com/showthread.php?t=4319
"The Trigger Pull-Off" - Part 2 (By Peter Laidler) (click here)http://www.milsurps.com/showthread.php?t=4320
It's accompanied by a detailed photo montage of a previously damaged skeletonised No.4(T) rifle, used as a training piece for budding Armourers to learn with and develop their skills. As Peter says "It appeared that this ‘rifle’ had never been finished as a ‘T’ as the front pad hole had not been drilled. During bead blasting after a hard life as a skeletonised rifle, it was established that the screw had sheared off and simply been made off level. Drilled out and extracted, it’s back to its former self. Waste not, want not as they say…". Other photos in the article show the clear interaction of the sear, cocking piece and trigger during various phases of its operation.
Regards,
Doug
With thanks to Advisory Panel member Peter Laidler, there's an article on triggers presented in two parts which can be found in the Technical Articles for Milsurp Collectors and Re-loaders (click here)http://www.milsurps.com/content.php...esearch-for-milsurp-collectors-and-re-loaders.
"The Trigger Pull-Off" - Part 1 (By Peter Laidler) (click here)http://www.milsurps.com/showthread.php?t=4319
"The Trigger Pull-Off" - Part 2 (By Peter Laidler) (click here)http://www.milsurps.com/showthread.php?t=4320
It's accompanied by a detailed photo montage of a previously damaged skeletonised No.4(T) rifle, used as a training piece for budding Armourers to learn with and develop their skills. As Peter says "It appeared that this ‘rifle’ had never been finished as a ‘T’ as the front pad hole had not been drilled. During bead blasting after a hard life as a skeletonised rifle, it was established that the screw had sheared off and simply been made off level. Drilled out and extracted, it’s back to its former self. Waste not, want not as they say…". Other photos in the article show the clear interaction of the sear, cocking piece and trigger during various phases of its operation.
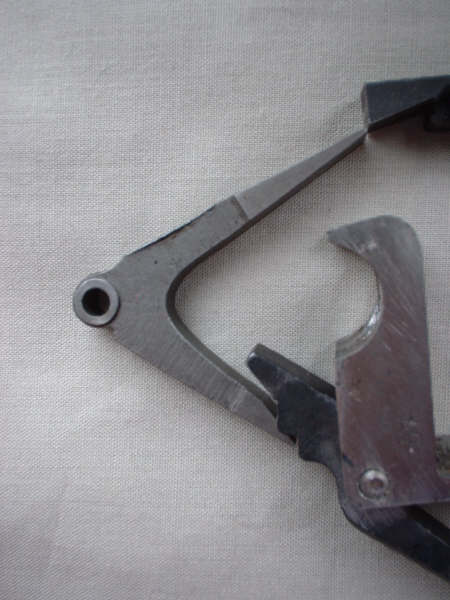
Article Extract .....
Pictorially, this shows the trigger at the end of the first pull, both ribs touching the trigger bent or flat of the sear with the sear nose at the extreme edge of the cocking piece………, just ready for the off.
(Click PIC to Enlarge)
Regards,
Doug
RememberTheSomme
CGN Ultra frequent flyer
- Location
- Nova Scotia
No4 Enfield trigger, what a lovely piece of engineering ,coaxing the inexperienced and seasoned Rifleman alike through its stages, right up to that sweet spot to deliver a perfect let off, in a Battle Rifle world terms anyway.
This is my take on All the No4s i've used, again that number could be counted on perhaps both hands.
Never met one I didn't like.
I remember Vince Gill saying leading into one of his hit songs for a music video, ......."If you can't dance to this baby, then you can't dance"
This is my take on All the No4s i've used, again that number could be counted on perhaps both hands.
Never met one I didn't like.
I remember Vince Gill saying leading into one of his hit songs for a music video, ......."If you can't dance to this baby, then you can't dance"
The obvious suggestion is to get a spare set of trigger parts and start swapping out until you find a combination that gives you the pressure you like.
I'd be careful stoning down any parts.
Big Ed P51 (in all his generousity) mentions the collar on the King Screw. In or out, or shorten with a careful file or run over an emery cloth, give it a try.
Note to maple leaf eh
The very first two Enfield manuals I obtained were from a very kind Canadian at the old Canadian Gun Nutz forum and he mailed them to me "FREE" of charge.
The forward trigger guard screw or king screw has a collar or bushing, the purpose of it was to prevent wood crush or heavy handed people from using the gorilla tight method on the king screw and crushing the wood excessively. In actuality the bushing is to be.005 to .010 shorter than the actual measurement to allow for a slight wood crush. (grip the stock)
 I have one for the No.4 that was made in Canada.


I have never used the stock collar gauge as a filing jig, and just used it as a gauge to check bushing length. Normally only a few passes with a fine file is all that is needed to get an existing bushing to the correct length in a battery powered drill.

Simple bushing length test, tighten the king screw and mark either side of the screw with a reference mark.

Now remove the bushing and reinstall the trigger guard minus the bushing and tighten the king screw. (25 inch lbs) Do not tighten gorilla tight and for god sake stop if the threads start to smoke.
If the screw turns past the first reference mark the bushing is too long.

Mark the stopping point of the screw and shorten the bushing slowly until the screw lines up with your last mark.
RememberTheSomme
CGN Ultra frequent flyer
- Location
- Nova Scotia
Thanks for this info and pictures BigEd, I learn something new everyday on these forums.
As to your comment on the kind person who did you the good deed with the manuals, I believe that with your post and help you have pasted on the original persons kindness and it will be returned again and again.
As to your comment on the kind person who did you the good deed with the manuals, I believe that with your post and help you have pasted on the original persons kindness and it will be returned again and again.
fat tony
CGN Ultra frequent flyer
1. Great information - thanks to all.
2. I put 500 recruits through CFRS Cornwallis 84 - 86.
3. How is Mel Gibson doing these days, anyhow?
4. What the heck is standing prone?
Ask the oc of the 1RCR rifle team circa 1988.
It was a technique developed under conditions of extreme military secrecy. 
Last edited:
maple_leaf_eh
CGN Ultra frequent flyer
Thanks for this info and pictures BigEd, I learn something new everyday on these forums.
As to your comment on the kind person who did you the good deed with the manuals, I believe that with your post and help you have pasted on the original persons kindness and it will be returned again and again.
ditto


