


RangerPark
CGN frequent flyer
- Location
- Near Edmonton, AB
Range Report on page 2.
Hello Everyone!
I just finished pillar bedding my new Sako 85 Greywolf in .375 H&H. I found the internet lacking in good tutorials compared to bedding a Remington 700, for example. This was my third bedding job. I made some mistakes that I thought I would share. In the end it was a complete success so here we go.
I again used Devcon, but this time I also got my hands on some Kiwi shoe polish. I was using the release agent from a Miles Gilbert bedding kit before. Let's just say the Kiwi is many times better!
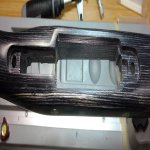
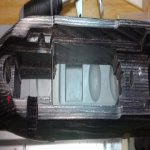
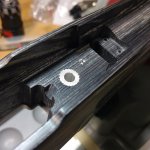
In the first two pictures you can see the original stock inletting. I found the Sako 85 to be very well inletted. The recoil lug was removed for the photos.


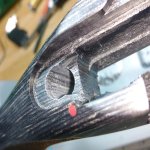
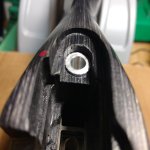
Next, I opened up the action screw holes to 1/2" with a counterbore, 5/16" pilot. I first had to open up the holes with a reamer as they were some weird metric size none of my pilots would fit in. You can already see stock compression at the rear screw, no regrets on the pillars.


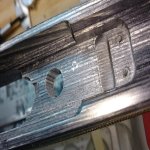
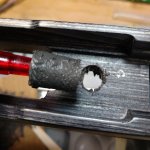
I trimmed the pillars to length. You can see the rear pillar sticking out quite a bit. This is the original gap between the bottom of the screw lug and the stock. I have the pillars trimmed to come in contact with both the floorplate and the action.


This time around I did each bedding step separately. Something I learned from my last bedding job. First on the list were the pillars. I used the floor plate to index the height.


The finished pillars. They looked the way they should.


Problem!!! As I was trimming my pillars I suspected the floorplate wasn't quite parallel with the action. This confirmed it. Both pillars were trimmed with .002" flatness between both ends. The front of the floorplate would pop out when when I did the rear screw. I was hoping to get away without bedding the floorplate, not this time!

Next step was to bed the floorplate. I relieved the area enough to reach the wood. Next time I would relieve it even more, some places had pretty thin epoxy in the end. Notice the recess by the front pillar. It served no purpose and was filled in.


The finished floorplate bedding. I only did a rough clean up job. I have Lee Valley needle files on their way, I'll finish cleaning up once they get here.


Decision time. You can see the gap between the recoil lug and the barrel. I could have bedded the recoil lug separately so it could be removed or I could have buried the plate in Devcon to better support the barrel. I went with the second option. I can't see any use in removing the recoil lug after the bedding job is finished, so it got buried in place.

Prepping to bed the action. My only regret was not using more clay. Next time around I won't be using any tape at all. I'll simply coat everything I don't want bedded with clay. The front of the stock is already generously relieved from the factory. There's tons of room for bedding compound in there. If I didn't know any better I'd say Sako did this on purpose, making bedding practically a requirement.


I started with the recoil lug. I coated both the stock and the lug and pressed it in place. It offered quite a bit of resistance. There wasn't much of a gap in the lug recess for the epoxy to flow.

Next, I coated all the parts to be bedded, both on the stock and the action. The recoil lug was buried in Devcon, never to be seen again.


The action was held in place with a rubber band. This is the part where you start wondering if you forgot to coat anything with polish. One drawback of using a rubber band was that I was unable to clean up inside the magazine well afterwards.

24 hours later. Perfect bedding impression. A bit too much epoxy in some places. It's when I was cleaning up the mess that I wished I used more clay instead of tape.

Rough clean up job. I'll make it pretty later. The way I bedded the rear screw boss I created a secondary recoil lug. I'll relieve it when the new needle files come in. Looks a bit rough but I'm happy with the result. The Devcon also created a second recoil lug at the front. There are many people who think this is the way a Sako 85 recoil lug ought to look like. It's pretty but no doubt it will snap off after a couple of shots. I'll clean it up then.


The action and stock were reunited after the clean up. Everything fitted perfectly.

This wasn't my prettiest bedding job, a bit of a diamond in the rough still, but it was by far the most effective one I've done. Under .001" barrel movement after the action screws were tightened. I'll venture forth and call the job a complete success.

This is the final set up. Everything is back in place. The mags and dummy rounds feed flawlessly. I will be using an Aimpoint H34L, very excited to try it out. It's mounted in 34mm Ken Farrell rings and rests on a NEAR rail. I'm using a generic Amazon cheek pad. I wasted a lot of time trying to get the lowest 34mm rings I could find. In the end it didn't matter, I still needed quite a bit of cheek padding for a proper cheek weld. Next time I'll use Leupold PRW 34mm rings. Just a bit higher, almost 1/3 of the price.

So the real question is, how does it shoot? Well I have no idea. I moved last October and won't have access to a range until April 1. I'll know for sure then! If you read all this I hope you found the post informative and useful.
Cheers!
Hello Everyone!
I just finished pillar bedding my new Sako 85 Greywolf in .375 H&H. I found the internet lacking in good tutorials compared to bedding a Remington 700, for example. This was my third bedding job. I made some mistakes that I thought I would share. In the end it was a complete success so here we go.
I again used Devcon, but this time I also got my hands on some Kiwi shoe polish. I was using the release agent from a Miles Gilbert bedding kit before. Let's just say the Kiwi is many times better!
In the first two pictures you can see the original stock inletting. I found the Sako 85 to be very well inletted. The recoil lug was removed for the photos.
Next, I opened up the action screw holes to 1/2" with a counterbore, 5/16" pilot. I first had to open up the holes with a reamer as they were some weird metric size none of my pilots would fit in. You can already see stock compression at the rear screw, no regrets on the pillars.
I trimmed the pillars to length. You can see the rear pillar sticking out quite a bit. This is the original gap between the bottom of the screw lug and the stock. I have the pillars trimmed to come in contact with both the floorplate and the action.
This time around I did each bedding step separately. Something I learned from my last bedding job. First on the list were the pillars. I used the floor plate to index the height.
The finished pillars. They looked the way they should.
Problem!!! As I was trimming my pillars I suspected the floorplate wasn't quite parallel with the action. This confirmed it. Both pillars were trimmed with .002" flatness between both ends. The front of the floorplate would pop out when when I did the rear screw. I was hoping to get away without bedding the floorplate, not this time!
Next step was to bed the floorplate. I relieved the area enough to reach the wood. Next time I would relieve it even more, some places had pretty thin epoxy in the end. Notice the recess by the front pillar. It served no purpose and was filled in.
The finished floorplate bedding. I only did a rough clean up job. I have Lee Valley needle files on their way, I'll finish cleaning up once they get here.
Decision time. You can see the gap between the recoil lug and the barrel. I could have bedded the recoil lug separately so it could be removed or I could have buried the plate in Devcon to better support the barrel. I went with the second option. I can't see any use in removing the recoil lug after the bedding job is finished, so it got buried in place.
Prepping to bed the action. My only regret was not using more clay. Next time around I won't be using any tape at all. I'll simply coat everything I don't want bedded with clay. The front of the stock is already generously relieved from the factory. There's tons of room for bedding compound in there. If I didn't know any better I'd say Sako did this on purpose, making bedding practically a requirement.
I started with the recoil lug. I coated both the stock and the lug and pressed it in place. It offered quite a bit of resistance. There wasn't much of a gap in the lug recess for the epoxy to flow.
Next, I coated all the parts to be bedded, both on the stock and the action. The recoil lug was buried in Devcon, never to be seen again.
The action was held in place with a rubber band. This is the part where you start wondering if you forgot to coat anything with polish. One drawback of using a rubber band was that I was unable to clean up inside the magazine well afterwards.
24 hours later. Perfect bedding impression. A bit too much epoxy in some places. It's when I was cleaning up the mess that I wished I used more clay instead of tape.
Rough clean up job. I'll make it pretty later. The way I bedded the rear screw boss I created a secondary recoil lug. I'll relieve it when the new needle files come in. Looks a bit rough but I'm happy with the result. The Devcon also created a second recoil lug at the front. There are many people who think this is the way a Sako 85 recoil lug ought to look like. It's pretty but no doubt it will snap off after a couple of shots. I'll clean it up then.
The action and stock were reunited after the clean up. Everything fitted perfectly.
This wasn't my prettiest bedding job, a bit of a diamond in the rough still, but it was by far the most effective one I've done. Under .001" barrel movement after the action screws were tightened. I'll venture forth and call the job a complete success.
This is the final set up. Everything is back in place. The mags and dummy rounds feed flawlessly. I will be using an Aimpoint H34L, very excited to try it out. It's mounted in 34mm Ken Farrell rings and rests on a NEAR rail. I'm using a generic Amazon cheek pad. I wasted a lot of time trying to get the lowest 34mm rings I could find. In the end it didn't matter, I still needed quite a bit of cheek padding for a proper cheek weld. Next time I'll use Leupold PRW 34mm rings. Just a bit higher, almost 1/3 of the price.
So the real question is, how does it shoot? Well I have no idea. I moved last October and won't have access to a range until April 1. I'll know for sure then! If you read all this I hope you found the post informative and useful.
Cheers!
Attachments
-
 IMG_20170218_110038147.jpg40.4 KB · Views: 170
 -
 IMG_20170218_110254928.jpg32.3 KB · Views: 172
 -
 IMG_20170218_112845556.jpg100.6 KB · Views: 173
 -
 IMG_20170218_112851541.jpg95.9 KB · Views: 171
 -
 IMG_20170219_174045.jpg83.8 KB · Views: 171
 -
 IMG_20170219_174102.jpg55.6 KB · Views: 171
 -
 IMG_20170219_175314.jpg87.5 KB · Views: 170
Last edited:
")


