Hahaha no sir! The handle is 30" long so she will be a workout.Beautiful work my man ....but another point...its sure not gonna be a "short stroke" to operate LOL.


You are using an out of date browser. It may not display this or other websites correctly.
You should upgrade or use an alternative browser.
You should upgrade or use an alternative browser.
Reloading press build
- Thread starter Zyox
- Start date
- Location
- WMU248 near Edmonton
Hahaha no sir! The handle is 30" long so she will be a workout.
any updates ??
Sadly no more work has been done on it, the shop got very busy though that has since ended.any updates ??
I have been thinking about it and Id love to finish it, i just need some more inspiration for designing the base plate and ram attachment for the shell holders, i have some ideas for those.
Most of the hard work was done designing and manufacturing the linkage so honestly i feel its over halfway.
After the last election i am unsure if i will ever get to use it for its intended purposes.
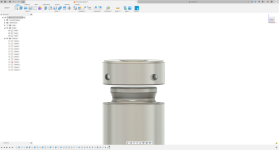
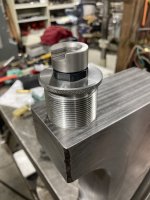
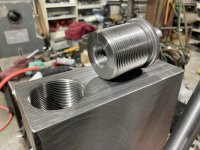
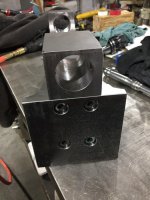
Well, After tinkering with designs I have some guidelines for the ram adapter to the shell-holders, and the base plate for the main body
The ram adapter allows positioning in any degree of rotation, it will lock to the ram with 2 setscrews pushing on a taper.
In the top of the adapter it will have 7/16-14 threads for various large shell holders and ram prime systems already available
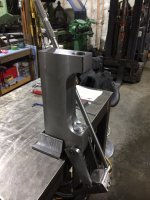
This press has been bugging me, I would like to get it finished.
As always id love to hear your criticism.
The ram adapter allows positioning in any degree of rotation, it will lock to the ram with 2 setscrews pushing on a taper.
In the top of the adapter it will have 7/16-14 threads for various large shell holders and ram prime systems already available
This press has been bugging me, I would like to get it finished.
As always id love to hear your criticism.
Attachments
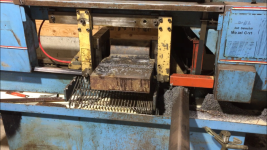
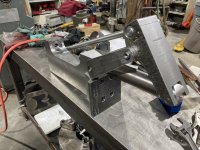
The saga continues, took about 4 hours to set everything up and get the profile machined out.
I still need to add the holes and modify the press body so it fits together correctly,..
The press body itself still needs many hours of machining to bevel each side/back, plus drill and tap holes in the bottom to attach the base.
boy oh boy do i ever love over-complicating things.
I still need to add the holes and modify the press body so it fits together correctly,..
The press body itself still needs many hours of machining to bevel each side/back, plus drill and tap holes in the bottom to attach the base.
boy oh boy do i ever love over-complicating things.
Attachments
- Location
- WMU248 near Edmonton
ok now I see what you are doing for a base.... wow, but looks nice ")
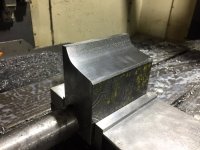
Ty ty! things should flow a little better when the main body is profiled, it looks a little block like as it sits.ok now I see what you are doing for a base.... wow, but looks nice
Ty! Yea working thicker material takes time, this is also not soft steel, there was 20lbs of chips come off that base.nice. I like the profiled edges. I am always surprised how long machining things takes.
Is the vision that the base is permanently attached with the press removable?
The base will be attached to the press body by four 1/2-13 grade 12.9 bolts, i could weld it together but having things easy to come apart is handy
Thanks bigbraz!I like the progress. Looks very well thought out and like a great design.
Its hard to tie it all together and make it look right,... aswell as function
We will have to see what the force on the handle is like to size some of those bigger cases. It should have plenty of balls, but then again I have never tested it.
- Location
- WMU248 near Edmonton
thing looks like its built like a tankTy ty! things should flow a little better when the main body is profiled, it looks a little block like as it sits.
I look forward to seeing what it looks like when its done.
you are running all CNC machines? or are you doing that manually?
I have all manual machines, and everything I do is done by eye and reading the wheels, I will one day upgrade and get a DRO set up.
Aye she is pretty heavy, I wanted to build something that will last.thing looks like its built like a tank
I look forward to seeing what it looks like when its done.
you are running all CNC machines? or are you doing that manually?
I have all manual machines, and everything I do is done by eye and reading the wheels, I will one day upgrade and get a DRO set up.
I am eager to finish it but man it takes allot of time
Nice! having your own machines is handy, without tools a guy is a fish out of water
Some of the initial roughing work is done on manuals, but when it comes to any sort of finish work or weird profiles its all cnc
The cnc mill & lathe definitely spoil me, I do about 90% of all work on them compared to the manuals
Me to Bob me to!I can't wait to see the first round loaded...
Cheers,

I have some display cartridges i would like to get all pressed together, though looking at the die prices for those larger rounds, Whew!
- Location
- WMU248 near Edmonton
2 Pd pompom ??
if you got the tools then making the dies is the next step.
then the next thing you know your looking at forming your own brass
if you got the tools then making the dies is the next step.
then the next thing you know your looking at forming your own brass
I do not have much interest in making dies, by the time i got the reamers and go through all the trouble it would probably be cheaper to buy them.2 Pd pompom ??
if you got the tools then making the dies is the next step.
then the next thing you know your looking at forming your own brass
Though, swaging brass? this interests me greatly, i have watched just about every video on youtube about that topic!
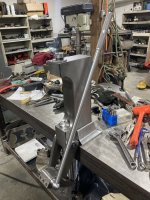
Little bit of progress to report
I have decided to just thread the ram 7/8-14, seems that will be more universal then making some oddball adapter.. but i am procrastinating doing that as the ram is as hard as a file, i may heat the top to reduce the hardness.
I actually decided to weld the top 2-12 thread up and re-do it as it was not a fit i was satisfied with
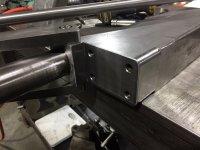
Machined, drilled and tapped the bottom of the press body to accept the base.
Drilled and counter bored the base so it can be bolted on.
Made a 2-12ns to 7/8-14 adapter (need to make more adapters, 1-1/4, 1-1/2)
Need to finish profiling the base and body, need to drill cross grease holes and harden the bolts for the linkage
Need to drill the bottom of the ram and insert a spring & ball detent to secure the bottom pivot pin
But hey we are close to it being usable
I have decided to just thread the ram 7/8-14, seems that will be more universal then making some oddball adapter.. but i am procrastinating doing that as the ram is as hard as a file, i may heat the top to reduce the hardness.
I actually decided to weld the top 2-12 thread up and re-do it as it was not a fit i was satisfied with
Machined, drilled and tapped the bottom of the press body to accept the base.
Drilled and counter bored the base so it can be bolted on.
Made a 2-12ns to 7/8-14 adapter (need to make more adapters, 1-1/4, 1-1/2)
Need to finish profiling the base and body, need to drill cross grease holes and harden the bolts for the linkage
Need to drill the bottom of the ram and insert a spring & ball detent to secure the bottom pivot pin
But hey we are close to it being usable
Attachments
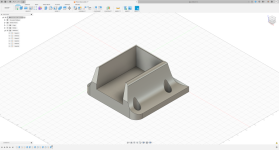
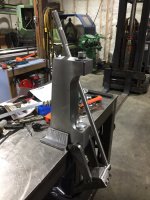
Little more work on it today, got the back of the press angled so its less brick looking, Also put a couple rads on the front of the base so it flows better.
I might angle the sides of the body yet, Mighttt add some heavy chamfers in areas aswell.
The whole press is down to 110lbs at the moment.
So far the hardest part about this whole thing has been figuring out what looks half appealing haha
I might angle the sides of the body yet, Mighttt add some heavy chamfers in areas aswell.
The whole press is down to 110lbs at the moment.
So far the hardest part about this whole thing has been figuring out what looks half appealing haha
Attachments
Last edited:


