Removing stripped threads

Bigbubba

CGN Ultra frequent flyer
Rating - 100%
317   0   0
Location
SW Ontario
Could use some advice here
Trying to get the rear sight off this old rifle
Flat head screws, slot is stripped

I don’t think? The screws are necessarily stuck in the threads, just the top is stripped so the screwdriver doesn’t get any grip.

And of course they’re inside the sight body…
See pictures
Thanks in advance
 

Attachments

  • image.jpg
    image.jpg
    85.8 KB · Views: 56
there are reverse bits available to drill these out. If they aren't stuck like you suggest then the reverse bit will likely catch and thread then out. Be carefull and make sure tht you are a close to center of the bold as bossible. If the bit doesn catch and thread them out you can then use an easy out.
 
Last edited:
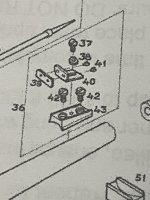
Before you start drilling, which isn't a bad idea, remove the sight completely, if possible, so you can see what's going on.

I've never seen a reverse bit that small, but that doesn't mean they aren't available.

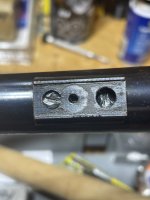
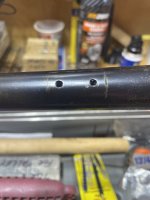
The biggest issue with drilling out those broken off ends, is centering your drill bit, especially tiny bits, onto the stem.

I've seen situations where people try using tiny bits and compound the issue by breaking off the bit, or in the case of one fellow, he drilled all the way through into the bore (extreme one off) he was using a hand drill.

Get a "center drill" of the proper diameter. They make them very small. Center drills have solid shanks and aren't "flexible" so if they're being held by a chuck in a drill press and the work is being held by a vice or clamp on the drill press table, the bit won't wander and screw up the threads.

You will end up with a very small hole in the broken off stem, but finding an appropriate "easy out" will be next to impossible

I use a home made "easy out" made from a very small screw driver, with the tip ground to a long point, so it will fit into the tiny hole.

Before trying to turn out the stem, apply a bit of heat, from a hand held torch, enough to make it to hot to touch, but not enough to change color.

This will help break the "friction weld" which often is created over the years of shooting, between the threads on the stem and those in the barrel.

While it's still hot, spray/dribble in some penetrating oil, the heat helps it to get around better. Let it sit until it cools.

Some people will suggest you "tap on the broken stem with a punch and hammer" to do the above job. DON'T DO IT. You will only expand the exposed end of the stem and make it more difficult to remove.

Often the above procedure is enough to loosen the stem enough to turn it out easily with finger pressure, if not, very lightly tap something into the hole, BE CAREFUL NOT TO EXPAND the stem, so you can apply light pressure to turn it out.

The next suggestion is to drill out the hole and tap for the next size up screw.
 
A couple solutions. First is to use a drill press. Not to drill them out but to apply downward pressure. Chuck a bit in the drill press, mount the barrel (or while gun) in a padded vice either the screw directly under the bit, Lower the bit into what is left of the slot and with significant downward pressure, turn the chuck by hand ( or use a pipe wrench or water pump pliers if you can’t get enough “twist” to break then free). The other way is to slip a #### piece of copper tubing over the screw head, then weld the top of the screw to build it up enough to either get on it with vice grips or cut a slot for a screw driver (then use the drill press as described above). I would NOT attempt to drill them out but screws out unless you have a mill and use a properly sized end mill to hog out the screw. When done correctly ( which requires some skill, patience and the tight equipment) you can just use a pick to pick out the wire left in the threads.
 
The post by License is the best post in this thread. I have used the "down pressure with a drill press" a couple of times with success and also the end mill. with the end mill very much care must be exercised to only cut the screw heads off, leaving enough screw shank to grip with pliers after removing base.
 
………. with the end mill very much care must be exercised to only cut the screw heads off, leaving enough screw shank to grip with pliers after removing base.
That was not what I meant (or perhaps Im just not understanding your meaning). I was referring to useing the endmill to remove the whole screw, not just the head. Choose an endmill that matches the shank of the offending screw and mill out the entire screw. VERY much care must be taken to ensure that the mill is set up EXACTLY on centre so it doesn’t cut the threads. When done right, the screw willl be gone and all that is left is the screw treads which can be “unwound” and picked out as a wire.
 
Success!
Thanks to all who replied
I did as per post 2 and 11
Drilled off the top of the screw- actually with a hand held drill as the sight provided a nice 15/64 centering guide…carefully and slowly and when I was pretty sure I was very close to removing all the top, gave the sight a little tap with a mallet.
Sight popped off and the stubs were easy to remove with some fingertip pressure and a turn- they were not seized, just no head on the screw to grip

Now to find another complete rear sight…
 

Attachments

  • image.jpg
    image.jpg
    73.6 KB · Views: 14
Gave this a little more thought. The end mill strategy works great ehen the head on the screw/bolt is broke off so the actual shank size can be determined. In this case, if the end mill is to be employed, a better strategy would be to mill off the head to expose the shank, THEN pick the appropriate mill to take out the shank. There are also tools out there for this when you put the screw driver bit into the slot snd hit the tool with a hammer. The tool imparts rotation when hit and this, along with the downward shock will often break loose stuck screws IF the head isn’t buggered up TOO bad.
 
that the mill is set up EXACTLY on centre so it doesn’t cut the threads
another tip to help you out with this...get or cut a short piece of rod that exactly fits the screw head hole in the base and then center drill a small hole in it dead center use a drill smaller than your screw shank dia...now you have a self centering drill guide that can only drill center of your screw head.
 
Wonder how many will keep posting suggestions... without reading post #13. :ROFLMAO:
Because more people are reading this than just the OP and while the OP got his issue resolved, others may be following for suggestions for a similar issue OR just following to learn more ways to resolve this or a similar issue in the future.
 
Back
Top Bottom